I’m still noodling about, trying to figure how to get the best performance out of high end USB NVMe drive enclosures. To that end, I was reminded of something I already knew but hadn’t considered. That is: deep down in the hardware policies for Windows removable devices — including NVMe drives — is something called “Removal policy.” As a quick and easy item, this USB NVMe HW tweak delivers big results.
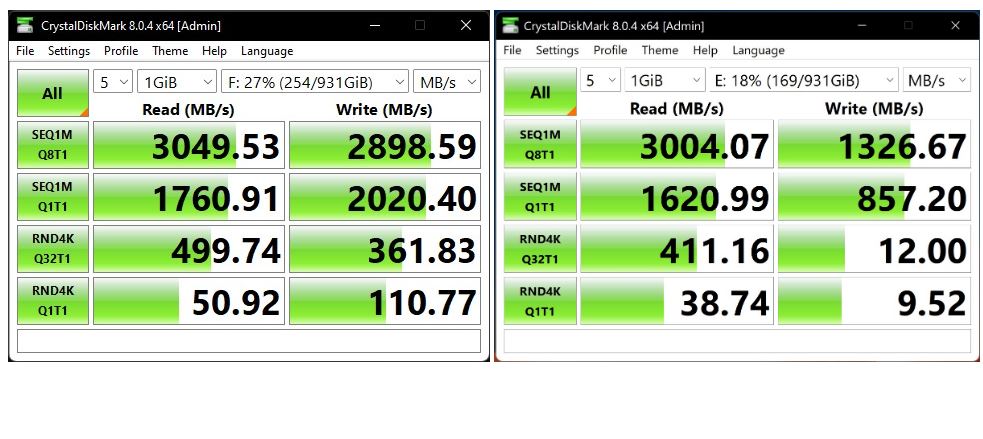
Those results appear in the lead-in graphic for this story. Both sets of CrystalDiskMark results come from the same system, same USB-C port, and the same NVMe hardware. The only difference is that one is tweaked (selected “Better Performance”) and one is not. As you can see, this tweak makes a big difference. (Hint: the left-hand item shows tweaked results.)
How-To: Set Up NVMe HW Tweak Delivers Big
This takes a bit of digging to get into. This properties page is several levels deep in the storage device properties hierarchy. There are multiple ways to get to this page. I’ll illustrate one with step-by-step instructions using Disk Management:
1. Use Winkey+X to open the quick access menu.
2. Select Disk Management.
3. Right-click the drive letter for the NVMe device, then select Properties.
4. On the General tab, click the Properties button at lower right.
5. On that General tab, click the “Change Settings” button at lower left.
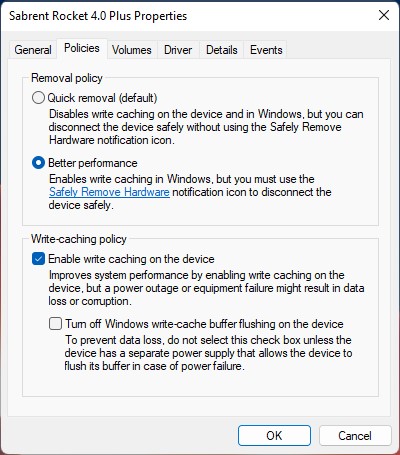
6. Click the Policies tab on the resulting Properties page, and click the radio button next to “Better Performance.” Also, click “Enable write caching on the device.”
Here’s what that final page looks like, with the described selections made:
This page is four levels deep into the device properties hierarchy. It offers a useful “Better Performance” option.
What About Those Results?
I built a spreadsheet using both sets of results. Note that for every cell in each set of results, the tweaked drive was faster than the untweaked one. Some of the differences are negligible (under 10%). Some are minor, but noticeable (under 35%). The entire write column, however, offers at least doubled speed (top two columns). The random writes are 30 times faster when one thread works against a queue depth of 32. That drops to “merely” 11 times faster for a single thread and a single write request. Amazing!
| Tweak(R) | Tw(W) | Notweak (R) | Notw(W) | Delta (R) | Delta (W) |
|---|---|---|---|---|---|
| 3049.53 | 2898.59 | 3004.07 | 1326.67 | 101.51% | 218.49% |
| 1760.91 | 2020.40 | 1620.99 | 857.20 | 108.63% | 235.70% |
| 499.74 | 361.83 | 411.16 | 12.00 | 121.54% | 3015.25% |
| 50.92 | 110.77 | 38,74 | 9.52 | 131.44% | 1163.55% |
This represents a significant boost in performance for a quick settings tweak. It does mean, though, that you must use the “Safe Eject” tool in the notification bar to eject the drive before you can disconnect it. Or, if you’re like me, you’ll simply do it the next time the host PC is rebooting (best done right when the restart gets underway, after shutdown is complete).
But gosh! Consider the money for a fast-ish NVMe drive (about US$120 – 150 for the 1 TB Sabrent Rocket 4 Plus). Then, factor in US$150-170 for a fast, USB4 NVMe enclosure. The tweak takes under a minute and really helps with drive performance. If you spend the money, you need to spend the time and effort to apply the tweak. You’ll get the most from your investment that way.
Realworld Results Change
Untweaked, it takes Macrium Reflect 5:30 to image the system drive on the P16 Mobile Workstation where the USB4 NVMe drive is attached. Tweaked, that same drive finished the job in 2:25. That’s over twice as fast. To me, that’s much more meaningful than synthetic benchmark results like those from CystalDiskMark. It also shows those benchmark results have some truth to them as well. Good-oh!

