Fixing Non-responsive Taskbar Icons

Last December, I wrote an article here that described an easy fix for an unresponsive Start Menu. The trick on my affected PCs was to go into Task Manager, right-click Windows Explorer, and select “Restart.” Over the past week the same thing is affecting Task Bar icons for open and pinned applications. It came in the wake of the occasionally wonky preview version of the upcoming March CU. That is, I’m inclined to name KB4601382 as an “update of interest” in this case. Fortunately, the same fix works.

Fixing Non-responsive Taskbar Icons

How can you tell when this problem manifests? Easy! You click on an icon in the taskbar and nothing happens. I show a portion of my taskbar icons in the lead-in graphic, by way of illustration.

I actually show the taskbar at the foot of both of my monitors. Sometimes, when one quits working, the other keeps going. Then I click that one instead. If neither works, the fix goes in. I’ve never had it fail.

As with my earlier report of Start Menu issues, I’m inclined to see some interaction between Stardock Software’s Start10 and the Explorer-based start menu and associated UI elements. Those include the taskbar icons and the notification area as well. Something wonky is happening, but is also easily fixed. I’ve reported this to Stardock and MS and am hopeful that, as before, a fix trickles into one or the other of those environments.

Seems Like a Limited Issue

I don’t see other reports of this phenomenon in the Start10 forums at Stardock. There’s plenty of discussion on the general phenomenon (Google search: “taskbar icons nonresponsive”). But all are unanimous in what to do: Restart Windows Explorer. Not much other cussin’ and discussin’ involved. Nice to know I’ve got the right fix, even if I don’t know the cause unequivocally and unambiguously. Sigh.

Facebooklinkedin
Facebooklinkedin

KB4577586 Flash Killer Download Available

For those Windows 10 users with Adobe Flash still installed, the Microsoft Update Catalog has the KB457786 Flash Killer download available. If this means you, click the preceding link. Next, pick the version that matches your current Windows install. Then, click its Download button for the corresponding Microsoft Standalone Updater (MSU) file. The individual download window for the x64 version appears in this story’s lead graphic.

Note: For whatever odd reason, I had to right-click the download link in the window shown above. Upon selecting the file link near the bottom of that window, I had to right-click and select “Open link in new window” to actually get the file to download. YMMV.

If KB4577586 Flash Killer Download Available, Then What?

Once downloaded to your PC, run the MSU file that you just grabbed. The Windows Update Standalone Installer will ask you if you want to install the KB4577586 update. Click the “Yes” button to proceed.

Next you’ll see an “… updates are being installed” window appear, with progress bar. It took about 15 seconds to install on my i7 Skylake (i7-6700, 32GB RAM, 512 GB Samsung 950 SSD) PC.

If Install Fails, No Worries

I already knew that the Flash Player was gone, gone, gone from this PC. And sure enough, a peek into Update History under the Other Updates heading shows the following info:

A quick search on the 0x8024001e error string shows the most likely cause — in this case, for sure — is a missing DLL file associated with the Adobe Flash Player. Why is it missing? Because it’s already been uninstalled on this PC. Thus, there’s no cause for concern about this error. In fact, even if you don’t need this update it’s safe to run it anyway.

Those who already know Adobe Flash Player is absent on their PCs need not download or run this update. But if you’re not sure, it’s OK to do so just to make sure it’s gone. Your call!

Le roi est mort, vive le roi!

The foregoing phrase translates as “The king is dead, long live the king!” Seems like an appropriate epithet for Adobe Flash Player which has been around since FutureWave SmartSketch made its debut in 1993. Acquired by Macromedia in 1996, in turn by Adobe in 2005, Flash has been around since the earliest days of the WWW.

Now, of course, more modern technologies built into HTML 5 have made Flash obsolete. It’s now passed its End-of-Life date as of 12/31/2020. As of February 2021, all major browsers now block Flash and have no player capability. It really is over. Amazing! Many thought it would never die, and few are sorry to see it go…


Facebooklinkedin
Facebooklinkedin

Mild Microsoft Update Health Tools Mystery

An interesting item is bubbling up in user forums  lately. Lots of Windows 10 PCs — including some of mine — have seen a new-ish, intriguingly named application show up. This story’s lead-in graphic shows it in second place. In fact, I’d say we’re facing a mild Microsoft Update Health Tools mystery. Typical questions include “What is it for?” and “When is it used?”

Cracking a Mild Microsoft Update Health Tools Mystery

A Microsoft Docs “Questions” item links the utility with update KB4023057 .  A corresponding support page mentions all Windows 10 versions, including 20H2. (It’s dated October 2020.) I’ve seen posts at answers.microsoft.com as far back as August 2020. It, too, references that same KB article.

That article says the update delivers “reliability improvements to Windows Update Service components.” It also says it:

includes files and resources that address issues that affect update processes in Windows 10 that may prevent important Windows updates from being installed. These improvements help make sure that updates are installed seamlessly on your device, and they help improve the reliability and security of devices that are running Windows 10.

Some Interesting Notes about KB4023057

There are 5 bulleted items (and a sub-note) the Support Note. All make fascinating reading. I reproduce them verbatim. (For brevity, I prune “This update may” or “This update will” ):

  • …  request your device to stay awake longer to enable installation of updates.

    Note The installation will respect any user-configured sleep configurations and also your “active hours” when you use your device the most.

  • … try to reset network settings if problems are detected, and it will clean up registry keys that may be preventing updates from being installed successfully.
  • … repair disabled or corrupted Windows operating system components that determine the applicability of updates to your version of Windows 10.
  • … compress files in your user profile directory to help free up enough disk space to install important updates.
  • … reset the Windows Update database to repair the problems that could prevent updates from installing successfully. Therefore, you may see that your Windows Update history was cleared.

Invitation to Conspiracy Thinking?

Go back, and read the forum traffic. Or, search Google for “Microsoft Update Health Utility.” Sadly, it reveals suspicion among community members. Indeed, some fear it helps MS forcibly update older Windows installs. In fact, MS does this already. Others don’t trust MS update orchestration. They’d rather control updates themselves. Still others worry about unwanted side effects or unusable PCs after forced updates.

Gosh! While these things are possible, I see nothing untoward at work here . Instead, I see MS staging repair tools in advance for update issues on Windows 10 PCs should they manifest. Aside from lacking user controls, I see them no differently than built-in update troubleshooters. In fact, I’m a devoted user of Shawn Brink’s Reset Windows Update tutorial and its accompanying batch file. It’s gotten me past 95% of all WU problems I’ve seen. That’s why I’ll gladly keep using it.

No Cause for Alarm

As far as I can tell, there’s not much to see here. Admittedly, Update Health Tools is a small surprise. But its Support Note offers good explanations. Thus, I’m OK with this tool. Nor should you worry, either. Rather, it looks like good software engineering.

Better yet, the Update Health Tools can handle update issues on their own, sans user input or guidance. That sounds like a blessing, even if in disguise. And FWIW, it’s missing  from Insider Preview releases. That tells me it aims squarely at production PCs outside IT umbrellas. That means mostly home and small business users. Thus, it should benefit those who need it most.

I’m coming out in favor of the Update Health Tools. I hope we’ll learn more about them from Microsoft soon. In the meantime, if you don’t like the tool, you can choose to uninstall it. I’m leaving it alone myself. If I’m right about it, it may come in handy someday.

Facebooklinkedin
Facebooklinkedin

X1 Nano First Look

Sometimes, you just get lucky. This Monday, I saw Rich Woods’ review of the Lenovo X1 Nano laptop at NeoWin.net. Immediately thereafter, I emailed my contact at Lenovo to ask for a review unit. Yesterday (one day later) I had that unit in my hands. That’s lucky! This mini-review is my X1 Nano first look report. Also, I’ll be writing about this light, compact, and powerful unit one or two more times in the next couple of weeks. Then, alas, I must return it.

Impressions from X1 Nano First Look

I’m a fan of the more compact X series ThinkPad laptops. I currently own an X220 Tablet (2012 vintage), 2 X380 Yogas (2018) and an X390 Yoga (2019). I like the portability of the 13″ form factor. I like the ease with which I can throw a unit (or two) into a carrying sleeve, a briefcase, or a backpack. On family trips especially, I’m used to taking two small laptops along. Thus, I can still keep up with email and post blogs while on the road. And my wife and son can use the other laptop when their smartphones aren’t enough.

I came into this review thinking the Nano would be a great candidate for family laptop on the road. I came out of it thinking that it would make an excellent (if lighter duty) candidate for work laptop on the road. I’ll need more time with the unit to suss this out further.

X1 Nano First Look.speccy

PiriForm’s free Speccy tool shows the basic components in this review unit.

X1 Nano Review Unit Speeds & Feeds

OK then, it’s got a Tiger Lake (11th generation) i5-1130G7 CPU, which runs at 1.10GHz on four cores and eight threads. Burst mode goes to 1.80 GHz for single-threaded tasks. It also comes with 16 GB of surprisingly fast LPDDR4-4266 RAM. It’s the first laptop I’ve used with Intel Iris Xe graphics. (Once again: these are surprisingly fast and also capable.)

There’s a Samsung OEM 512 GB SSD (NVMe PCIe 3.0 x4) that’s reasonably fast (NotebookCheck calls it “entry-level to mid-tier by H1 2020;” one year on, it’s pretty much straight-out entry level). It’s got a non-touch, 2560×1440 (2K), 450 nits, 16:10, sRGB display that’s crisp and readable at default resolution. The only ports on the device are two Thunderbolt 4 USB-C connections: one labeled for power-only, the other labeled for power and data.

It also sports a speedy Intel AX201 Wi-Fi chipset that meshed quite nicely with my Asus 802.11AX router. (Access speeds of 400 Mbps and better, in a busy, signal-rich office environment.) Oh, and it has a fingerprint reader and a 720p Windows Hello capable integrated Webcam, too.

What’s missing on this unit for those who don’t have a Thunderbolt dock handy? (I have several.) At least one USB 3.0 Type A port, and  a micro SD port for added, onboard flash storage. With even high-capacity uSDXC cards now pretty affordable, I do indeed wish Lenovo had found a way to squeeze one in somewhere.

What Makes the X1 Nano a Standout?

It weighs only 906 grams (1.99 lbs). It’s got a carbon fiber top deck and a  (nicely coated) magnesium bottom deck.  The keyboard is about 10% smaller than the one on my other X model ThinkPads. Even so, it feels (and works) so much like those others that I can’t tell any difference. And for somebody like me who makes his living by typing on a keyboard, that’s a big thing.

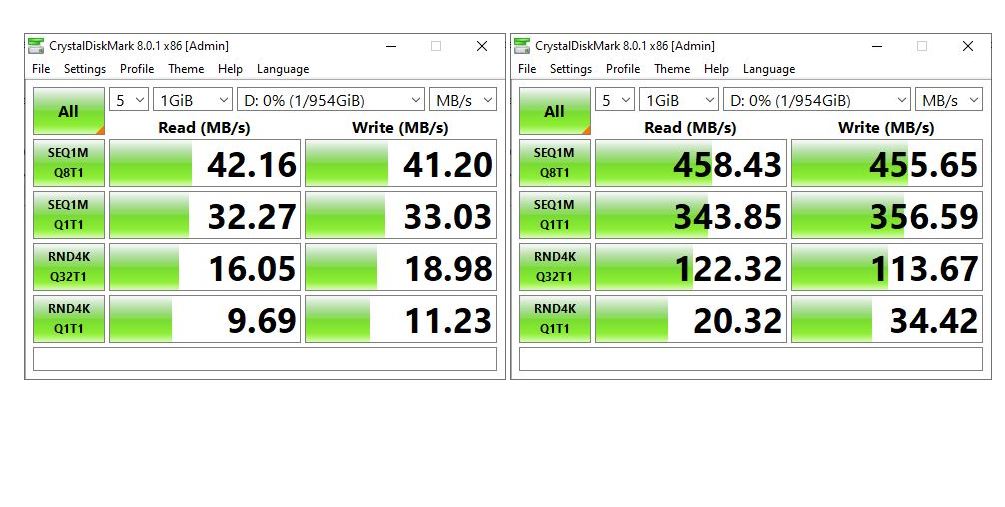
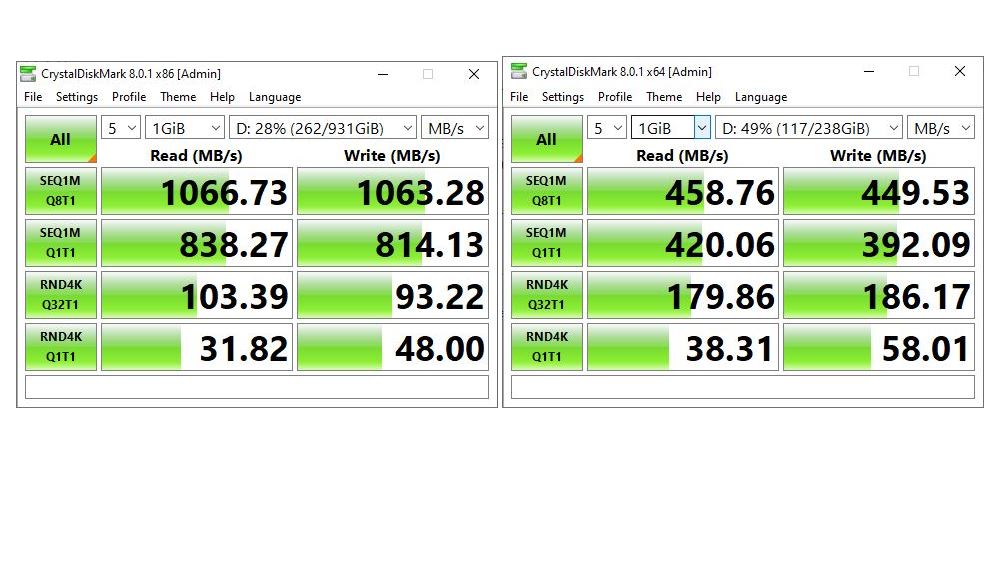
The display is also pleasingly bright and clear, and the Iris Xe graphics are fast, crisp and powerful. I’m no gamer, but I couldn’t make the display choke up even by throwing graphics pop-ups at it. Working with my usual mix of multiple Chrome, Firefox and Edge windows, plus MS Word for writing, I was impressed. It works and feels just like my now-aging but still capable i7-6700 Z170 desktop (32 GB RAM, Samsung 950 Pro SSD, GTX 1070) on my typical in-office workloads. Even comparing CrystalDiskMark 8.0.1 results for the two primary drives, they’re almost identical.

More to Come in Days Ahead

Right now, my response to this PC is an enthusiastic “So far, so good.” As equipped, this unit’s MSRP on its Lenovo product page is US$1727.40. That makes it about $100 less than a 10th generation,   i7-equipped, non Iris XE (Intel 620 UHD) touchscreen ThinkPad X1 Yoga Gen 5.

Were I myself to buy one of these, I would spring the extra $120 for an i7 CPU. It uses an M.2 2242 NVMe drive, of which 1 TB units are not yet readily available on the aftermarket. Thus, I would probably buy the 256 or 512 GB SSD and then do a swap myself, when higher-capacity, higher-performance options go up for sale.

Other than that, it’s a delightful little laptop. I recommend it highly, subject only to my reservations. Those are: few ports, no SDXC slot, and a mildly painful ouch factor on price. But that’s how it is for “thin-and-light” laptops, isn’t it?


Facebooklinkedin
Facebooklinkedin

Post Dev Channel Upgrade Drill

As somebody who’s been in the Insider Program for Windows 10 since October, 2014, I’ve been through hundreds of Insider Preview installations and upgrades. That means I have a pretty well-defined drill through which I take my test PCs once an upgrade is in place. In today’s item, I’ll take you through my Post Dev Channel Upgrade drill as an illustration. That’s because I just finished upgrading to Build 21318.1000, released Friday February 19.

High-level View: Post Dev Channel Upgrade Drill

Viewed at a high level, those post Dev Channel upgrade steps might be described as follows:

    1. Check the environment, restore tweaks, make repairs
    2. Clean up post-upgrade leftovers, esp. Windows.old
    3. Perform other routine cleanups
    4. Check for and install software updates (non-Windows)
    5. Use Macrium Reflect to make a pristine image backup

In general, the idea is to make sure things are working, clean up anything left behind, catch apps and applications up with Windows, and make a snapshot to restore as this release baseline, if needed.

Step 1: Check & Restore or Repair Anything Out of Whack

YMMV tremendously during this activity. After many upgrades, I’ve jumped into File Explorer Options (Control Panel) to make file extensions visible again, show hidden files, and so forth. MS is doing a better job with this lately, and I don’t usually have to do this with Insider Preview upgrades (though it does still happen for standard feature upgrades).

For a long, long time I had to go into Advanced File Sharing to loosen “Guest or Public” and “All Network” network profiles on the Lenovo X220 Tablet to get RDP to work. Because I use RDP from my production desktop to access and work on my arsenal of test PCs, this is pretty important — to me, anyway. The last few Dev Channel releases have NOT had this problem, I’m happy to say.

I run Helmut Buhler’s excellent 8 Gadget Pack on my Windows 10 PCs. That’s because its CPU Usage and Network Meter gadgets provide helpful dashboards. The former is good for CPU and memory usage and system temps; the latter is great at showing network activity and base addressing info. Very handy. But each time an upgrade is installed, Windows 10 boots it off the desktop. Buhler has written a handy “Repair” utility that I run after each upgrade to put everything back the way it was.

Step 2: Clean up post-upgrade leftovers

You can use the built-in Disk Cleanup utility, run as admin, to take care of most of this. I personally prefer Albacore/TheBookIsClosed’s Managed Disk Cleanup (available free from GitHub). Why? Because he tweaked the UI so you can see all active controls in a single display window, and select all the stuff you want gone in a single pass. Here’s what that looks like to make it visually obvious why I prefer this tool:

Post Dev Channel Upgrade Drill.mdiskclean.exe

Notice you can see ALL options eligible for selective clean-up in a single display area in Managed Disk Cleanup. I like it!

Step 3: Perform other routine cleanups

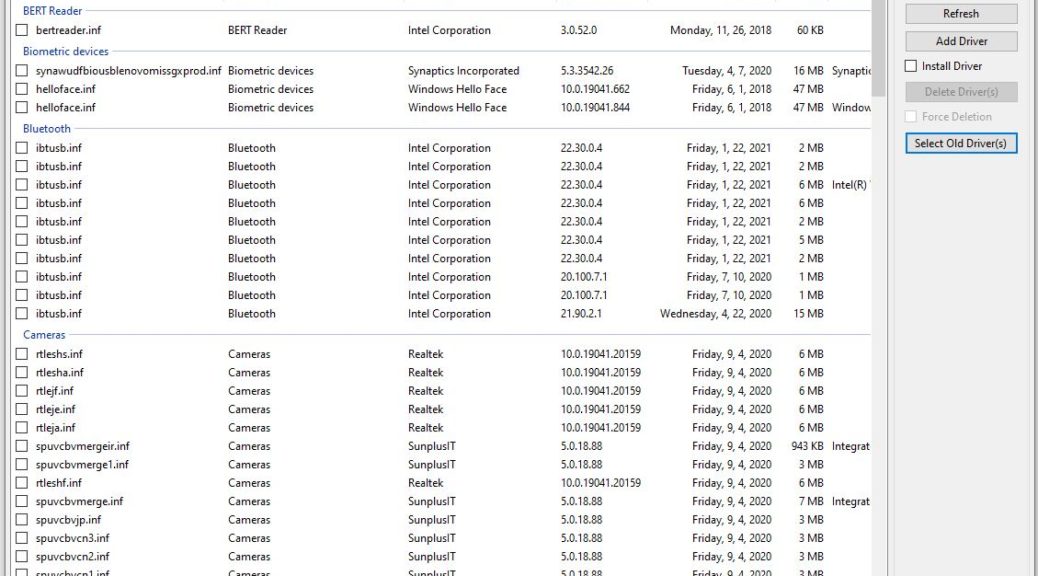
I still use Josh Cell’s Uncleaner utility to clean up temp files and other leftovers after an upgrade. If I’m feeling ambitious I’ll run the DriverStore Explorer (RAPR.exe) to identify and remove duplicate device drivers, too. Once upon a time I would run Piriform’s CCleaner as well, but I’m less than happy with that software now that the maker has started including bundleware in the installer. I haven’t found another tool I like as much as the old version.

Step 4: Update Third-Party Software

You can use a tool like KC Softwares SuMO or Patch My PC Updater to suss out most of the items in need of update on Windows PCs. SuMO is a little better at its job but costs about US$35 for the PRO version (does automatic updates for most programs, but sometimes vexing to use). PMP Updater is free, fast, and entirely automatic but doesn’t update everything. Sigh. I use PMP Update on my test machines, and SuMO PRO on my production PC myself. I’m doing this on the theory that it’s best to have everything updated before making a pristine image backup, as I do in the next step.

Step 5: Make a Pristine Backup

With everything upgraded and updated, and all the dross cleaned up, it’s the perfect time to make a fresh image backup. I like Macrium Reflect, mostly because it’s faster and more reliable than the built-in Windows 7 Backup and Restore utility (which MS itself has recommended against since 2016). And indeed, it’s faster at backing up and restoring than most other utilities I’ve used, and also includes a bootable rescue flash drive utility you can use for bare metal and “dead boot/system” drive repair/restore scenarios.

Please note: Macrium Reflect is MUCH faster than using the rollback utility to return to a lower-level OS image from a higher-level one. That’s why I feel safe getting rid of the Windows.old folder as part of my cleanup efforts. I know I’m not going to use those files anyway…

OK then, that’s my drill. I’m sticking to it. Hopefully, you’ll find something in there to like for yourself. Cheers!

Facebooklinkedin
Facebooklinkedin

Windows 10 LTSC Lifetime Gets Halved

OK, then. It must be something in the air. I blogged here about the Long Term Servicing Channel (LTSC) version of Windows 10 about two weeks ago. And today, I just saw — courtesy of the always vigilant Mary Jo Foley (MJF) at ZDNet — that MS is cutting LTSC support life from 10 to 5 years. This starts with the next release as explained in a Windows IT Pro blog post. (See below for a key snippet.) Fore sure, the big takeway is that Windows 10 LTSC lifetime gets halved, as of 21H2.

Why Windows 10 LTSC Lifetime Gets Halved?

The best answers for inevitable follow-on questions appear in a quote from the aforementioned blog post. Here ’tis:

Today we are announcing that the next version of Windows 10 Enterprise LTSC and Windows 10 IoT Enterprise LTSC will be released in the second half (H2) of calendar year 2021. Windows 10 Client LTSC will change to a 5-year lifecycle, aligning with the changes to the next perpetual version of Office. This change addresses the needs of the same regulated and restricted scenarios and devices. Note that Windows 10 IoT Enterprise LTSC is maintaining the 10-year support lifecycle; this change is only being announced for Office LTSC and Windows 10 Enterprise LTSC. You can read more about the Windows 10 IoT Enterprise LTSC announcement on the Windows IoT blog.

Two important take-aways:

1. Happily, this change synchronizes Windows 10 Enterprise LTSC and Office LTSC release timing.

2. Even better, Windows 10 IoT Enterprise LTSC is NOT affected. It stays on a 10-year schedule.

Apparently MS understands full well that, once deployed, IoT devices are best left alone as long as possible. Happily, Windows 10 Enterprise LTSC and Office LTSC are synching up, because they’re likely used in tandem. Thus, both benefit from the same release cycle. In most cases, five years is in keeping with typical technology refresh cycles (which usually run 5-7 years).

Plus çe change…

The complete French aphorism translates “The more things change, the more they stay the same.” Indeed, it seems that MS isn’t afraid to tweak long-term servicing options, to better meet customer needs. My guess: making customers upgrade LTSC Office without upgrading the OS  simultaneously could be less than helpful. Therefore, it makes sense that MS would synch things up where the two are likely used together.

On another front, MJF and I both see a bit of ‘suasion possibly at work in this change. Here’s what she says on this in her story:

Microsoft execs have tried to dissuade customers from using LTSC versions of Windows 10 as a way to avoid regular feature updates. (More than a few customers do this.) They’ve emphasized that the intent of LTSC releases is to support mission-critical systems that can’t or shouldn’t get regular updates.

In today’s blog post, officials said they also found that many customers who installed LTSC versions for their information worker desktops “found that they do not require the full 10-year lifecycle.”

Given that the typical refresh cycle is less than 10 years, I’d have so say “No kidding!” to her final observation. I concur!

Facebooklinkedin
Facebooklinkedin

Samsung Network Printer Goes Missing

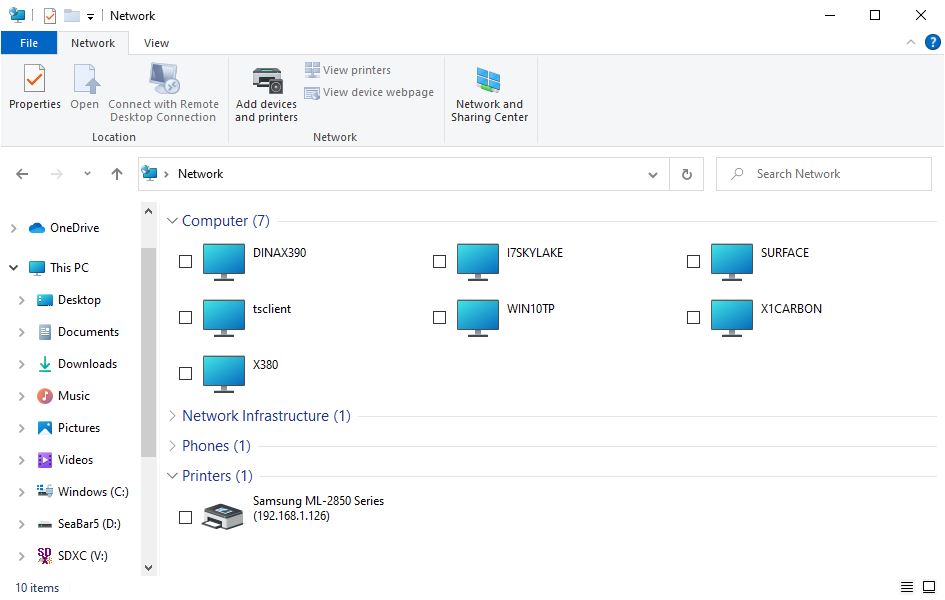
OK, I admit it. I hadn’t set up DHCP reservations on my LAN. I could try to blame the Spectrum-supplied router that provides DHCP, but it’s really my fault. Thus, when I saw my Samsung ML-2581ND laser printer was offline yesterday morning, I immediately knew what was up. Generally, when the Samsung Network Printer goes missing on my LAN it’s because DHCP has assigned it a different IP address.

Look at the lead-in graphic for this story. There you’ll see that the device (Samsung ML-2850) is associated to Private IP 192.168.1.126. It had previously been …127. And as soon as I changed that address selection on the Ports tab of Printer Properties, it started working again. So how did I figure out which port it had actually been assigned?

When Samsung Network Printer Goes Missing, Then What?

That’s when I call on one of Nir Sofer’s handy network utilities — namely NetBScanner. It quickly scans the local cable segment on its address range. In fact, the program is smart enough to figure that out on its own, after which it supplies a short list of all occupied addresses in that range. Here’s what I saw when I scanned my local wired Ethernet:

Samsung Network Printer Goes Missing.NetBscan-results

Notice the entry for …126 which also shows the device name SAMSUNGNWP. That’s what I want!

It turns out I already had defined this address in the Ports tab, so all I had to do was switch the device from the now-incorrect …127 entry to the current …126 entry and it was done. That meant unchecking the box next to the former, and checking the box next to the latter. Dead simple, quick and easy to fix. As long as you know how, that is…

The Right Fix is a DHCP Reservation

DHCP lets admins make static address assignments from the IP address pool it manages. That way, devices like servers and printers can keep the same address forever, and DHCP won’t move those assignments around, as it otherwise might. That shows up under the Advanced and DHCP tabs on my Askey RAC2V1K boundary device. I reserved the …126 address for the Samsung ML-2850 and also the …15 address for my Dell Color Laser CB745E. The latter is shown here:

Samsung Network Printer Goes Missing.DellCPres

By supplying the MAC address and the desired (reserved) IP address, you tell DHCP “hands off” for future assignments.
[Click image for full-sized view.]

So now, I’ve done what I should have done long ago, thanks to sharing my (prior) shame with you, dear readers. Live and learn!

Facebooklinkedin
Facebooklinkedin

21H1 Hits Beta Preview Channel

The lead-in graphic for this story shows some big news. That is, the Feature update to Windows 10, Version 21H1 is now available. This applies to Windows Insiders in the Beta Insider Preview channel, I hasten to add. And indeed, the foregoing item showed up on my Beta Channel test machine this morning. Hence the proclamation that 21H1 hits Beta Preview channel.

When 21H1 Hits Beta Preview Channel, Then What?

There are two kinds of implications for this occurrence. One is technical, and the other is a matter of historical analysis and implication. On the technical front, this means that the upcoming 21H1 is more or less locked down. That is, what we see in this preview release is also pretty much everything we’ll see in any upcoming public release. On the historical front, public releases typically have followed previews somewhere from 4 to 6 weeks after the preview appears. That puts initial public release of 21H1 somewhere between March 18 and April 1, by my reckoning.

Upon reflection, I kind of like an April 1 date (April Fool’s Day).

The Beta Channel Upgrade Experience

The screencap you see at the head of this story is the one that appeared on my Beta Channel test PC. For up-to-date Beta Channel PCs, this update is undoubtedly an enablement package that simply turns on features already present in the Insider Preview OS.

Why say “enablement package?” I say that because it completed the pre-reboot portion of the install in under two minutes on a Surface Pro 3 (vintage 2014) machine. The “Working on Updates” portion was pretty speedy, too (less than a minute). And the post-reboot drill took about 30 seconds (just a hair slower than a normal rebooot, in other words).  You won’t have to spend much time twiddling your thumbs while waiting for this “feature upgrade” to install!

I’m jazzed to understand that 21H1 is in the offing, and should be making its way into public release somewhat sooner than I’d expected. My congrats and thanks to the #WindowsInsiders team in general. Take a read of Brandon Leblanc’s Announcement post for more Insider info.

Facebooklinkedin
Facebooklinkedin

SetupDiag.exe Unveils Upgrade Gotchas

If you read this blog, you already know I finally got my Lenovo X380 Yoga upgraded to 21313 earlier this week. I’d been fighting a bugcheck error for the two prior Dev Channel upgrades before that. Along the way, I found myself  looking for diagnositic info about the failed upgrade.  A Microsoft tool SetupDiag.exe unveils upgrade gotchas, so I started using it. With this post, I want to shed more light on this nice little tool, based on recent experience.

How SetupDiag.exe Unveils Upgrade Gotchas

The program is a log analysis tool that focuses on Windows Setup log files. As the MS Docs page for SetupDiag says:

It attempts to parse these log files to determine the root cause of a failure to update or upgrade the computer to Windows 10. SetupDiag can be run on the computer that failed to update, or you can export logs from the computer to another location and run SetupDiag in offline mode.

That latter offline capability is nice, because it means you can boot an otherwise unbootable machine using rescue media. Once booted, you can then suck the files you need from the problem PC and analyze them on a working machine instead.

Note 1: consider bookmarking the already-quoted MS Docs page. It includes an always-current download link to the latest SetupDiag.exe version. (V160 is current as of Feb 17, 2021 only.)

Note 2: SetupDiag.exe requires .NET Framework 4.6 (or newer). See this WindowsCentral story for multiple .NETversion check methods  in PowerShell (3) or Cmd.exe (1).

Working with SetupDiag.exe

Starting with Windows 10 2004, SetupDiag.exe is included with Windows Setup on Windows 10 ISOs and other install images. Paraphrasing the MS Docs item, it says:

During the upgrade process, Windows Setup extracts its sources files to a directory named %SystemDrive%$Windows.~bt\Sources . With Windows 10, version 2004 and later, setupdiag.exe is also installed to this directory. If there is an issue with the upgrade, SetupDiag will automatically run to determine the cause of the failure.

Thus, so long as you don’t clean up after an attempted upgrade, you’ll find SetupDiag.exe in the afore-cited directory. Grab a copy and put it somewhere else, if you’d like.

Simply search your PC for SetupDiag.exe. Once found, you can run the program from Explorer, in PowerShell, at the Command Prompt, or via the run command.

Reading the Results

SetupDiag.exe writes its results in a file named SetupDiagResults.log. By default, it appeared in my download folder
(C:\Users\<uname>\Downloads).
I found it easily, because I use Voidtools Everything to locate files on my behalf. It’s how I got the details on my bugcheck error code. It reads 0X0000000A therein, but may appear as 0XA in discussions online. When I got the GSOD the error identified itself in the report window as IRQ_NOT_LESS_OR_EQUAL…

The lead-in graphic for this story shows the log file. The area of interest starts mid-way down in a line that reads: “Found crash information in rollback log.” That’s where the bugcheck code appears. Also, “nt” appears as the responsible driver. This, alas, is a built-in OS driver. Mere users cannot uninstall or update it. (That’s a Microsoft internal thing dontcha know?) It’s what convinced me that waiting for an upgrade from MS was the ultimate (and only) fix avaialble.


Facebooklinkedin
Facebooklinkedin

DISM Trumps SFC To Fix Hung Execution

Here’s an interesting observation straight from TenForums. Occasionally, the System File Checker (SFC) will hang when run. That is, it will grind forward to some percentage of completion, and then sit there indefinitely, making no further progress. If that happens to you on a Windows 10 PC, it’s OK to terminate the process (enter Ctrl-C at the command line or in PowerShell). In such cases, DISM trumps SFC to fix hung execution. Let me explain…

How DISM Trumps SFC to Fix Hung Execution

To unpack my assertion, please understand that when SFC finds an error it cannot fix, it more or less stops where it is. The Deployment Image Servicing and Management tool, aka DISM, can replace the files in Winodws 10’s cross-linked code repository WinSxS. By doing so, it will often fix the errors that SFC cannot surmount successfully.

The syntax for the specific DISM incantation is most often:

DISM /online /cleanup-image /restorehealth

Other variations for offline images, or that use something other than local files already known to Windows 10 are documented at MS Docs. There you’ll find a helpful article entitled “Repair a Windows Image” that take you through various elaborations that may sometimes prove necessary. Using the Source: attribute can get particularly interesting, especially if you’re working from a WIM or ESD file that is home to two or more Windows images.

If SFC Hangs, DISM /RestoreHealth Often Sets Things Right

As it did for the person who posted about SFC difficulties at TenForums, this approach will often (but not always) make things right. You can’t know until you try. But the thing to remember is that if SFC hangs or fails, your next step should be to try this specific DISM command.

In my personal experience, this has fixed half or more of such issues when they’ve come up. If the odds come up as they should, this approach will also work for you. Try it, and see!

[Note Added Feb 16 afternoon]:
Go Ahead: Skip SFC, Run DISM First

Members of the Insider Team responding to this post informed me that “On Win10 it’s recommended to run DISM first.” This is explained in an MS Support Note entitled “Use the System File Checker tool to repair missing or corrupted system files.” And sure enough, in reading over that article it informs readers “If you are running Windows 10 … first run the inbox Deployment Image Servicing and Management (DISM) tool prior to running the System File Checker.” I’m not sure what “inbox” means in this context, but the order is clear and unmistakable: DISM first, SFC second.

I’ve been following typical advice from TenForums and conventional wisdom for so long, I neglected to read up on SFC in putting this story together. Live and learn: now I know to reverse the order and run DISM first. Hope this helps others, too!

Facebooklinkedin
Facebooklinkedin

Author, Editor, Expert Witness