Canary Compresses Date/Time Layout

Every now and then, Microsoft likes to mess with Windows desktop display stuff. Today’s case in point come courtesy of Windows 11 Canary Build 27754, installed two days ago. In this go-round, Canary compresses date/time layout at the far right of the notification area. You can see its incredibly brief form: 10:23 above, and 11/22 below in the lead-in graphic. Does that mean I have to like it — or even want like that? Heck, no. If Canary compresses date/time layout on its own recognizance that gives me cause to report here, and remonstrate elsewhere.

If Canary Compresses Date/Time Layout, Then?

Based on my attempts to reformat the date from its current minimalist form to something a bit more informative, neither Settings > Time & Language > Language and Region nor Control Panel > Region > Date and time formats exercises any obvious effect on its appearance. I filed a Feedback Hub request to ask them to allow the prevailing settings to work rather than changing them independendly. Sheesh!

If you want to upvote my Feedback Hub suggestion, see it at Notification time/date in Canary Build 27754. TIA.

The More Things Change, the More They Stay the Same

I’m not sure why MS rearranges things at its own whim, or for reasons not fully understood, explained, or immediately obvious. But it happens from time to time. Looking at the 27754 announcement, MS has this to say:

You can revert to the long form of the date/time and bell icon visuals by toggling the values in the Settings via Settings > Date and Time under “Show time and day in the system tray” and Settings > System > Notifications under “Notifications”.

Then I found it: there’s a down-caret for a dropdown menu on the “Show time and date in the System Tray” entry in the “Date & time” section. If you open that dropdown, you can switch back to long-form displays. Here’s what that looks like:


As you can see, I clicked the entry “Show seconds…” Once I did that the time then displays as 11:15:27 AM and the date as 2024-11-22, as per my settings. It looks like one must go the long way around to get to the right destination. That’s not a totally unexpected experience in Windows-World, either!

Why didn’t the announcement simply say, switch from Show abbreviated date and time to Show seconds in system tray…? I would’ve understood that immediately, and known exactly what to do. Sigh.

Facebooklinkedin
Facebooklinkedin

Revo Uninstaller Poses Typical Update Trap

I’ve seen it before. And I’m pretty sure I’ll see it again. Recently, I’ve noticed the Revo Uninstaller app popping up on my desktop without any action on my part. When I checked (enabled) Startup items in Task Manager, it was absent. But then, I did some poking around online. That’s how I learned that Revo Uninstaller poses typical update trap: when it updates, it resets its Options to check a box labeled “Check for update on startup.” Perforce that means it starts the app, and leaves it running on the desktop as well.

Foiling Revo Uninstaller Poses Typical Update Trap

You can see the Options window from Revo Uninstaller in the lead-in graphic above. To stop this from happening you will forgo update checks. But you’ll also forgo the application open on your desktop at startup. I’m willing to trade the inconvenience of the former against the annoyance of the latter. Problem is, this gets reset each time the app updates. So one must remember to uncheck the re-rechecked box to stay ahead of the annoyance. I guess that means I’m really trading annoyance against annoyance, and absorbing a minor inconvenience.

Too bad Revo doesn’t create a WinGet package for inclusion in its packages database. Then I’d catch this issue more readily in my usual day-to-day routine. That said, PatchMyPC Home Updater might manage to handle this without activating the checkbox — at least, as far as I can tell. Goes off to check… Nope, it leaves that alone, too.

Just another little sniglet of update trivia to track here in Windows-World. I guess I’m used to that by now…

Facebooklinkedin
Facebooklinkedin

Windows Resiliency Initiative Includes Quick Machine Recovery

It’s that time of year again, when MS meetings and conferences — Ignite 2024, in this case — heat things up with future promises and new idea campaigns. Yesterday’s Windows Experience Blog from David Weston (MS VP Enterprise & OS Security) is a case in point. Entitled Windows security and resiliency: Protecting your business, it asserts that a new Windows Resiliency Initiative includes Quick Machine Recovery as a key capability. Very interesting!

Explaining Windows Resiliency Initiative Includes Quick Machine Recovery

This new initiative “takes four areas of focus” as its goal — namely (all bullet points quoted verbatim from the afore-linked blog post, except for my [bracketed] commentary):

  • Strengthen reliability based on learnings from the incident we saw in July. [Crowdstrike kernel mode error took down 8.5M Windows PCs.]
  • Enabling more apps and users to run without admin privileges.
  • Stronger controls for what apps and drivers are allowed to run.
  • Improved identity protection to prevent phishing attacks.

The first and arguably most impactful preceding item is what led MS to its announcement of Quick Machine Recovery. Here’s how Weston explains it:

This feature will enable IT administrators to execute targeted fixes from Windows Update on PCs, even when machines are unable to boot, without needing physical access to the PC. This remote recovery will unblock your employees from broad issues much faster than what has been possible in the past. Quick Machine Recovery will be available to the Windows Insider Program community in early 2025.

In other words, this new feature should enable what savvy administrators had to do using OOB access to affected machine via KVMs smart enough to bootstrap machines otherwise unable to boot.

Great Addition: How’s the Execution?

IMO this is something MS should’ve built into Windows long ago. I’m curious to see how (and how well) it works. I’m also curious to see if it will be available for Windows 10 as well as 11. Only time will tell, but I’ll be all over this when it hits Insider Builds early next year. Good stuff — I hope!!

Facebooklinkedin
Facebooklinkedin

Copilot+ PC High-Perf Power Plan

Here’s something interesting. I’ve got a Lenovo ThinkPad Yoga Slim 7i Aura 15 (aka Model 15ILL9) Copilot+ PC. It’s the Intel follow on to the Snapdragon X models let go earlier this year. In reading over Paul Thurrott’s November 14 review of that unit, I saw that defining a Copilot+ PC high-perf power plan will produce more reliable and faster output, albeit at some cost to battery life. FWIW, this accords with my own observations and experience. But by default, all Copilot+ PCs use the Balanced power plan. It gets better…

Where’s the Copilot+ PC High-Perf Power Plan?

Alas, likewise by default, Balanced is the ONLY power plan defined and available for Copilot+ PCs (and indeed, for most PCs that support the S0 sleep state). What to do? You can create one, but that involves tweaking more than a handful of settings. Wait: there’s a better way.

I went trolling around at ElevenForum.com and found a thread that linked to a Web site named  Windows Answer File Generator. It includes an entry named Windows 10 Power Configuration. Indeed, that script works for Windows 11 as well. So I used it, then downloaded the resulting file named power.bat to the afore-mentioned 15ILL9 Copilot+ PC. It ran within a Command Prompt session without issue, and shows up now as the current, in-use Power Plan:

After running the script, High Performance is the chosen Power Plan.

Good stuff! If you find yourself in a situation where you need more performance or reliability from a Copilot+ PC, this technique and its tool stand ready to help. Do yourself a favor, and give them a try…

Facebooklinkedin
Facebooklinkedin

Pondering Apparent Windows 11 Build Fork Jump

If you look over my blog posts for the past few days, you’ll see I was trying to get the Lenovo ThinkPad X1 Extreme (2018 8th-Gen i7, etc.) from 23H2 to 24H2. I provide a list of links and capsule summaries to those item below. But the reason I’m puzzled is that manually applying KB5046633 took me from Build 22635.4460 (23H2 Beta) after which using the Installation Assistant took me to Build 26100.1742 (24H2 GA/Production). That’s supposed to be impossible. Thus, it’s got me pondering apparent Windows 11 build fork jump that somehow occurred.

Installer Oddity Has Me Pondering Apparent Windows 11 Build Fork Jump

I didn’t think the installer let one jump from Insider Preview versions (Beta Channel, in this case) to GA/Production images. But something I did — I think it’s the manual application of KB5046633 — let that happen. Once I got there, though, I was stuck. I couldn’t repair install my way to either the current GA Build (26100.2314) or its Beta Channel counterpart (22635.4510).

I can only surmise that I somehow slipped a version check. It might have happened when using the afore-linked KB item. Or, it could’ve happened when running the Windows 11 installation assistant after that. Truth to tell, I was relieved when my final repair operation hit a dead end, and the Windows Installer basically forced me to clean install Windows 11 from scratch.

Factor 1: Multi-Version Manual KB Installs

Indeed, KB54046633 works on both 23H2 and 24H2 based Beta Channel versions. The upgrade path from one to the other doesn’t necessarily need the full-blow installer (including the Installation Assistant). Indeed, Copilot tells me that when I applied KB5046633 it could’ve upgraded me from 23H2 to 24H2. But it did not.

Factor 2: Using the Windows 11 Installation Assistant

When I ran the assistant, that’s when the fork jump actually occurred. And again: I didn’t think it was supposed to work at all, let alone the way that it did. That’ s how I found the X1 Extreme enrolled in the Beta Channel but showing a GA/Production Build number.

The moral of this story is to limit yourself to the kinds of upgrade techniques you elect to use. Thank goodness these were all well-backed-up, non-essential machines. This could turn into a real snake pit for those not aware of such potential pitfalls. Me: I enjoy fallling into them, and then figuring out how to get to a better place. Thus, I hope you can learn from my mistakes … errrrr … adventures here in Windows-World.

Here are links to my previous blogs in this series with capsule summaries:

  • Nov 12 X1 Extreme Still Gets No 24H2 Offer: explains that this 2019 vintage laptop is still on some kind of update hold
  • Nov 13 X1 Extreme 24H2 Beta Pickle: Explains the sequence of updates that got me from a 23H2 Beta Build to a 24H2 GA Build
  • Nov 14 MSA Switch Brings Standard 24H2 Aboard: Explains how changing to a non-registered MSA produces only clean install option for 24H2.

Gosh this has been interesting and educational, too.

Facebooklinkedin
Facebooklinkedin

MSA Switch Brings Standard 24H2 Aboard

Here’s the happy, happy conclusion of my recent saga involving the ThinkPad X1 Extreme laptop. When I ran the clean install of 24H2, I also provided a different MSA than the one I’d used previously. Because that combination of MSA and machine name is not enrolled in the Insider Preview program, the Windows installer went with the standard General Availability (GA) channel. Hence, I aver that an MSA switch brings standard 24H2 to that PC.

Why Say: MSA Switch Brings Standard 24H2?

The results speak for themselves, as you can see in the Winver output in the lead-in graphic. You can also see that the machine is not enrolled in any Insider Channel. Instead it says “Join the Windows Insider Program.” That means it’s not enrolled.

Because I use this machine on the road, especially for legal cases, that’s a good thing. I’m actually pleased to have this laptop back on the primary GA track. That means it should be as stable as Windows 11 gets. So, all’s well that ends well, but it took some doing.

A Long and Winding Road to 24H2 26100.2314

After I completed the clean install and started into the OOBE, I supplied a different MSA for this machine setup. It was therefore happy to stick with the GA thread of 24H2 releases. I did have to apply two sets of updates (2 CUs and one preceding update, plus an MSRT and a Confugration Update). I show most of that history in the next screencap:

2 CUs, another update, MST and configuration stuff (plus 8 drivers and 2 Defender updates) make the install current.

The Rest of the Schlemozzel

Now, of course, I need to restore the applications I like to use on my production PCs. PatchMyPC Home Updater can handle many of them, but I’ll need to install Office 2024, Nitro Pro, WizTree, and a few other odds’n’ends to bring the machine back to its former glory. But hey! I’m caught up to 24H2, back in the GA channel, and ready to rock and roll. It’s what passes for a happy ending, here in Windows-World!

Bottom line: as soon as the installer recognized it could only handle a clean install, things got on the right track. I’m not sure how I got off that track when I manually installed a CU the other day, but I’m glad to have a clue as to what’s what on that laptop finally restored.

Facebooklinkedin
Facebooklinkedin

X1 Extreme 24H2 Beta Pickle

For me, a key aspect involved in learning Windows’ many ins and outs is occasionally painting myself into a corner. That’s what I seem to have done with the Beta Channel Windows 11 install image on my Lenovo ThinkPad X1 Extreme. ( Equipped with 8th-Gen i7-8850H, 32GB RAM, 2xNVMe SSD, and NVIDIA GTX 1050 Ti/Intel UHD 630.) As I explained in yesterday’s post I got it to build 22635.4460 under the 23H2 version umbrella. Upon discovering it was an Insider Preview anyway, I decided to run the 24H2 Installation Assistant, and let the chips fall as they would. Fall they did, and now I’m in an X1 Extreme 24H2 Beta pickle. Let me explain…

Easier Into than Out of X1 Extreme 24H2 Beta Pickle

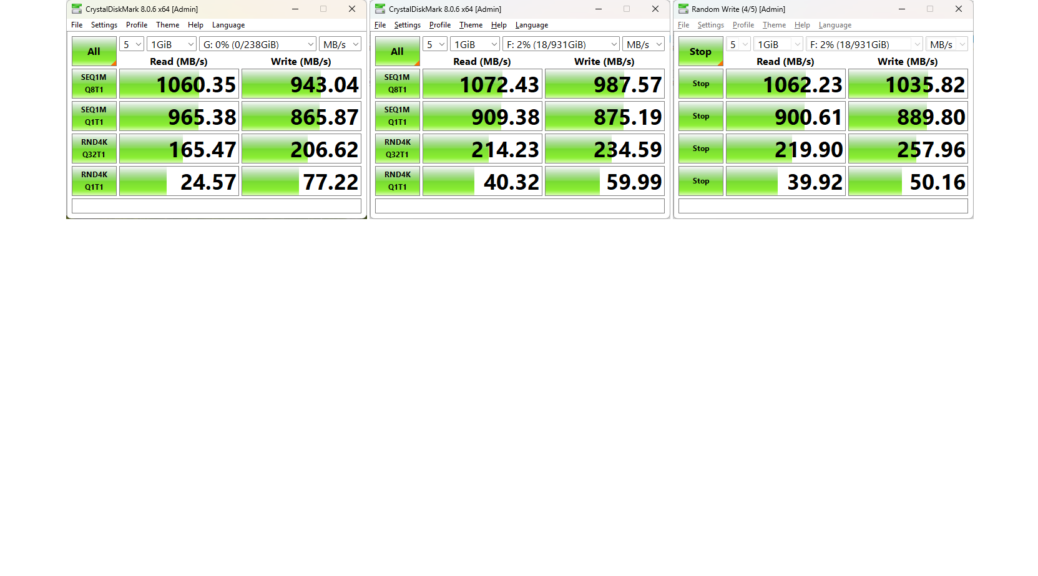
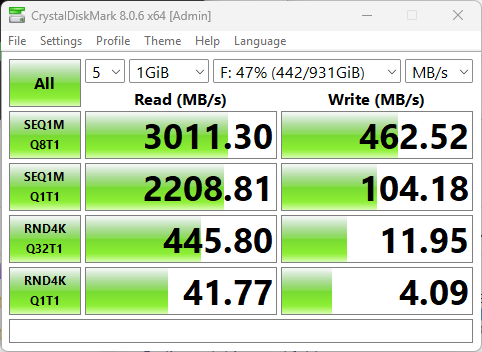
Take a look at the lead-in graphic. It shows Settings > Windows Update > Windows Insider Program with the X1 Extreme in the Beta Channel. Alas, it also shows the Build number as 26100.1742. According to Copilot it was released on September 10. 2024 as part of the original Windows 11 24H2 update. It’s not a Beta Channel release. Rather, it’s a production release build (and what obviously provided the image info for the corresponding ISO or contents that the Installation Assistant uses).

That’s the corner I’m in right now. The Insider Program thinks I’m in the Beta Channel, but my current build and image fall outside that channel. On a whim I tried repairing the image with an ISO for 26100.2314 — the most current production build. To my combined relief and chagrin, this failed with a “The install failed” error. That’s what I’d expect from a version mismatch.

Onto the Next Repair: Beta Channel ISO

I’m now going to try again, with the latest Beta Channel item from the Windows 11 Inside Preview ISO Downloads page. My best guess, and my fervent hope, is that this will make for a successful in-place upgrade repair. At this point, I’m past the half-way point in the download. I’ll be able to access and use the ISO shortly…

The ISO mounted as the G: drive. I’m running setup.exe from the root directory right now. It’s checking for updates, then the installer had to restart itself. I’m now accepting the EULA and then comes the moment of truth: the only option available is for a clean install, as you can see here (note the two “keep” options are greyed out, and unavailable):

The Windows Installer finally gets wise and requires a clean install.

That’s an acceptable offer, and I’m going to take it. But first I want to experiment with WinGet Export to save all my stuff and attempt to import it back later on. I also need to make an image backup in case something goes wrong in my next planned steps.

Tomorrow, I’ll close this out, report on how the clean install went, and reflect on the whole experience. Stay tuned…

Facebooklinkedin
Facebooklinkedin

X1 Extreme Still Gets No 24H2 Offer

I’m getting down to the bitter end, and it’s troubling me. The Lenovo ThinkPad X1 Extreme still gets no 24H2 offer from Windows Update. Indeed, it’s my only remaining 23H2 holdout. Looking at the 24H2 Known Issues List, I can’t figure out why. One outstanding possibility is the Synaptics WBDI fingerprint reader. But shoot, it’s dated 12/4/2022. I’m puzzled… OTOH, Copilot says that Intel Display Audio drivers include Intel SST audio support, and that’s a listed issue as well. It could be the blocker, and a good thing to know.

Waiting Impatiently, as X1 Extreme Still Gets No 24H2 Offer

Here’s what I’ve done to try to address potential update hold issues:

  1. Applied all Optional updates, including drivers
  2. Use Snappy Driver Installer Origin (SDIO) to update NVIDIA and Intel Display Audio drivers (restart required)
  3. Run comprehensive cleanup and integrity checks (PC Manager, DISM, sfc, etc.)

Still no joy, and no real clue on how to get over this hump. All in all, I’m both miffed and bemused that a 2018 vintage (8th-Gen) i7 PC is still lagging behind the update pack. I’m biting my tongue, holding back on forcing matters. I guess I have a perverse desire to see how long it’s going to take for WU to come through with 24H2.

Only time will tell, I guess! And that’s they way things go sometimes, here in Windows -World.

Additional Oddments Present on X1 Extreme

OK, so today is Patch Tuesday. I couldn’t get WU to present KB5046633, so I downloaded the self-installing update file (.msu). It took nearly an hour to get it up and going again, but the PC is now running 22635.4460. I suddenly understand that this PC is running the Beta Insider version (a surprise to me, or perhaps a “senior moment”). THAT explains why the update took so long: it had LOTS of work to do to fit it into the beta release…

Given that it’s running an Insider version anyway, I’ve decided to force matters using the 24H2 Installation Assistant. Here goes… Chunking through the GUI portion without issues, but took awhile (~ 45 minutes). First reboot to completion: same again. But I had no idea the Windows Installer could play such hopscotch with Insider Preview updates. I just flat thought it wouldn’t work. It’s actually kind of amazing. And, with many things in my Windows experience, the biggest surprises — like this one — are mostly self-inflicted.

There is a problem though: the Build Number currently self-reports at 26100.1742. This corresponds to the early October build for plain-vanilla 24H2, NOT the beta version. I just ran WU and updated again, and it still reports the same build number. Very strange! I’m going to build an ISO for 22100.2314 and see if it will repair install. This is getting decidedly interesting…

Facebooklinkedin
Facebooklinkedin

Fixing Winget Source Update Fail

In the past two-plus years that I’ve used WinGet nearly every day, I’ve seen one error show up occasionally. It reads “Failed in attempting to update the source: winget.” This means that the winget command is looking to its own repository of known packages to obtain the latest list but unable to complete that access request. You can see what this looks like at the top of the lead-in graphic. The error follows right after the initial WinGet upgrade… command. The bottom part of that same screencap (it’s two pieces stitched together, actually) shows what’s involved in fixing WinGet Source update fail.

Fixing Winget Source Update Fail Has Its Own Command

It should come as no surprise that there’s a WinGet Source command that takes various subcommands to add, list, update, remove, reset and export WinGet sources. You can read all about these items in this MS Learn item The winget source command.

As you can see at the bottom of the lead-in graphic I used WinGet Source Update -n WinGet for my fix. Basically, that tells Winget to “try again” with updating the default WinGet source named WinGet. It does so automatically when you run WinGet Upgrade… But it does occasionally fail. And when it does, most of the time the Source Update at the head of this paragraph fixes things.

When Might WinGet Source Update Itself Fail?

A variety of problems could provoke error messages from the WinGet Source Update -n WinGet command I used for my fix. It might be that the WinGet source is offline. It might be some kind of networking communication problem is preventing access. I’ve never had this happen, but it would no doubt produce a different error message to help point you in the right direction. WinGet is well engineered that way.

Indeed, WinGet is now an essential part of my admin toolbox. I simply can’t live without it anymore. Cheers!

Facebooklinkedin
Facebooklinkedin

Replacement Production PC Planning

All righty, now. I’m making the move to switch over from my now-ancient i7 Skylake B550 desktop to a Lenovo ThinkStation P3 Ultra. That has me jumping 6 Intel generations: the Skylake is a 7th-Gen beast; and the P3 is home to a Core i9-13900. I’ll also be switching over to a newish 46″ 2022 vintage monitor from a pair of 2017 Dell 27″ UltraSharps. As I get into the minutae of replacement production PC planning, big changes are afoot. It’s past time — and I’ll keep the Windows 10 box running to observe EOS and beyond — but I need to get production on a newer footing.

Comparing Cases: Replacement Production PC Planning

The lead-in graphic shows two PC cases side by side. On the left: the new SFF case on its side for the P3 Ultra. On the right, the Rosewill BlackHawk Ultra case (ordered from Newegg in 2015).  The picture is emphatically not to scale. By volume the P3 case would fit 4.77 times into the Rosewill case. The old beast is MUCH bigger.

But much of that size is meant  to accommodate as many as 8 3.5″ HDDs. By contrast, the P3 can accommodate 1 2.5″ SATA device and 2 M.2 NVMe SSDs. This is driving a lot of my pre-migration acquisition plans. Here’s the current iteration:

  • A modestly-priced Gen4 NVMe for the 2nd unoccupied slot in the P3 (estimated cost ~US$200).
  • 2 more 32GB DDR5-5600 SO-DIMMs to bring the unit up from 64GB to 128GB RAM. ($US150 or so).
  • If it will fit, I’ll use one of my Seagate 5 TB 2.5″ SATA drives in the unit’s SATA enclosure (it’s a tall drive heightwise: 15mm). If not, I’ll probably buy another 4TB SATA SSD (US$180 or so)

I’ve got everything else I need to bring the build together and start moving everything over. Max total budget looks like US$530 or so. Not too shabby. I’ll probably buy another copy of PC Mover to get everything moved over, unless I somehow get persuaded otherwise. It’s been my modus operandi for my last two production moves and seems to work reasonably well.

Stay tuned: more is surely coming … and soon, I hope.

Facebooklinkedin
Facebooklinkedin

Author, Editor, Expert Witness