Macrium Reflect X Rocks

I’ve known about this for a couple of months, but until last week I was under embargo, as they say in trade press lingo. Macrium Reflect X (version 10, so it’s a Roman numeral) went public on October 8, so now I can talk. Reflect X not only backs up ARM PCs — the lead-in graphic comes from my Lenovo ThinkPad T14s Gen 6 Copilot+ PC — it does so swiftly and surely. As you can see it created a 47.24GB full disk image backup in under two minutes (1:51). But there’s more…

Why Say: Macrium Reflect X Rocks

It’s not just way speedy (it would be two to four minutes faster than version 8 for the same setup on a Wintel PC), it’s also got other things going in its favor as well. ARM support is a big deal (it’s one of a very few tools that offers scalable backup for ARM CPUs). But Macrium Reflect X also offers:

  • Resumable imaging: Even after interruptions, image backup can pick up where it left off, with no data or time losses.
  • Open-source file formats: Reflect has published specifications for its .mrimgx and .mrbakx file formats so other programs can use them.
  • Enhanced filtering: Relect X can ignore files (e.g. contents of the Temp directory, caches, and other transient items that don’t need backing up) to reduce backup size and speed image capture time.
  • Improved compression and backup optimization techniques (see this video for a backup that goes from over 8 minutes for version 8 to under 2 minutes for version X).

Reflect X Does Come at a Cost

With this latest release, Paramount Software (the company behind Macrium Reflect) has changed its licensing approach. It’s moved over from perpetual licenses plus annual maintenance fees to a pure annual subscription model. Because I had 8 licenses (4 from a 4-pack perpetual license, 4 more from a version 8 subscription purchased last year) my upgrade costs to get into Version X were right around US$200 (approximately US$25 per license per year).

I think that’s a reasonable price, but understand that new buyers won’t get as good a deal. That said, the company runs occasional specials wherein they drop list prices anywhere from 25 to 50%. Best to keep an eye out for such, if you’re planning on getting into the latest Macrium Reflect X version. IMO, it’s completely worth it, and very much the best backup/restore/repair option available for Windows PCs. You can check out a free trial for 30 days.

Facebooklinkedin
Facebooklinkedin

USB4 Version 2 Devices Emerge

I knew they were coming, but not as fast as this. I just wrote a newsletter item for AskWoody. Entitled Using USB-Attached Windows media (subscription required for full access) it talks about issues related to USB ports, cables and devices in getting the best available performance from external storage. Thanks to reader comments on that story, I’m now aware that Amazon is selling 80 Gbps USB cables. That’s a clear signal that USB4 Version 2 devices emerge in the marketplace. Let me explain…

Links Show USB4 Version 2 Devices Emerge

Thank goodness the USB Implementers Forum (USB-IF) has changed its approach to labeling cables and devices. As you can see in the Amazon product shot that serves here as the lead-in graphic, it’s clearly labeled with speed (80Gbps) and wattage (240w) maxima. This beats the heck out of USB 3.2 Gen 1 or USB 3.2 Gen 2. Shoot! It even shows maximum video resolution (16K) supported, too — on the right-hand backside info.

So far, though, 80 Gbps USB-C support appears limited to cables, and cables alone. I can’t find any docks, hubs, monitors or storage devices that support that data rate anywhere. And, FWIW, CoPilot agrees that while such things are coming, they’re not yet out. Here’s its reply to a query about 80 Gbps monitors, for example:

USB4 with 80 Gbps is cutting-edge, but mainstream adoption often takes a bit of time. Up to this moment, no 80 Gbps USB4 monitors are commercially available. But hey, tech innovation is like a speeding train. They’re likely not too far off!

How Soon is RSN?

I’ve been reading tech journalism long enough to remember Jerry Pournelle’s excellent Chaos Manor column in BYTE magazine many, many years ago. (It ran from the early 1980s until 1998.) He used the phrase “real soon now” (sometimes abbreviated as RSN) to poke fun at breathless promises of emerging technologies on the cusp of availability. That’s exactly where 80 Gbps USB4 Version 2 stands at the moment: on its way, but not here yet. Stay tuned (and check out those nosebleed cable prices. Ouch!). Don’t get hit by any speeding trains, either…

Facebooklinkedin
Facebooklinkedin

24H2 Compatibility Holds Block WU

OK, then: thanks to Paul Thurrott, I think I know why my half-dozen Windows 11 23H2 PCs are getting no 24H2 offers. Among the half-dozen “Known Issues” that could bollix such an upgrade is an item named Fingerprint sensors might experience problems after a device is locked. And wouldn’t you know it: every one of my Lenovo laptops that could get the offer has one. And now I know: 24H2 Compatibility holds block WU from offering 24H2 to such PCs. You can see the issue label and first ‘graph of text as the lead-in graphic above.

When 24H2 Compatibility Holds Block WU…

One can always decide to upgrade forcibly if WU declines to make an upgrade offer. That’s what I did on the Lenovo ThinkPad P16 Mobile Workstation — which includes a fingerprint sensor and a Windows Hello IR camera. And indeed, it’s been running 24H2 since October 2 without issues or hiccups.

If you decide you want to upgrade ahead of WU offers, just be sure to make an image backup beforehand. That way, if anything goes sideways, you can reboot to WinRE and run a repair or rescue disk (Macrium Rescue Media, in my local cases) to restore that image. It takes 3-7 minutes to make such an image on my PCs, and up to 15 minutes to restore same. Well worth it IMO, to sidestep potential or actual trouble when needed.

In the meantime, I’m standing pat on my other Windows 11 23H2 PCs (both test and production units) waiting to see how long the compatibility holds will persist. If history is any guide, it’ll probably take another month or three before that happens. Stay tuned: I’ll keep you posted!

Facebooklinkedin
Facebooklinkedin

WinGet High Water Mark 14

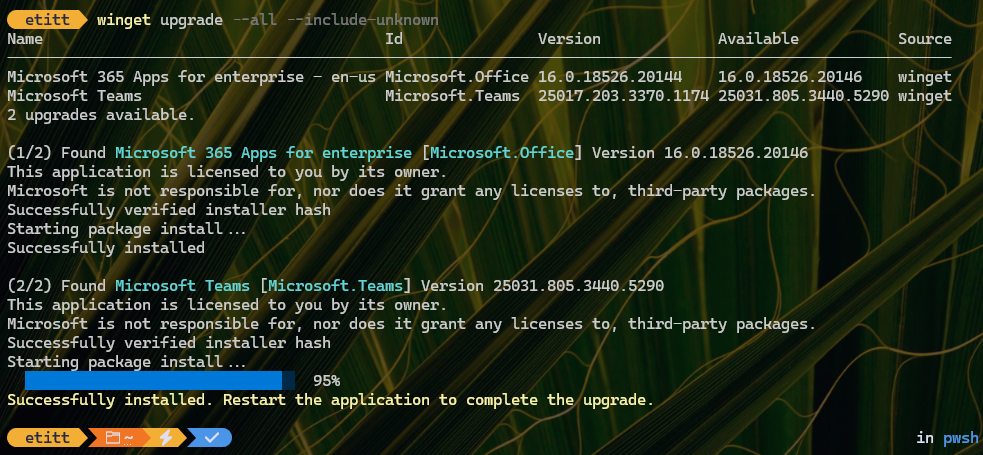
Holy mackerel. It’s not so much that I’ve been ungodly busy lately. It’s more like my ongoing visual impairment (I’ve had one lens replacement done, and go back in next Monday for the second) is limiting my activity to only what’s essential. Thus, while I’ve been distracted from my usual routine. WinGet’s been piling up updates. Today, I hit a WinGet high water mark: 14 updates pending, as you see in the lead-in graphic. Wow!

When WinGet High Water Mark (14) Hits, Then What?

Wait. Wait. And wait some more. The whole process took about 18 minutes to complete, much of which went to a Visual Studio update. Interestingly Windows Terminal did NOT come in at the end of the batting order, as it normally does. Why? Because WT needs restarting when it’s updated. But this time, Teams snuck in at the end, so it got updated before I could get WT restarted. Go figure!

As usual, my hat’s off to Demitrius Nelon (@denelon) and his WinGet team, for their stellar work in making updates safe, easy and routine. I’m a rabid partisan on their behalf, and recommend this tool unreservedly to all charged with keeping Windows PCs current and correct.

Best of all I got a clean bill of health from WinGet after a single run: “No installed package found matching input criteria.” That’s WinGet speak for “everything is up to date.” Good-oh!

Facebooklinkedin
Facebooklinkedin

Uncovering Create Dev Drive Gotcha

Yesterday, I blogged about a real, but apparently small, performance boost for ReFS volumes vis-a-vis NTFS ones. While I was undertaking that testing, I switched a USB4 NVMe from NTFS to ReFS to keep everything else the same. I’m pretty sure that’s the best way to isolate file system differences because port, cable, enclosure and drive all remained the same. Along the way, I found myself uncovering “Create Dev Drive” gotcha. Let me explain.

Uncovering Create Dev Drive Gotcha:
Two Create Dev Drive Buttons

If you attach an unallocated drive to a Windows PC, then navigate to System > Storage > Disks & Volumes, you’ll not only see the “Create Dev Drive button” at the top of that UI pane as shown in the lead-in graphic. Should you scroll down to said unallocated drive, you can evoke a different Create Dev Drive button by clicking on the down-caret for “Create volume” like so:

Here’s the gotcha: if you use the upper Create Dev Drive button, everything works as it should. But if you use the lower one, the create operation fails every time, and reports it fails because the drive is read-only. Here’s what the Settings UI looks like after that error:

Something odd and interesting apparently happens when you use this button instead. I’m reporting this to Feedback Hub. Here’s that link, if you’d care to upvote: Create a dev drive button doesn’t work.

Clean-Up and Fix

Once you do this to yourself, you need to clean things up before you can set things up correctly using (only) the upper “Create Dev Drive” button. You must open Disk Management and delete the RAW volume you’ll now see there (right-click, and select Delete Volume… from the pop-up menu). Then you can return to Settings > System > Storage >Disks & volumes and do it right this time. Enjoy!

One more thing: the Dev Home app is a great place to get started when creating an ReFS volume. It does the Settings navigation for you and drops you right where you want to be. Just remember: it only works when you select the upper, general “Create Dev Drive” button, NOT the lower, device-specific “Create Dev Drive” button. I have no idea why this is so, but that’s the way it seems to work at present. Mysteries like these are what keep me forever fascinated with the wrinkles in Windows-World.


Facebooklinkedin
Facebooklinkedin

Exploiting ReFS Speed Advantage

I’ve been reading articles online about a supposed speed advantage for the Resilient File System, aka ReFS, in Windows. But I’m observing some caveats when it comes to exploiting ReFS speed advantage. Let me use a speed check from the Lenovo ThinkStation P3 Ultra as an example, mounted in a USB 3.1 Gen 2 (10 Gbps) NVMe enclosure. Quick examination makes the point nicely: one sees no difference vis-a-vis NTFS. Indeed the speeds shown are entirely typical of any UASP devices at nominal 10 Gbps speeds.

Exploiting ReFS Speed Advantage Requires 20 Gbps or Higher

Do the math: 982.75 MBps = 7,862 Mbps = 7.67 Gbps. That’s about as fast as a USB 3.1 Gen 2 (10 Gbps) device can go in a real-world situation, such as running the CrystalDiskMark benchmark. My basic point, therefore, is this: Don’t switch to ReFS for performance gains unless you have a device that can deliver 20 Gbps (or higher) performance. That means USB 3.2 Gen2 (20 Gbps) or USB 4/Thunderbolt 3 or 4 (40 Gbps).

So I tried the same enclosure, same SSD, same cable (all of these factors count) with both ReFS and NTFS. I found it easiest to use the “Create a Dev Drive” option in the Dev Home app to start the former. Disk Mgmt worked find for the latter. Here are those results, which do show ReFS has a speed advantage — but it’s pretty small.

If you compare the big block write speeds (upper 2 left cells) that’s where the advantage is noticeable. For the rest of the cells, it’s barely there.

True, But Nugatory

I’m going to have to mess around with faster SSDs and see if that helps. But so far, I don’t see the uptick as big enough to be worth a lot. That said, as 24H2 goes final I should try again. The P3 Ultra isn’t getting that update offer yet, and that’s usually for good reason. If this changes, I’ll update this post accordingly. Right now, it’s mostly a ho-hum level of added performance.

OK, so I tried it on a different PC — a ThinkPad P16 Gen 1 Mobile Workstation — running 24H2 preview version. It shows modest improvements over the P3 Ultra but nothing spectacular. I’ll keep checking and reporting back here. It’s possible there’s more to see than I can tell just yet. I’m going to run a Macrium Reflect Backup next…


Facebooklinkedin
Facebooklinkedin

Unbearable Windows 10 Weirdness: Copilot + Edge

When is a Windows app not really a fully standalone piece of software? When it runs as an extension of the Edge environment. To be more specific: when it’s the Windows 10 version of the MS Store Copilot app. I found myself in login lockout because Copilot was using my base-level work MSA as its login account, and it only works with so-called “personal MSAs.” Only after a fair bit of searching did I discover I needed to change my default Edge profile to get Copilot to run. With apologies to Milan Kundera, I see this as a case of unbearable Windows 10 weirdness: Copilot + Edge, when the latter comes as a kind of unexpected surprise.

Deciphering Unbearable Windows 10 Weirdness: Copilot + Edge

My real issue was that I suddenly couldn’t log into Copilot. It said I was using a work MSA (it’s the base of my current production login account, in fact). It offered a “Switch account” option, too. But try as I might, I got exactly nowhere working through the MSA interface via Copilot. It kept looping back to the same place, and I remained stuck.

Naturally, I turned to Google using “can’t login to Copilot” as my starting point. Only after some serious rooting around in MS Answers and other similar online communities did I find a fix. It showed up in this MS Community thread Windows Copilot Is Not Working. Therein a self-professed “IT technician” observed that “you have to delete your Edge profile and then it works fine.”

That’s not exactly true. But it is an important pointer in the right direction. If you define or switch away from a work or school MSA to a personal MSA it works that way, too. I had to set up a personal MSA profile for the account shown in the lead-in graphic, then switch to same. After that, no more problems circling around my work MSA with no traction. To be more direct: after the switch, the Copilot app resumed working.

When they say “The Devil is in the details,” I am pretty sure the MSA stuff falls under that rubric. And for what it’s worth, so also does the MSA vis-a-vis MS Teams logins. Just another day in the paradisaical paradoxes of Windows-World.

Facebooklinkedin
Facebooklinkedin

WinGet Discord Update End-Around

I absolutely love Microsoft’s built-in package manager WinGet. But occasionally things happen when updating application that it can’t (or won’t) handle. As you can see in the lead-in graphic, it cheerfully discloses in red that Discord “…cannot be upgraded using winget.” Indeed, its own built-in update facility did nothing to get me to version 1.0.9165. Thus, my only shot at a WinGet Discord update end-around was the tried-and-true uninstall-reinstall maneuver. That worked, as you can see…

Why Use a WinGet Discord Update End-Around?

Short answer: because it worked. Apparently, it’s uninstaller is smart enough to leave user account information alone. Even though I uninstalled the old version and then installed the new one, it carried over anyway. I’d been worried I’d have to set accounts back up, but no. Everything came up as it should’ve even after an “out-with-the-old, in-with-the-new” operation had completed.

I’m counting myself lucky in this case. There are plenty of other applications that don’t ask if you want to keep personal, account and config info. Then they cheerfully wipe all that stuff out as part of the uninstall process. That makes getting back to where one started a little more time-consuming, especially when a reinstall requires account, password, and possibly even other information to complete.

What’s with Discord’s Pinned Status Anyway?

Notice my attempts to unpin Discord reported “There is no pin for package Discord” (line 7 in the intro graphic). In the past, WinGet has often reported it can’t update Discord because the app is pinned. That’s an experimental feature in WinGet that prevents ordinary syntax for updates from working on certain apps.

Contrary to expectations, though, Discord wasn’t pinned. Yet WinGet couldn’t update it, either. Because the built-in updater didn’t do anything when I tried it (right-click on the notification area icon, then select “Check for updates…” in the resulting pop-up menu), I didn’t have a lot of other options. Thus, I’m grateful that the remove-replace approach did the trick. As you can see from the name of the package downloaded, I did wind up with version 1.0.9165. That’s just what I wanted.

Good thing one can sometimes get lucky here in Windows-World. Glad to have this behind me with no apparent ill effects.

Facebooklinkedin
Facebooklinkedin

Assistant Handles 24H2 Upgrade

OK, then: I read this morning that MS dropped the “official” 24H2 release yesterday. “This time,” I thought to myself, “I’m taking a different approach.” From the Download Windows 11 page, I grabbed the Installation Assistant. Prosaically enough, it’s named Windows11InstallationAssistant.exe. File properties show today’s date for creation and modification, so I’m hopeful it will get me to 24H2. But I’m still wondering if the assistant handles 24H2 upgrade as expected, or not. Right now it’s going into its initial restart.

Deciding if Assistant Handles 24H2 Upgrade

If you look at the lead-in graphic it shows the Assistant in phase 3 of the upgrade process — namely 75% through installing the new stuff. After this got to 100%, I rebooted that PC (Lenovo ThinkPad P16 Gen 1 Mobile workstation). It’s now 30% through the post-reboot install process (white  text, spinning arrow, black background).

…Aaaaaand then, it stayed at 30% long enough for me to finish a round of Backgammon waiting for it to complete. But complete it did, only to drop into the OOBE portion of the install next. A couple of minutes later, I had a Windows 11 desktop. But which version is it? Here’s what winver says:

Looks like the Installation Assistant is a workable way to get to 24H2 from 23H2, if you’re of a mind to do that. And it also looks like indeed the upgrade is officially out. I’ll go some exploring and report my findings in tomorrow’s blog post. In the meantime you could try it yourself to see what happens… Cheers!


Facebooklinkedin
Facebooklinkedin

Onscreen Keyboard Lacks Copilot Key

Consider this: Copilot itself tells me that my ThinkPad T14s Gen6 Copilot+ laptop should show a Copilot key on its onscreen keyboard. It definitely has one on its physical keyboard: I can see it right now, plain as day. But none of the fixes Copilot recommends gives me such a key, nor can I access settings for that keyboard either. As you can see in the lead-in screencap, the onscreen keyboard lacks Copilot key (it would normally appear between Right-Alt and Right-Ctrl on the bottom row). Sigh.

Does It Matter If Onscreen Keyboard Lacks Copilot Key?

Not really, because the Copilot icon is pinned to the taskbar by default. I’ve always been able to open it with a single click anyway. But what I find interesting is that Copilot itself says there SHOULD be such a key on the onscreen keyboard. It’s clearly not visible.

Copilot also says I should be able to access Settings for the onscreen keyboard as well. But when I open the On-screen Keyboard menu, it shows me only options for Restore, Move, Size, Minimize, Maximize and Close. No Settings anywhere, nor does right-click help, either.

It Gets More Interesting at MS Learn

So I truck over to MS Learn to examine its article Get to know the touch keyboard. It offers versions for both Windows 10 and 11 (the preceding link is for 11, because it’s the only one with Copilot key capability AFAIK).

There’s an interesting sentence in this document though. It says “Select the keyboard settings icon in the upper-left corner of the touch keyboard to view and switch between options.” That’s the same thing I’ve been doing to try to access Settings. I don’t see the things it tells me I should see.

I’m left to draw one speculation: perhaps Lenovo didn’t update the onscreen keyboard for Windows 11 (24H2 or even earlier versions). I jump onto the P16 Mobile Workstation (23H2 Build 22631.4169). It shows me the exact same onscreen keyboard, with the same missing items. And indeed, it’s identical to the onscreen keyboard I see in Windows 10, too, with the same top-left icon menu and behaviors. Now, I think I have a clue…

Emailing Lenovo to ask about this. If I learn anything interesting I’ll be back in touch in this post… Isn’t that just the way things sometimes go, here in Windows-World? You betcha!

Facebooklinkedin
Facebooklinkedin

Author, Editor, Expert Witness