Category Archives: Windows 10

USB Flash Drive Follies 4th vs 11th Gen

Just yesterday I got videotaped for an upcoming session at SpiceWorld 2021 Virtual. One of the subjects I covered for HPE covered “the aging of technology” and what that does to IT efficiency, security and resiliency. That got me to thinking. “How has USB fared as faster busses, faster connections, and faster media have evolved over the past while?” I decided to conduct some USB flash drive follies 4th vs 11th gen systems to see what changed.

What’s Up With USB Flash Drive Follies 4th vs 11th Gen?

It turned into a tale of two drives, two systems, and three means of attachment. These were as follows:

Drive 1. Sabrent mSATA SSD enclosure with Samsung 950 EVO mSATA 500GB SSD USB 3
Drive 2: Fideco NVMe SSD enclosure with Sabrent Nano NVMe 1TB SSD USB 3.1
System 1: 2014 Vintage Microsoft Surface Pro 3 (i7-4650U, 8 GB RAM, USB 3)
System 2: 2021 Vintage Lenovo ThinkPad X12 (i7-1180G7, 16 GB RAM, USB 3.2/Thunderbolt 3)

The three means of attachment were USB 3, USB 3.1 (both using Type A connectors) and USB 3.2 using USB-C.

Technology Trumps Bus Speed

First things, first. There’s simply no comparison between mSATA and NVMe devices. It’s an order of magnitude from the older mSATA SSD technology to the newer NVMe. That tells me — and it should tell you — it’s simply not worth buying mSATA devices anymore. If you’ve still got them (I’ve got half-a-dozen) you can still use them.

The aging effect shows very strongly in the mSATA results. They stay pretty much the same across both systems and across all USB connection types (3.0, 3.1, and 3.2). That’s because the mSATA enclosure is either 3.0 or 3.1 (I just checked: it’s 3.0).

Things get more interesting with the NVMe devices. They run at about half-speed when there’s no UASP support on the PC (as with the Surface Pro). Amusingly, I got the same results from my Belkin Thunderbolt 3 dock with a USB 3.1 cable plugged into the NVMe enclosure. But when I used a USB-C cable directly into a USB-C port on the ThinkPad X12 I got big-block read/write speeds of ~1050 MBps read/~1004 MBps write from the NVMe flash device. Compare that to ~455 read/~457 write through the Thunderbolt dock for the same device.

Very interesting! This tells me that USB-C/Thunderbolt 3 or better drive enclosures, coupled with PCIe x3 or better NVMe SSDs in those enclosures deliver the fastest external drive storage I can use today (on my newer systems with USB-C, of course). And it looks like the performance boost from using the fastest possible port and connection is also very much worth it. Good to know!

This just makes me more interesting in acquiring a Thunderbolt 4 dock to see if it can extend that performance to secondary ports (right now, I get best speed only from USB-C ports on the X12, of which there are only 2).
Facebooklinkedin
Facebooklinkedin

Windows 11 Gets Snipping Tool Makeover

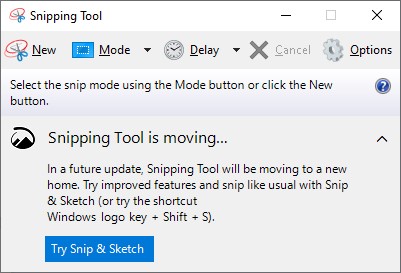
With the latest Build of Windows 11, 22000.132, several new app versions have appeared. This includes a new version of the Snipping Tool. In fact, Windows 11 gets Snipping Tool Makeover that combines this older program with the newer Snip & Sketch. What’s interesting about this update is that MS has advised Snipping Tool users to switch to Snip & Sketch for some time now. Take a look at its home screen in Windows 10, where it says “Snipping Tool is moving…”

Windows 11 Gets Snipping Tool Makeover.old-version

The Windows 10 version still warns users it’s “moving to a new home,” and exhorts them to “Try Snip & Sketch.”

If Windows 11 Gets Snipping Tool Makeover, Now What?

The new combined tool calls itself Snipping Tool. But it works more like Snip & Sketch than it works like the Windows 10 Snipping Tool. It still does the job, though. I can use it without any learning curve, because I’ve long switched between both Snipping Tool and Snip & Sketch, as well as TechSmith’s SnagIt tool. All have their unique strengths, which I’ll play to as I need them.

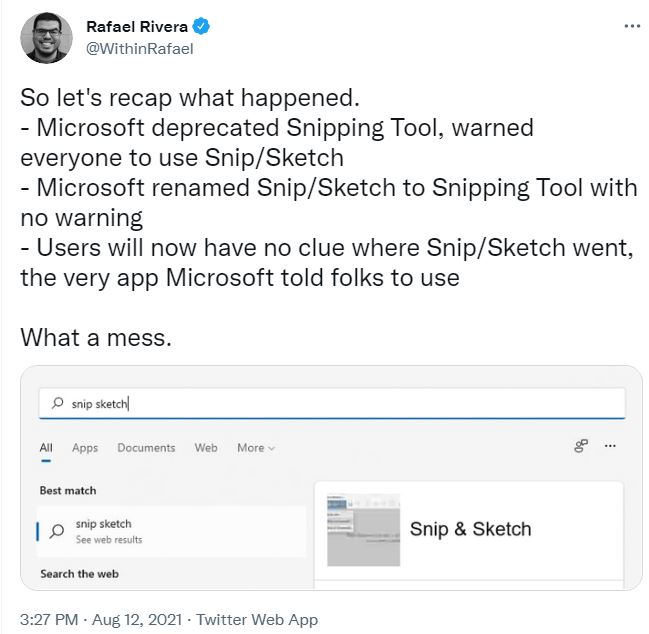
The change is a little odd though, along the lines of “one step forward, one step back, one step sideways.” Long-time Windows developer and gadfly Rafael Rivera got this right in an August 12 tweet on this subject, to wit:

Windows 11 Gets Snipping Tool Makeover.rivera-tweet

Rivera’s comments are spot-on for Windows users who may not catch this change of course.

Doesn’t life sometimes get interesting, here in Windows-World? I’m pretty sure most people will figure this out, but it can be perplexing to keep up with the changes sometimes. Count on me to keep you informed, please, as I also try to see the humorous side of this wonderful game.

Facebooklinkedin
Facebooklinkedin

WinKey+P Powers Display Projection

Sometimes, it isn’t until things go terribly wrong that one appreciates the power of simple syntax. Check out this TenForums post, which explores the impact of the WinKey+P gone wrong: Win p key  pressed. Because WinKey+P powers display projection, a user’s nephew’s wrong menu choice made him think he’d lost access to 2 of his 3 displays in a multi-monitor configuration. Not so!

WinKey+P Powers Display Projection — Usually Into a Menu

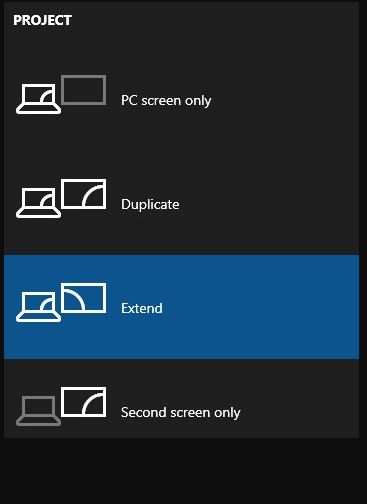
Normally, when you strike Winkey+P on a Windows 10 or 11 PC, you’ll get a pop-up menu like the one shown in the lead-in graphic. It highlights the current setting — Extend in my case, because I have my desktop extended over a pair of Dell 2717 monitors. Overall, it offers these four settings:

  • PC Screen only: (tantamount to striking WinKey+P once)
  • Duplicate: copies primary monitor to all other monitors (select by striking WinKey+P twice)
  • Extend: extend the desktop across all available monitors (select by pressing WinKey+P three times)
  • Second screen only: use only Display #2 for graphical output (select by pressing WinKey+P four times)

Our hapless user’s nephew struck WinKey+P once, which apparently forced his PC into “PC Screen only” mode. On my PC, however, I got the menu shown above, and was easily able to move among the selections using my mouse.

When Key Combos Go Wrong, Try More!

Interestingly, advice on TenForums about what to do in this situation is spot on. It reads “Did you try pressing ‘WinKey+P’ again? Sometimes a key acts like an ‘on off’ switch.” In this case, our user wanted to press WinKey+P 3 times to get to the extend option through the keyboard. There’s no discussion of using the menu instead, which I find infinitely preferable.

For some odd reason I’m reminded of one of William Blake’s epigrams from his Proverbs of Heaven and Hell:

The fool who persists in his folly soon becomes wise.

This turns out to be good, if oblique, advice when dealing with unwanted WinKey key combinations. As for myself: I’d have looked it up online, and found all the insight I ever could have wanted, and more.

Facebooklinkedin
Facebooklinkedin

Discretionary New Intel 30.0.100.9805 Graphics Driver

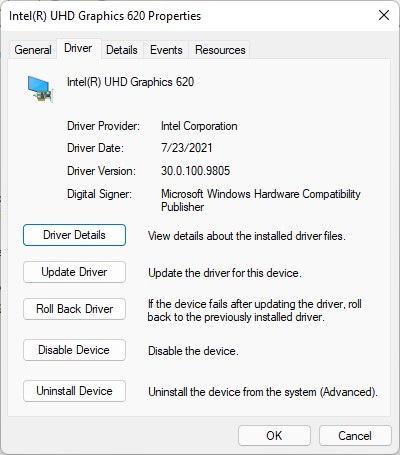
This morning, I learned about a DCH graphics driver from Intel, which adds Windows 11 support. This is the discretionary new Intel 30.0.100.9805 graphics driver. It’s shown in the driver properties for the UHD 620 integrated graphics on my Lenovo ThinkPad X380 Yoga in the lead-in graphic. This driver installed quickly and easily on that test PC, albeit with a self-inflicted gotcha. Let me explain…

Why Say: Discretionary New Intel 30.0.100.9805 Graphics Driver?

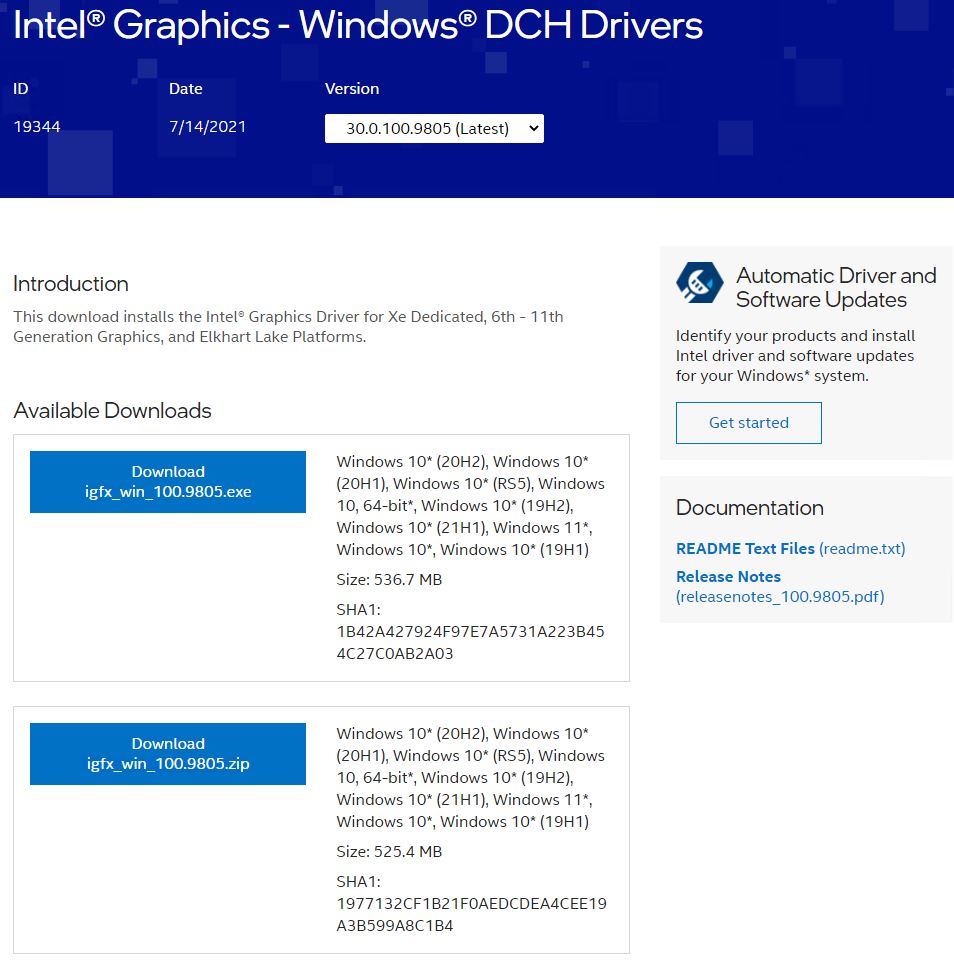
Normally, graphics and other key Intel drivers come either through Windows Update or from the Intel Driver & Support Assistant (DSA). This time, things are a little different. I imagine it’s because this driver specifically targets Windows 11 (though it also works on Windows 10) that Intel hasn’t yet targeted it within DSA. Instead one must visit the Intel Graphics – Windows DCH Drivers page. There one must select the 30.0.100.9805 (Latest) version, and download either an .exe or .zip based installer. Here’s what it looks like online:

Discretionary New Intel 30.0.100.9805 Graphics Driver.download

The download page offers .exe and .zip options.
[Click on image for full-sized view.]

Who Should Grab This Update?

All Intel CPUs 6th generation (Skylake) or newer are on Intel’s “covered platform list” for this upgrade. It works on Windows 10 releases 1809 through 21H1, and on Windows 11. Laptop and tablet users should be aware that OEMs sometimes offer customized Intel graphics drivers through their own update channels. By switching to this Intel update, you forgo those customizations. Some contortions — such as uninstalling the Intel drivers and software — may be required if you want to switch back to OEM drivers later on.

The gotcha I encountered in installing this driver is mostly self-inflicted, but worth reporting anyway. I started the install process through an RDP session from my production desktop. About half-way into the install, the process hung and didn’t advance further. When I ended the RDP session, and logged into the X380 Yoga locally, it picked back up and ran to completion. Sometimes, driver install MUST run locally to work properly. Apparently, this Intel driver requires a local session to run all the way through. By comparison, I did use DSA to update the PC’s LAN and Bluetooth drivers via RDP just before starting the display adapter update for the UHD 620 without issues.

And indeed, that’s the way things went today, here in Windows-World. Cheers!

Facebooklinkedin
Facebooklinkedin

Windows 10 Build 19043.1165 Install Button

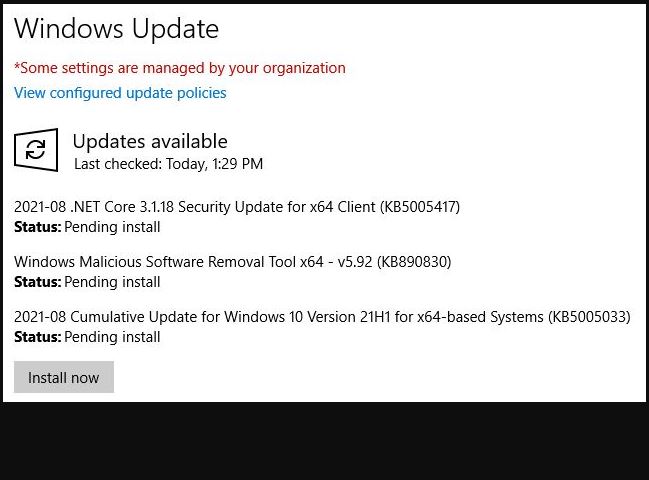
Here’s an interesting departure from the usual. Today, August 10, is Patch Tuesday. That means it’s the second Tuesday of the month, and normally when Microsoft pushes updates out on its normal monthly cycle. But when I checked for updates, after they downloaded, the process paused. As you can see in the lead-in graphic, I had to push a Windows 10 Build 19043.1165 install button to make the install continue. What’s up with that?

When Is a Windows 10 Build 19043.1165 Install Button Typical?

Normally, one doesn’t see such things unless there’s some kind of preview element in the update mix (and rarely, if ever, does that hit as part of Patch Tuesday offers). That said, there is a KB5003791 Enablement Package update out today to take 2004, 20H1 or 21H1 to 19044 (21H2) build levels. Perhaps the button shows up because of that item? Interestingly, it was not offered to my PC (nor should it have been, as it is an Insider Preview element).

Even more interesting, I saw the update process cycle around for the KB5005033 item on my production desktop PC. That is, it counted up to 100%, stayed there for a while, then dropped back into the 60s and counted back up to 100% a second time before showing the usual “Restart now” button upon completion. That’s not exactly unheard of, but it is a little unusual. Thus, Patch Tuesday brings me a little unexpected excitement today.

Here’s what came through today, as part of the update package:
1. KB5005417 .NET Core 3.1.18 Security Update
2. Windows Malicious Software Removal Tool KB890930
3. KB6005033 Cumulative Update for 19043.1165
I don’t see anything in there that would normally induce the “Install now” button to appear. But as the lead-in graphic shows, I got one anyway.

And that’s the way things go here in Windows-World sometimes. Go figure! I’m clueless…

Facebooklinkedin
Facebooklinkedin

Remote Desktop App Holds Cloud PC Keys

OK, then. I’ve finally had a chance to read and learn a bit more about Microsoft’s Cloud PC offering. Indeed, it’s now finally available for subscription and use. I did not luck out and land a free trial (the offer was swamped beyond capacity within minutes of opening). Over at ZDNet, however, Ed Bott ponied up for a subscription. He reports on his experiences working with the Windows 365 Service, built around Cloud PC. His “Hands-on” story appeared yesterday and includes lots of useful info. Not least amongst its nuggets of wisdom and observation is the notion that the Remote Desktop App holds Cloud PC keys.

Why Say: Remote Desktop App Holds Cloud PC Keys?

Bott describes the “Open in Browser” button for Cloud PC as  “the simplest way to begin working with” its capabilities. His story shows useful screenshots and example. In fact, it’s well worth reading from end to end.

In that story, Bott further opines as follows:

“The browser is fine for casual connections, but you’ll have a better experience using Microsoft’s Remote Desktop client, which is available for download from a separate page on the Windows 365 dashboard. Apps are available for Windows, Mac, iOS, and Android.”

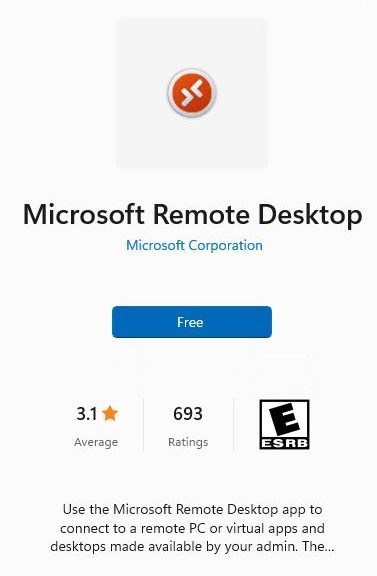
I wrote a story for ComputerWorld earlier this year called “Windows 10’s Remote Desktop options explained.” Its conclusion starts with the heading “The future of Remote Desktop.” In that section I put forward the guess that “URDC [the store app for Remote Desktop depicted as the lead graphic here] and MSRDC [an enterprise version of the same tool] will become much more important and capable clients than they are right now.” I also expressed the idea that this might spell the waning days for the old Remote Desktop application (mstsc.exe). I believe Mr. Bott’s story just proved me right, to my great relief.

What Remote Desktop Brings to Cloud PC

In short, it makes interacting with Cloud PC just like any other remote PC session. It permits full-screen (and even all displays in multi-monitor set-ups) operation and works just like desktop access over the network. Of course, that’s what it is, so this is no surprise.

What is surprising is what Bott report about Cloud PC performance. Not much lag, with only “momentary display glitches” for graphics-heavy apps, and “general productivity apps like Office perform just fine.” His only compatibility issue came when trying to connect to a Gmail account with Cloud PC (the server didn’t accept Outlook authentication dialog boxes, but Bott did access the account using the built-in Mail app and via MS Edge).

Bott’s economic analysis of Cloud PC is also interesting. At a minimum of US$20 per month (single vCPU, 2 GB RAM, 64 GB storage) — useful for what he describes as “only the most lightweight tasks” — it offers no significant value-add for home or small business users. For larger businesses, though, I think he observes correctly that the simplicity of Cloud PC (operable from any Internet-attached device including PCs, tablets and smartphones) could appeal to and might even cost less than deploying a managed and secured company-owned PC to employees at home (and other remote locations). It also lets remote users work from familiar local platforms already to hand and might even boost productivity.

So far, I very much like what I’m seeing and reading about Cloud PC. But that’s not the same as trying it out for oneself.

From Reading About to Hands-On

Next, my goal is to figure out how to get involved with Cloud PC myself. I’ve already floated the question with the Windows Insider MVP program if they can’t make  such subscriptions available as part of the award benefit.

But just because I think they should, doesn’t mean they will. In that case, I’ll have to carefully examine the family exchequer to see if it can float the $492 a 1-year subscription for a suitably equipped Cloud PC would cost. By hook or by crook, though, I want in! Stay tuned: I’ll keep you posted…

Facebooklinkedin
Facebooklinkedin

Updates Require Balancing OCD Against Time

I can’t help it. Tinkering with my PCs gives me great joy. I also love to check up on them at regular intervals. I work to keep the OS, drivers, apps and programs current and correct. But I learned long ago that it takes time — often, too much time — to attain absolute perfection. Or perhaps I should say “total update coverage” instead? Indeed, updates require balancing OCD against time. One must know when to quit or give up looking for elusive elements. Thereby hangs today’s tale…

If Updates Require Balancing OCD Against Time, How Much Is Too Much?

I use a couple of good tools to help me track non-OS updates for programs. The Store does a good job of keeping up with most apps. WU does well enough by me with the OS. For drivers, I rely on reading TenForums and ElevenForum to keep up. I also hasten to add that Windows 10/11 both do a good job of handling drivers on their own. That means I concentrate on Nvidia GPU drivers, output from the Intel Driver & Support utility, news about Samsung NVMe drivers, Realtek UAD audio drivers, and — occasionally — Thunderbolt drivers. The rest of them take pretty good care of themselves, though I do rely  on DriverStore Explorer to keep an eye on them, and to purge duplicates and oldies from time to time.

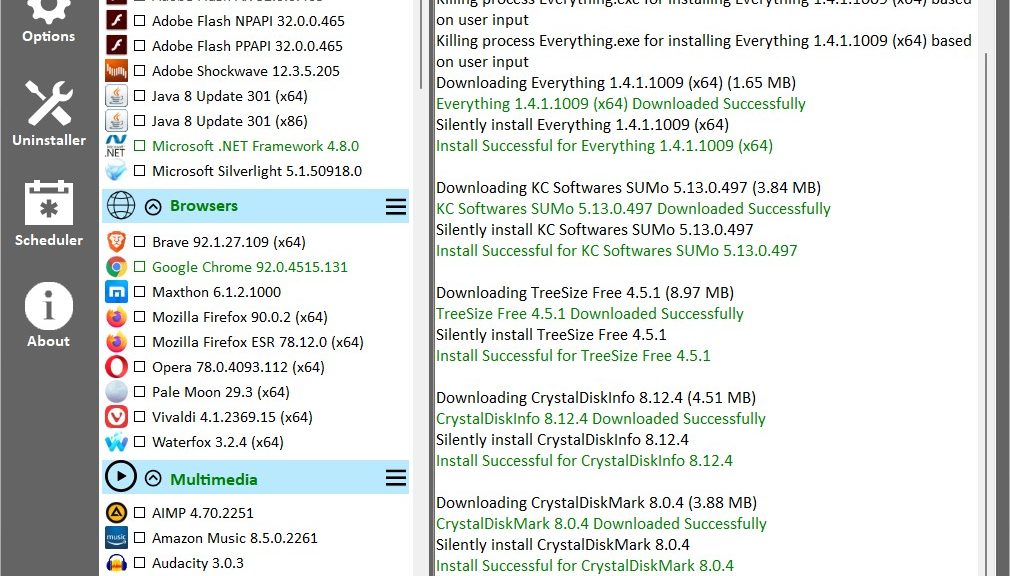
I use the free and excellent PatchMyPC Home updater to handle all the updates it can find. (It provides this story’s lead graphic, in fact.) Why? Because it is set up to silently install updates without requiring human intervention and action. I like that. But I also use the free version of KC Softwares’ Software Update Monitor (aka SUMo) because it finds more apps and programs than PatchMyPC does. That said, I wouldn’t recommend paying for its commercial version because their behind-the-scenes engineering for downloading updates is hit or miss. And the misses happen too frequently for me to want to pay US$30 per PC to grouse about them further. If SUMo finds a program that needs updating, you need to get and apply the update yourself.

Where to Draw the (Update Search) Line

In working with these tools, I’ve learned to spend no more than 10 minutes trying to get any individual item updated. Sometimes, SUMo reports updates available that I just can’t find. For example, SUMo has had me chase DolbyDAX2DesktopUI versions on multiple occasions that I can find nowhere online (though items that present themselves as valid links do pop up they lead only to the Dolby.com homepage).

After one or two revolutions when going around in circles, I’ve learned to give up. I also don’t worry about minor version discrepancies, especially when I know PatchMyPC will catch up to SUMo soon. Case in point: I just updated one of my Lenovo X380 Yoga ThinkPads. PatchMyPC took CrystalDiskInfo to version 8.12.4.0 only for SUMo to tell me I needed to upgrade it to 8.12.5.0. I know if I wait a while, PatchMyPC will get me there without me having to visit CrystalDewWorld, and then download and run the installer myself. So, that’s where I draw the line to avoid too much lost time. You can, of course, draw lines as you see fit.

According to eminent anthropologist Gregory Bateson, the 18th century British poet and artist William Blake said “Wise men see outlines and therefore they draw them.” Blake also said: “Mad men see outlines and therefore they draw them.” Wise or mad, I think drawing lines is an important part of managing how one spends time and effort. Don’t you?

Facebooklinkedin
Facebooklinkedin

Dev Channel Downgrade Raises Flightsigning Mystery

OK, then. Yesterday I posted here about the conditions under which Insiders can downgrade from Dev Channel to Beta or Release Preview channels. Today, there are reports that Insider Preview stuff may go missing in SettingsUpdateWindows Insider Program if you follow that advice. At the same time MS Insider Team member Eddie Leonard has posted a fix for same at Answers.Microsoft.com. As you’ll see in his step-by-step fix advice below, the Dev Channel downgrade raises Flightsigning mystery because it’s key to that fix. Here are those details, quoted verbatim (I changed the text color to red on the key term to make it stand out):


1. Click on Start
2. In the search box, type cmd
3. In the lower right of the search results, under Command Prompt, click Run as Administrator
4. On the UAC prompt, click OK
5. At the elevated command prompt, type: bcdedit /set flightsigning on
6. Press Enter
7. At the elevated command prompt, type: bcdedit /set {bootmgr} flightsigning on
8. Press Enter
9. Reboot the device

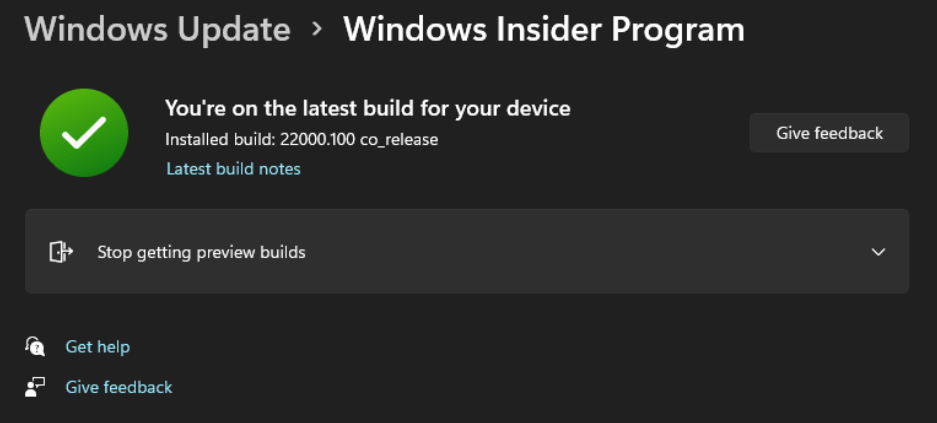
How do you know if you’ve got this problem? You’ll see a screen that looks like the one from the lead-in graphic (also cribbed from Eddie’s Answers Fix info). Notice that only the “Stop getting preview builds” choice appears, when you should also see choices for “Choose your Insider settings” and “Windows Insider account.” The preceding fix explains how to get those items back, and restore Windows Insider Program capabilities along the way.

Researching Dev Channel Downgrade Raises Flightsigning Mystery

Of course that raises more questions — namely:
“What is flightsigning?”
“Why must it be turned on (twice)?”
I have no answers for these questions just yet, but I’m digging in. There’s a 2014 TechNet article “What is flightsigning?” It raises the question and provides the glimmer of an answer from bcdedit tool help “Allows flight-signed code signing certificates.” It also says “These are certificates used during the Windows development process and chain to an internal root.” Documentation simply says:

“…this command will enable the system to trust Windows Insider Preview builds that are signed with certificates that are not trusted by default:”

I’m guessing that downgrading from Dev Channel may somehow alter these certificate checks. Further, I believe Beta and Release Preview channels must have them turned on by default. Switching from Dev to lower channels requires them to get turned back on and enabled in the boot manager before Insider Program info can show up.

But details are sparse and documentation terse and limited. The BCDEdit command-line options at MS Docs mentions flightsigning only in passing (see “Changing entry options”). Even the GitHub info from MS Docs doesn’t say much about flightsigning. There’s also a tantalizing post at OSR.com about “New test signing options.” But not a lot of hard or explanatory info.

I’ll keep digging. But if anybody has other sources or info, please comment or use the website’s Contact form to send me an email. All input gratefully received.


Facebooklinkedin
Facebooklinkedin

Downgrading Dev Channel Is Now Sometimes Possible

Here’s an interesting tidbit from the July 29 version of Microsoft Docs “Deeper look at flighting.” And of course, as the lead sentence reads “Flighting is the process of running Windows Insider Preview Builds on your device.” In an amendment to prior policy, downgrading Dev Channel is now sometimes possible for test PCs or VMs. Let me explain…

What Downgrading Dev Channel Is Now Sometimes Possible Means

The key to switching without requiring a clean re-install (the prior policy in all cases) is that the Dev Channel must have the same or lower Build number than the target channel. That means switching from Dev Channel to another channel requires users “to find your current build number and compare it to the current build number in the channel you wish to switch to.” Build numbers appear in the output from winver.exe, and in Start → Settings → System → About.

I quote the step-by-step process verbatim from the previously linked flighting document:

  1. Open Settings > Windows Update > Windows Insider Program.
  2. Select Choose your Insider settings.
  3. Select the desired channel, either Beta Channel (Recommended), or Release Preview Channel.
  4. The next time you receive an update, it will be for your new channel.

This will make the process of downgrading channels simpler. It also provides an “exit strategy” for Dev Channel PCs. Prior policy insisted that the only escape from Dev Channel could be a clean re-install of some other Windows version. The other channels have always offered the option to drop back to production/RTM versions when they become available. This extends that out to Dev Channel, but requires two steps to get there: first drop back to Beta or Insider Preview, then drop back to production/RTM. Good stuff!

Why Am I Telling You This … Now?

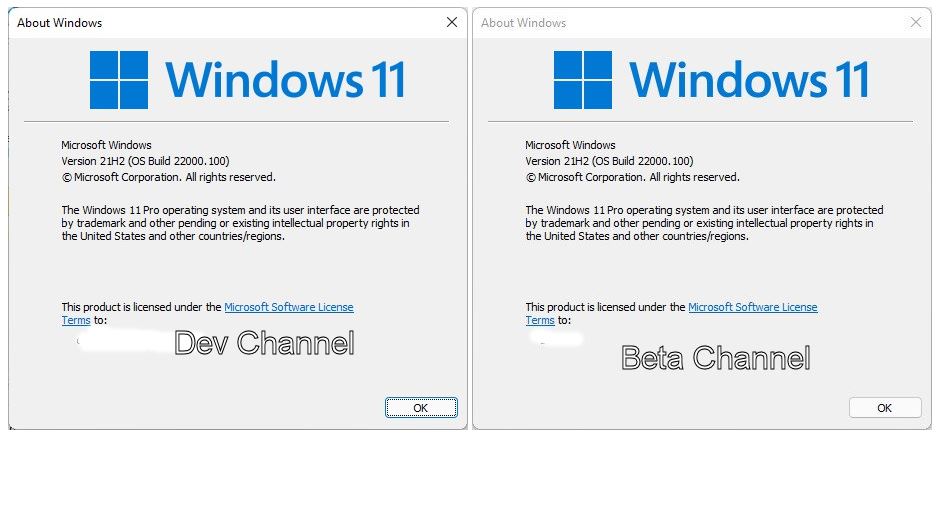
As you look at the WinVer output from Dev Channel (left) and Beta Channel (right) in the lead graphic, right now the Build numbers are the same. That means that you can downgrade Dev Channel PCs as I write this story. Given that MS hasn’t released a Dev Channel build in a while this can’t last forever. If you want to try it out, act fast — or wait for the next synch-up. Your call…

Facebooklinkedin
Facebooklinkedin

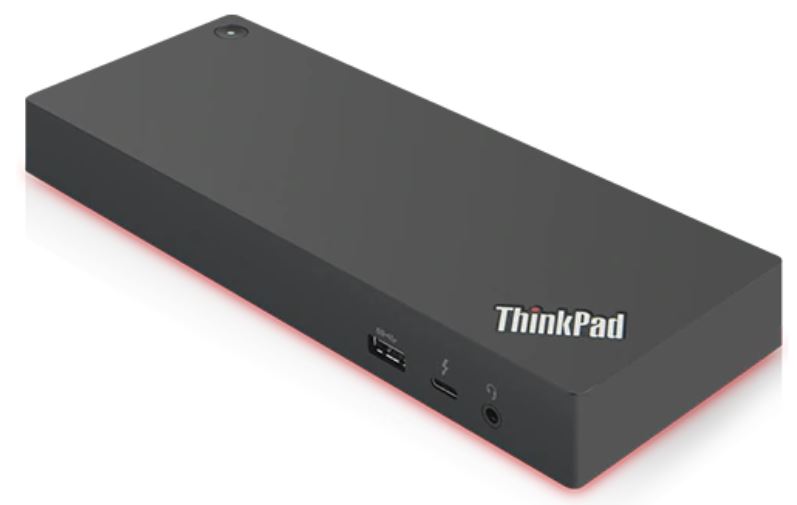
Slow Charger Warning Means Underpowered Thunderbolt Dock

Here’s one I haven’t run into before. I wanted to use multiple USB-C ports on my Lenovo X390 Yoga yesterday. Alas, it has but one. So I plugged it into a Lenovo Thunderbolt 3 Gen2 dock the company sent me. Even though it was for another computer I expected all itches properly scratched. Instead I learned that a slow charger warning means underpowered Thunderbolt dock at work. In fact, by the next morning, the battery was exhausted and the laptop inert, amidst a massive PC-to-iTunes music conversion.

Given Slow Charger Warning Means Underpowered Thunderbolt Dock, Then What?

Find a workaround, obviously. Luckily the X390 sports two USB 3 ports. I used one for the drive dock where the music files resided, and the other for the iPhone 12’s Lightning-to-USB cable. I ended up not using USB-C at all (except for power from the dock and then the brick later on).

In fact, the Lenovo Dock claims to support “up to 65W power charging.”  And indeed, the X390 needs 65W of power delivery. But obviously, something wasn’t right. In fact, Reliability monitor showed an APPCRASH from PowerMgr.exe at 7:12 this morning. I guess that’s when the battery finally died. When I saw the error message after this morning’s walk I switched back to the regular power brick and the music transfer continued without further hitches or delays.

The moral of this story appears to be: if notifications ever tell you there’s a “slow charger” at work, you’d best use a different power supply if you want to keep your laptop running indefinitely. Lesson learned for me, for sure!

Note Added August 2: Reader Concurs

I got a comment from a LinkedIn member on this post that cites to issues with some docks and power bricks. Apparently these devices struggle to service peripherals and keep the battery charged at the same time. Interesting!

Facebooklinkedin
Facebooklinkedin