Category Archives: Tips, Tricks and Tweaks

Want to know how to make the most out of your Windows 7 system?
Here we share the things we have learned for what to do (and what not to do) to make Windows 7 perform at its best.

USB Cables Make Amazing Differences

A couple of weeks ago, I read an online item bemoaning the variations in USB cables, especially those with USB-C connectors on one or both ends. This weekend, I experienced this phenom for myself. I also learned that the right USB cables make amazing differences in speed/throughput.

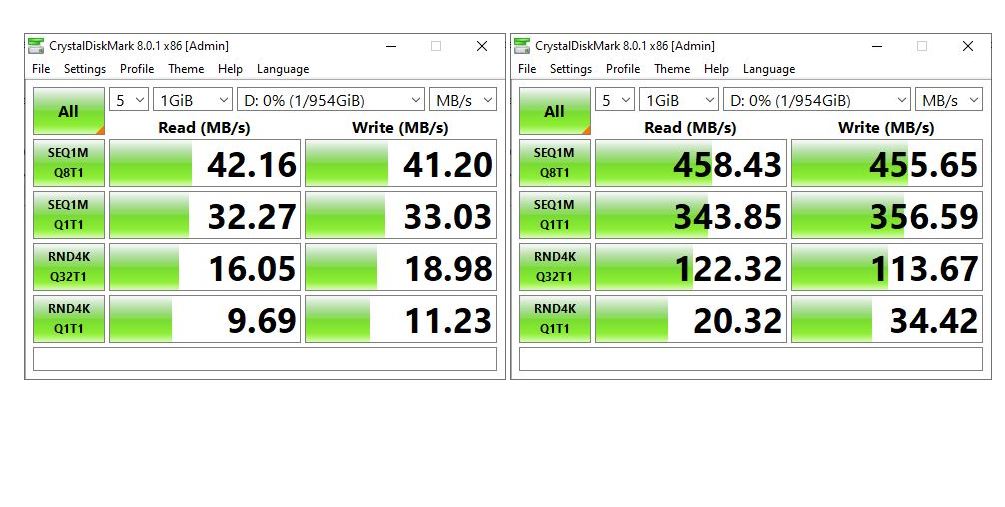
In the lead-in screenshots above, CrystalDiskMark speeds for the same device appear at left and right. To the left is the US$26 Fideco M.2 NVME External SSD Enclosure – USB 3.1. It’s linked to my Lenovo Yoga X390 through its USB 3.1 port using the vendor-supplied cable. Inside is the Sabrent 1TB Nano M.2 2242 SSD I’ve been writing about a lot lately. To the right everything is identical except I used a USB 3.1 Gen 2 cable. It’s rated at “up to 10 GBPS.”

No Lie: USB Cables Make Amazing Differences

Why on earth would the equipment vendor ship such a POS cable with an otherwise capable NVME enclosure? Speed results for the in-box cable (right) versus a US$7 cable purchased from Amazon differ starkly. For bulk transfers, the Amazon cable is 10 or more times faster. For 4K random reads and writes (bottom two rows), it’s between 6 and 7 times faster for queue depth = 32. That drops to 2 to 3 times faster for queue depth = 1.

Clearly, this is a red flag. It tells us that faster USB-C cables can speed peripheral I/O significantly. It also indicates that one should know what kinds of cables to buy. I got the speed-rated cables so I could see if they did make a difference. Little did I know I would actually benefit greatly from this experiment.

Wrinkles in the Plug-n-Play Experience

The question with USB-C cables is not “Will it work?” Rather, it should be “How fast does it go?” I’ve just learned that big differences sometimes present themselves. Testing your devices is the only way to confirm what kind of performance you’re getting. In my case, it quickly showed me that a high-speed USB-C cable is a worthwhile expense.

FWIW, this experiment also  explained some of the cost differential between the US$26 Fideco unit linked above and the US$45 Sabrent units I also own. The latter ships with USB-C 3.1 Gen 2 cables that perform on par with the speed-rated cables I mentioned near the outset of this story. The NVME enclosures are more or less on par performance wise. That’s NOT true for the in-box USB-C cables, though. There indeed: you get what you pay for!

Facebooklinkedin
Facebooklinkedin

A Tale of Two USB Ports

I’ve been troubleshooting a vexing M.2 2242 NVMe drive this week. If you look back over my recent writings here at edtittel.com, you’ll see this adventure has led me to some interesting places. Yesterday, it led me to recognize that not all USB-C ports are the same. I found myself confronting the profound difference that current-gen Thunderbolt support can make. Thus indeed, a tale of two USB ports follows.

Telling the Tale of Two USB Ports

On the one hand: a 2019-vintage Lenovo X390 Yoga. Its fastest USB port is described in its tech specs as “USB 3.1 Gen 2 Type-C / Intel Thunderbolt 3.” On the other hand: a 2021-vintage Lenovo X1 Nano. Its fastest USB port is described in its tech specs as “USB 4 Thunderbolt 4.” I must confess, I was curious about what differences might manifest between these two technology generations.

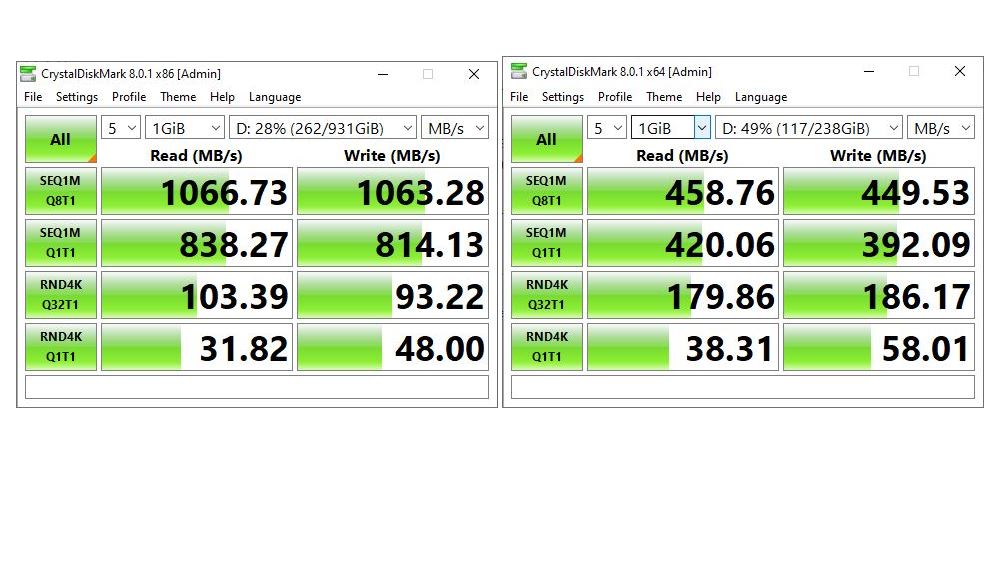
It made a significant difference. Thus the story’s lead-in graphic shows. CrystalDiskMark output from the Nano is on the left, the X390 on the right. It shows the speed-up varies somewhat. It is better than 2:1 on the big-transfer items (upper 2). But the more important random 4K reads/writes fill the bottom two rows. There,  we see 17-18% (read-write) for random with queue depth=1. That jumps to 42-50% with queue depth=32.

In practice, I believe it’s what allows the X1 Nano with an i5 processor to work much like my older i7-6700 on my desktop PC. It also makes the X1 Nano faster than the X390, despite an i7 on that older machine. I/O is indeed a  powerful performance factor.

Is USB 4 Thunderbolt 4 Worth Buying?

If you’re in the market for a new PC or laptop, you will get a performance boost from using the newer USB technology. If the ability to complete backups (and other big file transfers) twice as fast is worth something to you, factor that into the price differential. If better overall I/O performance of at least 18% in accessing peripheral storage has value, ditto.

Only you can decide if it’s worth the price differential. For me, the answer is “Heck yeah!” I’m not sure that means I’ll buy an X1 Nano. But I am sure it means my next laptop will have USB 4 Thunderbolt 4 ports.

Facebooklinkedin
Facebooklinkedin

Zen and the Art of USB Troubleshooting

Back in the 1970s, Robert Pirsig’s Zen and the Art of Motorcycle Maintenance made its debut. I was a year out of college, working in a somewhat technical job as an audio engineer at the Library of Congress. I devoured that book and many of its thoughts have stayed with me over the intervening years. None has stuck better than his discussion of the scientific method (that link goes to a reprint of that section). It always struck me afterward that when somebody wants to get serious about troubleshooting, it’s time to invoke the awesome majesty of “the formal scientific method.” That’s why I call this blog post, with tongue in cheek: “Zen and the Art of USB Troubleshooting.”

What Good is Zen and the Art of USB Troubleshooting?

Early in the cited section on the scientific method, Pirsig makes two great observations. First he says “Actually, I’ve never seen a cycle-maintenance problem complex enough really to require full-scale formal scientific method.” Second, he compares that method to “an enormous juggernaut, a huge bulldozer — slow, tedious, lumbering, laborious, but invincible.” As I’ve been troubleshooting a vexing issue with a recently-acquired Sabrent Nano 1 TB M.2 2242 NVMe SSD lately, I’ve had reason to revisit and ponder Pirsig’s thinking and  problem-solving toolset.

Here’s the Deal

Here’s the combination of the four-plus ingredients that go into my problem set:

  1. A Sabrent NVMe SSD enclosure, model EC-NMVE
  2. The Sabrent 1 TB Nano SSD, model SB-1342-1TB; for comparison I also have an M.2 ADATA XPG 256GB 2280 NVMe
  3. The USB-C  cable (with USB 3.1 female to USB-C male adapter) that Sabrent shipped with the enclosure
  4. The USB port on Windows PC into which I plug enclosure (1) using cable (3)

The only time I have problems with the enclosure is when the Sabrent Nano device is plugged in. It works reliably and constantly if I use the enclosure, its cable and the ADATA SSD. When the Nano is plugged in, however, the device goes offline if I leave it plugged in overnight. When I come into my office, the controller light on the enclosure is blinking constantly. At other times, and at irregular intervals, the device goes offline while it’s idle.

I take the constant blinking to mean the USB controller in the PC is trying — and failing — to handshake with the drive controller in the enclosure. If I unplug the device (either end) and plug it back it, it resumes working.

The scientific method tells me that you must vary only one item in a collection of possible causes for trouble at a time to determine which item is the actual cause. The only collection of the items listed in 1-4 above that causes a fault occurs when the Sabrent Nano is present. Therefore, the Sabrent Nano is the faulting item.

Filing a Tech Support Case

I’m going to use this article as the documentation for a tech support filing, and re-open my trouble ticket with Sabrent. I believe I have shown that the Nano is not working as it should be, and that it faults regularly. I am hopeful Sabrent will agree with my analysis, and send me a replacement SSD. I’ll keep you posted, and share their response(s) here. Stay tuned.

[Note Added 3/17 Afternoon]

Sabrent simply asked for a copy of the invoice (easy to retrieve from my Amazon order history) and the ship-to information. Let’s see how long it takes for a replacement to get here. Interesting, and satisfying, so far!

Facebooklinkedin
Facebooklinkedin

Interesting Partial 21H1 Component Store Cleanup

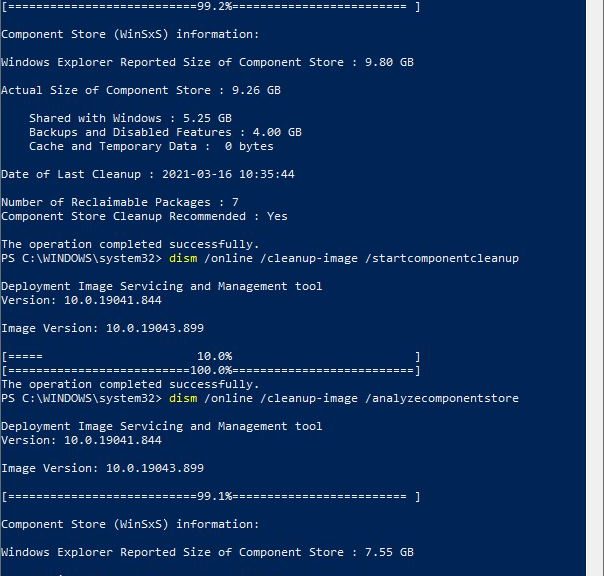
I’m running the Beta Channel Insider Preview on my Surface Pro 3. I just bumped it to Build 19043.899 thanks to KB5000842. Out of curiosity, I then ran the DISM commands to analyze and clean up the component store as shown in the lead-in graphic for this story. A final analyze shows interesting partial 21H1 component store cleanup occurred. Let me explain…

What Does Interesting Partial 21H1 Component Store Cleanup Mean?

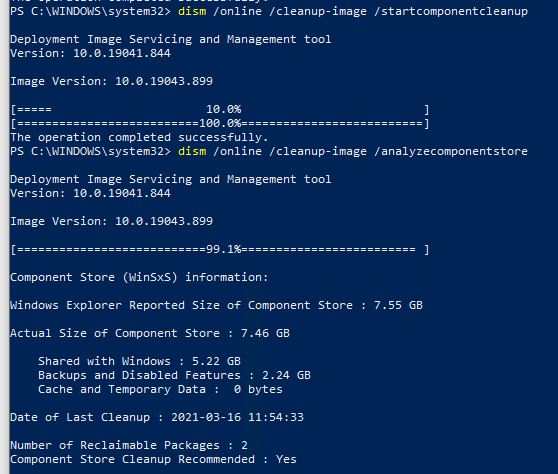
If you take a look at some detail from the lead-in graphic then check the screencap below, you’ll see they show 7 reclaimable packages before clean-up. After cleanup, 2 reclaimable packages still remain behind.

Notice that 2 reclaimable packages persist, event after running the cleanup option.

Reclaimable packages persist after dism cleanup for one of two reasons AFAIK:
1. At some point, the user ran the /resetbase parameter in an earlier dism cleanup.
2. Something odd or interesting is going on in the component store, and dism can’t clean up one or more packages (in this case, two).

I don’t use /resetbase on test machines as a matter of principle. So something interesting and odd is going on here.

Another Try Produces No Change

Having seen this before on other Insider Previews (and production Windows 10 versions), I had an inkling of what would happen. I repeated the cleanup and got the same results: 2 reclaimable packages still show. In my experience, this means they’re “stuck” in the component store. What I don’t know is if taking the image offline and trying again would make any difference. What I do know is that this won’t change until Microsoft finalizes the 21H1 release for general availability (or issues a specifically targeted fix).

Trading on my connections with the Insider Team at MS, I’ll be letting them know about this curious phenomenon. We’ll see if anything changes as a result. My best guess is that this gets a cleanup as part of the final release work sometime in the next 2-3 weeks. That said, only time will tell. Stay tuned!

Facebooklinkedin
Facebooklinkedin

Fixing Non-responsive Taskbar Icons

Last December, I wrote an article here that described an easy fix for an unresponsive Start Menu. The trick on my affected PCs was to go into Task Manager, right-click Windows Explorer, and select “Restart.” Over the past week the same thing is affecting Task Bar icons for open and pinned applications. It came in the wake of the occasionally wonky preview version of the upcoming March CU. That is, I’m inclined to name KB4601382 as an “update of interest” in this case. Fortunately, the same fix works.

Fixing Non-responsive Taskbar Icons

How can you tell when this problem manifests? Easy! You click on an icon in the taskbar and nothing happens. I show a portion of my taskbar icons in the lead-in graphic, by way of illustration.

I actually show the taskbar at the foot of both of my monitors. Sometimes, when one quits working, the other keeps going. Then I click that one instead. If neither works, the fix goes in. I’ve never had it fail.

As with my earlier report of Start Menu issues, I’m inclined to see some interaction between Stardock Software’s Start10 and the Explorer-based start menu and associated UI elements. Those include the taskbar icons and the notification area as well. Something wonky is happening, but is also easily fixed. I’ve reported this to Stardock and MS and am hopeful that, as before, a fix trickles into one or the other of those environments.

Seems Like a Limited Issue

I don’t see other reports of this phenomenon in the Start10 forums at Stardock. There’s plenty of discussion on the general phenomenon (Google search: “taskbar icons nonresponsive”). But all are unanimous in what to do: Restart Windows Explorer. Not much other cussin’ and discussin’ involved. Nice to know I’ve got the right fix, even if I don’t know the cause unequivocally and unambiguously. Sigh.

Facebooklinkedin
Facebooklinkedin

Mild Microsoft Update Health Tools Mystery

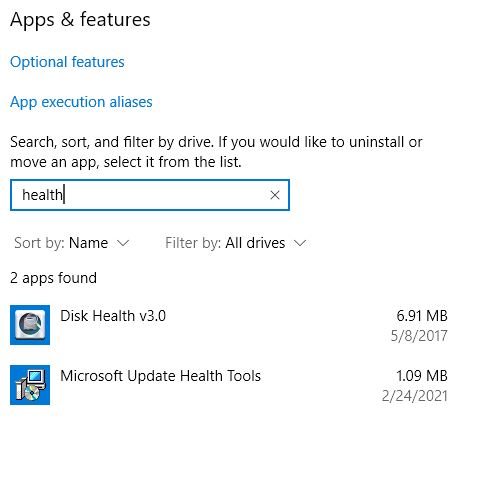
An interesting item is bubbling up in user forums  lately. Lots of Windows 10 PCs — including some of mine — have seen a new-ish, intriguingly named application show up. This story’s lead-in graphic shows it in second place. In fact, I’d say we’re facing a mild Microsoft Update Health Tools mystery. Typical questions include “What is it for?” and “When is it used?”

Cracking a Mild Microsoft Update Health Tools Mystery

A Microsoft Docs “Questions” item links the utility with update KB4023057 .  A corresponding support page mentions all Windows 10 versions, including 20H2. (It’s dated October 2020.) I’ve seen posts at answers.microsoft.com as far back as August 2020. It, too, references that same KB article.

That article says the update delivers “reliability improvements to Windows Update Service components.” It also says it:

includes files and resources that address issues that affect update processes in Windows 10 that may prevent important Windows updates from being installed. These improvements help make sure that updates are installed seamlessly on your device, and they help improve the reliability and security of devices that are running Windows 10.

Some Interesting Notes about KB4023057

There are 5 bulleted items (and a sub-note) the Support Note. All make fascinating reading. I reproduce them verbatim. (For brevity, I prune “This update may” or “This update will” ):

  • …  request your device to stay awake longer to enable installation of updates.

    Note The installation will respect any user-configured sleep configurations and also your “active hours” when you use your device the most.

  • … try to reset network settings if problems are detected, and it will clean up registry keys that may be preventing updates from being installed successfully.
  • … repair disabled or corrupted Windows operating system components that determine the applicability of updates to your version of Windows 10.
  • … compress files in your user profile directory to help free up enough disk space to install important updates.
  • … reset the Windows Update database to repair the problems that could prevent updates from installing successfully. Therefore, you may see that your Windows Update history was cleared.

Invitation to Conspiracy Thinking?

Go back, and read the forum traffic. Or, search Google for “Microsoft Update Health Utility.” Sadly, it reveals suspicion among community members. Indeed, some fear it helps MS forcibly update older Windows installs. In fact, MS does this already. Others don’t trust MS update orchestration. They’d rather control updates themselves. Still others worry about unwanted side effects or unusable PCs after forced updates.

Gosh! While these things are possible, I see nothing untoward at work here . Instead, I see MS staging repair tools in advance for update issues on Windows 10 PCs should they manifest. Aside from lacking user controls, I see them no differently than built-in update troubleshooters. In fact, I’m a devoted user of Shawn Brink’s Reset Windows Update tutorial and its accompanying batch file. It’s gotten me past 95% of all WU problems I’ve seen. That’s why I’ll gladly keep using it.

No Cause for Alarm

As far as I can tell, there’s not much to see here. Admittedly, Update Health Tools is a small surprise. But its Support Note offers good explanations. Thus, I’m OK with this tool. Nor should you worry, either. Rather, it looks like good software engineering.

Better yet, the Update Health Tools can handle update issues on their own, sans user input or guidance. That sounds like a blessing, even if in disguise. And FWIW, it’s missing  from Insider Preview releases. That tells me it aims squarely at production PCs outside IT umbrellas. That means mostly home and small business users. Thus, it should benefit those who need it most.

I’m coming out in favor of the Update Health Tools. I hope we’ll learn more about them from Microsoft soon. In the meantime, if you don’t like the tool, you can choose to uninstall it. I’m leaving it alone myself. If I’m right about it, it may come in handy someday.

Facebooklinkedin
Facebooklinkedin

Post Dev Channel Upgrade Drill

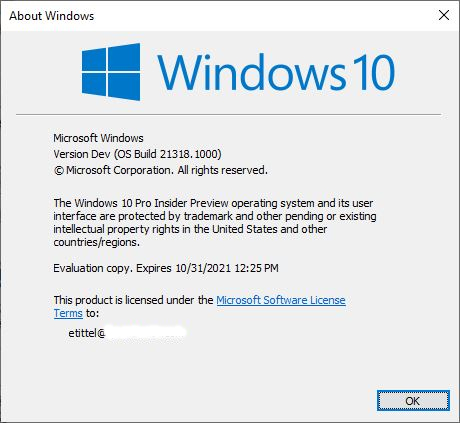
As somebody who’s been in the Insider Program for Windows 10 since October, 2014, I’ve been through hundreds of Insider Preview installations and upgrades. That means I have a pretty well-defined drill through which I take my test PCs once an upgrade is in place. In today’s item, I’ll take you through my Post Dev Channel Upgrade drill as an illustration. That’s because I just finished upgrading to Build 21318.1000, released Friday February 19.

High-level View: Post Dev Channel Upgrade Drill

Viewed at a high level, those post Dev Channel upgrade steps might be described as follows:

    1. Check the environment, restore tweaks, make repairs
    2. Clean up post-upgrade leftovers, esp. Windows.old
    3. Perform other routine cleanups
    4. Check for and install software updates (non-Windows)
    5. Use Macrium Reflect to make a pristine image backup

In general, the idea is to make sure things are working, clean up anything left behind, catch apps and applications up with Windows, and make a snapshot to restore as this release baseline, if needed.

Step 1: Check & Restore or Repair Anything Out of Whack

YMMV tremendously during this activity. After many upgrades, I’ve jumped into File Explorer Options (Control Panel) to make file extensions visible again, show hidden files, and so forth. MS is doing a better job with this lately, and I don’t usually have to do this with Insider Preview upgrades (though it does still happen for standard feature upgrades).

For a long, long time I had to go into Advanced File Sharing to loosen “Guest or Public” and “All Network” network profiles on the Lenovo X220 Tablet to get RDP to work. Because I use RDP from my production desktop to access and work on my arsenal of test PCs, this is pretty important — to me, anyway. The last few Dev Channel releases have NOT had this problem, I’m happy to say.

I run Helmut Buhler’s excellent 8 Gadget Pack on my Windows 10 PCs. That’s because its CPU Usage and Network Meter gadgets provide helpful dashboards. The former is good for CPU and memory usage and system temps; the latter is great at showing network activity and base addressing info. Very handy. But each time an upgrade is installed, Windows 10 boots it off the desktop. Buhler has written a handy “Repair” utility that I run after each upgrade to put everything back the way it was.

Step 2: Clean up post-upgrade leftovers

You can use the built-in Disk Cleanup utility, run as admin, to take care of most of this. I personally prefer Albacore/TheBookIsClosed’s Managed Disk Cleanup (available free from GitHub). Why? Because he tweaked the UI so you can see all active controls in a single display window, and select all the stuff you want gone in a single pass. Here’s what that looks like to make it visually obvious why I prefer this tool:
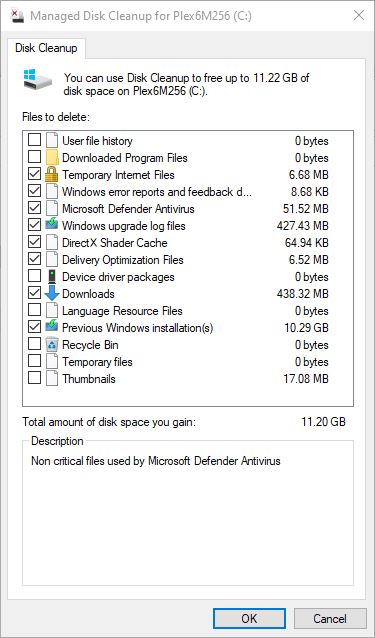
Post Dev Channel Upgrade Drill.mdiskclean.exe

Notice you can see ALL options eligible for selective clean-up in a single display area in Managed Disk Cleanup. I like it!

Step 3: Perform other routine cleanups

I still use Josh Cell’s Uncleaner utility to clean up temp files and other leftovers after an upgrade. If I’m feeling ambitious I’ll run the DriverStore Explorer (RAPR.exe) to identify and remove duplicate device drivers, too. Once upon a time I would run Piriform’s CCleaner as well, but I’m less than happy with that software now that the maker has started including bundleware in the installer. I haven’t found another tool I like as much as the old version.

Step 4: Update Third-Party Software

You can use a tool like KC Softwares SuMO or Patch My PC Updater to suss out most of the items in need of update on Windows PCs. SuMO is a little better at its job but costs about US$35 for the PRO version (does automatic updates for most programs, but sometimes vexing to use). PMP Updater is free, fast, and entirely automatic but doesn’t update everything. Sigh. I use PMP Update on my test machines, and SuMO PRO on my production PC myself. I’m doing this on the theory that it’s best to have everything updated before making a pristine image backup, as I do in the next step.

Step 5: Make a Pristine Backup

With everything upgraded and updated, and all the dross cleaned up, it’s the perfect time to make a fresh image backup. I like Macrium Reflect, mostly because it’s faster and more reliable than the built-in Windows 7 Backup and Restore utility (which MS itself has recommended against since 2016). And indeed, it’s faster at backing up and restoring than most other utilities I’ve used, and also includes a bootable rescue flash drive utility you can use for bare metal and “dead boot/system” drive repair/restore scenarios.

Please note: Macrium Reflect is MUCH faster than using the rollback utility to return to a lower-level OS image from a higher-level one. That’s why I feel safe getting rid of the Windows.old folder as part of my cleanup efforts. I know I’m not going to use those files anyway…

OK then, that’s my drill. I’m sticking to it. Hopefully, you’ll find something in there to like for yourself. Cheers!

Facebooklinkedin
Facebooklinkedin

DISM Trumps SFC To Fix Hung Execution

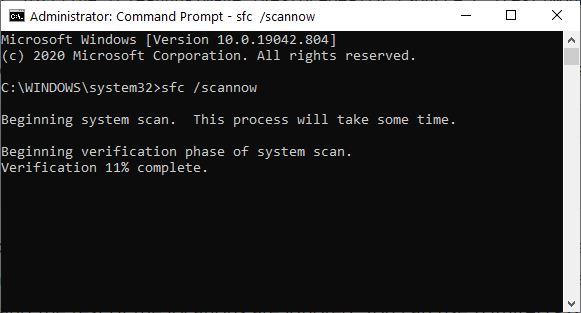
Here’s an interesting observation straight from TenForums. Occasionally, the System File Checker (SFC) will hang when run. That is, it will grind forward to some percentage of completion, and then sit there indefinitely, making no further progress. If that happens to you on a Windows 10 PC, it’s OK to terminate the process (enter Ctrl-C at the command line or in PowerShell). In such cases, DISM trumps SFC to fix hung execution. Let me explain…

How DISM Trumps SFC to Fix Hung Execution

To unpack my assertion, please understand that when SFC finds an error it cannot fix, it more or less stops where it is. The Deployment Image Servicing and Management tool, aka DISM, can replace the files in Winodws 10’s cross-linked code repository WinSxS. By doing so, it will often fix the errors that SFC cannot surmount successfully.

The syntax for the specific DISM incantation is most often:

DISM /online /cleanup-image /restorehealth

Other variations for offline images, or that use something other than local files already known to Windows 10 are documented at MS Docs. There you’ll find a helpful article entitled “Repair a Windows Image” that take you through various elaborations that may sometimes prove necessary. Using the Source: attribute can get particularly interesting, especially if you’re working from a WIM or ESD file that is home to two or more Windows images.

If SFC Hangs, DISM /RestoreHealth Often Sets Things Right

As it did for the person who posted about SFC difficulties at TenForums, this approach will often (but not always) make things right. You can’t know until you try. But the thing to remember is that if SFC hangs or fails, your next step should be to try this specific DISM command.

In my personal experience, this has fixed half or more of such issues when they’ve come up. If the odds come up as they should, this approach will also work for you. Try it, and see!

[Note Added Feb 16 afternoon]:
Go Ahead: Skip SFC, Run DISM First

Members of the Insider Team responding to this post informed me that “On Win10 it’s recommended to run DISM first.” This is explained in an MS Support Note entitled “Use the System File Checker tool to repair missing or corrupted system files.” And sure enough, in reading over that article it informs readers “If you are running Windows 10 … first run the inbox Deployment Image Servicing and Management (DISM) tool prior to running the System File Checker.” I’m not sure what “inbox” means in this context, but the order is clear and unmistakable: DISM first, SFC second.

I’ve been following typical advice from TenForums and conventional wisdom for so long, I neglected to read up on SFC in putting this story together. Live and learn: now I know to reverse the order and run DISM first. Hope this helps others, too!

Facebooklinkedin
Facebooklinkedin

Voidtools Everything Finds Files Fast

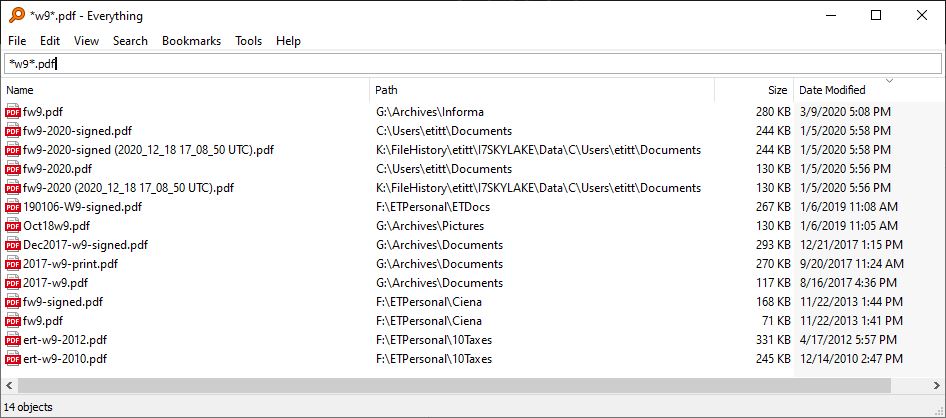
I know plenty of purists who won’t use third-party Windows tools if a Microsoft-supplied tool or facility will do the job. I am not such a person, and I’m happy to use third-party tools that either do things that Microsoft doesn’t do, or do as well as they do. Because Voidtools Everything finds files fast, it’s part of my standard Windows 10 desktop runtime. Oh, and it’s free, imposes little overhead, and — in my experience — runs faster and works better than Microsoft search. I usually get what I’m after before I’ve finished typing my input string.

Because Voidtools Everything Finds Files Fast, Use It!

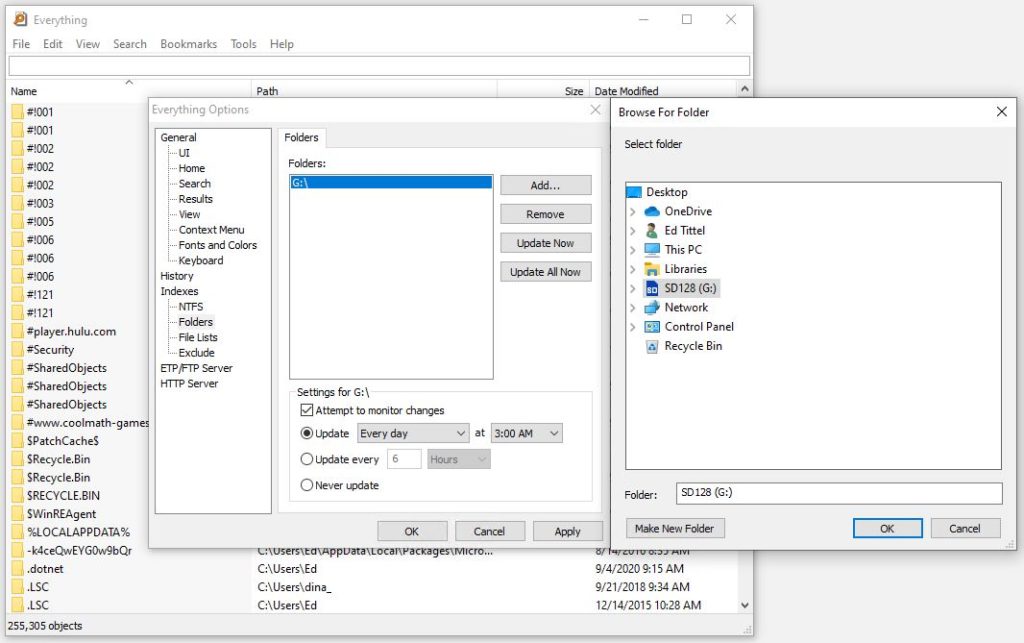
The Everything FAQ provides a peachy overview of the tool, and explains its speed, behavior and workings. That said, Everything is primarily a name search tool for files and folders. It provides only limited visibility into file contents (that’s a search tool of a different stripe). The developers say that Everything takes about 1 second to index a fresh Windows install (about 120K files) and a minute to index 1M files. It really is fast, based on personal experience. It can also access files on FAT volumes, network storage, and flash devices (but minor configuration wiggles in Tools → Options → Folders are required, shown below).

FAT-derived volumes (like those on SD cards and UFDs) don’t show up by default in Everything. But they are easy to add.
[Click image for full-sized view.]

Working Search for Everything It’s Worth

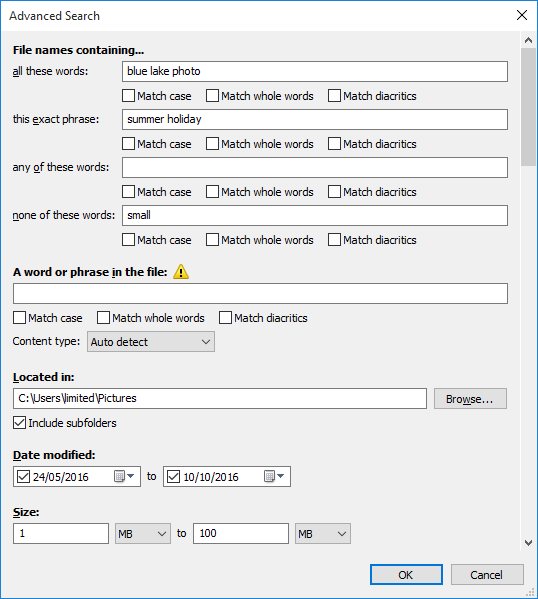
OK, bad pun, I know. But you can use boolean operators and wildcards in Everything much like you do at the Windows command line. Everything also supports advanced search for more complex search strings that also include the program’s content search functions (warning: these are slow because Everything does not index content in advance). For me the Advanced Search window provides the complex functions I need. Check it out:

Advanced search offers a variety of pattern definition and matching functions. Works like a champ, too!

If, like me, you have lots of storage and millions of files at your fingertips (right now, Everything says it’s indexed 1.4+M objects for me), Everything is handy and useful. If you try it out, you’ll probably end up keeping it around and using it regularly. I use it dozens of times a day, every day myself.

Facebooklinkedin
Facebooklinkedin

X380 Yoga 21301 Installation Issues

I’ve been struggling since last Thursday to get the latest Fast Ring version — namely, 21301.1000 — installed.  That’s right, I’ve got “interesting” X380 Yoga 21301 installation issues running hot and cold right now. So far I’ve seen at least 4 different error codes, all of which hit at about the 48% mark after the first reboot. I call this the “post-GUI” phase of Windows 10 installation, because it occurs after the WinPE environment takes over the install process following that first reboot.

Diagnosing X380 Yoga 21301 Installation Issues

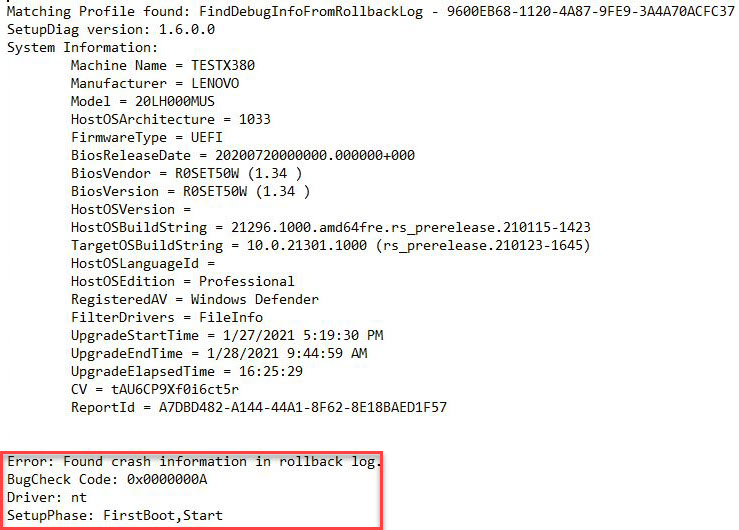
I’ve just confirmed that these issues persist in the latest CU 21301.1010,  as well as in 21301.1000. I’ve been using the MS tool setupdiag.exe to get to the bottom of things. But because it finds the NT driver as the culprit for the IRQL_NOT_LESS_OR_
EQUAL and the bugcheck 0X0A error, that puts the onus on MS to fix something beyond my control. You can see this in the setupdiag output in the lead-in graphic for this story.

I can tackle and fix lots of Windows 10 drivers. But as I understand it when the NT driver (shows up as lowercase nt in the screencap) is mentioned, it’s general indicator. According to dbgtech.net, “the error might be caused by a device driver, a system service, a virus scanner, or a backup tool that is incompatible with the new version.”

Coming Up Dry Is No Fun at All

I’m running Defender on this PC so I’m pretty sure it’s not involved. I’ve stripped my services down to the bare minimum. Macrium Reflect is my backup too (and still working on the X220 Tablet that has managed both of these recent updates/upgrades). The same device drivers work on 19042.746 on my other nearly-identical X380 Yoga PC (only difference: Toshiba SSD vs. Samsung).

I’m still looking for enlightenment, but not finding any. Last time something like this happened, I just had to wait for a new Fast Ring/Dev Channel release, and it installed just fine. Here’s hoping!

[Note Added Feb 12] 21313 Brings Success!

I’d been contacted by a member of the Windows Insiders team as a result of sharing a link to this post on the Windows Insider MVP Yammer community. I was informed that a future Dev Channel release would fix my problem. As I learned earlier this afternoon, 21313 installed without difficulties. Seems that this PC got bit by a known bugcheck error.  It’s the first item on the Fixes list in the 21313 release notes. This has been a known issue for some time, and is apparently now fixed. Woo hoo!

Facebooklinkedin
Facebooklinkedin