Want to know how to make the most out of your Windows 7 system?
Here we share the things we have learned for what to do (and what not to do) to make Windows 7 perform at its best.
OK, I admit it. I’m a little bit obsessive about maintaining maximum free space on the 80 GB putative (74.5 GB actual size) Intel X25-M SSD I use as the system drive for my production PC. In my never-ending quest to keep things pared down to the absolute minimum, I will occasionally resort to cleaning up and compressing the PST files associated with Outlook on that machine. To that end, I’ve already moved my Archive.pst file to another drive. But today, I got into compacting my PST files (and completely cleared out the default Archive.pst that Outlook manages to create on my C: system drive, whether I want it to or not), and learned some interesting stuff along the way.
Anybody who follows my system blog knows that my current production system is probably best described as temperamental. Since upgrading to Windows 7 in August of 2009, it’s been a heckofalot better than its previous life under Vista, to be sure, but I’ve had my share of ups and downs with this collection of hardware parts. Here’s a brief description of what’s going on under the hood in this particular box:
Ed’s Production Windows 7 PC
Case
Antec 900
CPU
Intel QX9650 (Yorkfield, 45 nm)
Memory
2 x 2GB SuperTalent DDR2-800 (5-5-5-18)
Graphics
GeForce GTX 275
System HD
Intel X25-M 80GB SSD
Other HDs
SpinPoint 1.0 GB (7200 RPM)
Cooler
Zalman CNPS 9500
PSU
Gigabyte ODIN 800W
Optical drive
Asus BC-1205PT Blu-ray
Over the past couple of years, I’ve had to deal with numerous instances of blue screens, application hangs, and strange Windows Explorer hangs. I’m also doing increasing work with virtual machines and have found that 4 GB of RAM just isn’t enough to permit me to be productive running regular apps with even one VM open. So I’ve been preparing to upgrade this system to x64 Windows 7 from the current 32-bit x86 version, as documented in my August 2, 2011 blog “Coming Soon (I Hope): Win7 32- to 64-bit Conversion.”
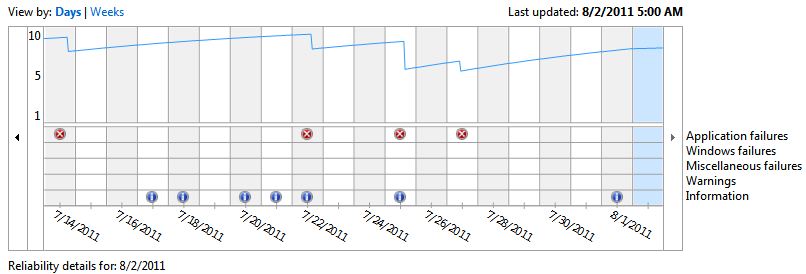
Here’s my problem, depicted in the form of the current Reliability Monitor for the past 20 days: this system has been completely trouble-free pretty much since I wrote the afore-cited blog. Not a single glitch, hitch, blip or hiccup in the interim.
Reliability monitor for August 6 thru August 24
(Click to enlarge)
Frankly, this puts me in a quandry: yeah, sure I do need the extra memory space that converting from 32- to 64-bit Windows 7 will confer thanks to the 8 GB of additional RAM I’ll install into the system to take it up to 12 GB. But I’m slammed with work right now, and it goes against my better instincts to start making major changes to my principal production system right now. I have a 12 GB i7-930 system up and running already anyway, with a GTX 470 graphics card and an even faster Corsair Vertex 2 SSD for the system drive. I’m starting to think that maybe I should migrate to that system instead, and convert this box to test machine status when I upgrade to x64 Windows 7 and add the extra memory. But one thing’s for certain: I’m not doing anything major until the current onslaught of work tapers off a bit. I just don’t have time to make any production changes right now!
I took delivery of my snappy new and way cool Dell Alienware M11x R3 laptop last Thursday, August 4, but it wasn’t until this afternoon (August 9) that I finished a key step in making best use of this machine. I finally got my WiMAX account turned on with wireless service provider Clear. Although the instructions aren’t terribly clear in the emails and Web site information about turning on and using my WiMAX interface, all I had to do was hear these words from the very nice tech support guy who called me and said “Do a new account sign-up with Clear” to know exactly what to do.
I finally got the additional 8 GB of DDR2-800 RAM I ordered for my primary production system —a QX9650-based Quad Core system built around a Gigabyte X38-DQ6 mobo with an Intel X25M 80GB SSD and nVidia 275 GTX graphics card. That means that I’m going to snapshot the current 32-bit version of that system into a VM, make an image and standard backup, then blow everything away and finally rebuild that system around 64-bit Windows 7 Ultimate, to replace an aging and sometimes wonky 32-bit version of the same OS on that system. This build goes all the way back to the initial release of the production version of Windows 7 to MSDN on August 6, 2009. I’ve patched and updated this puppy to keep up with Windows Update ever since and it’s gotten to the point where, as so often happens with heavily used and abused Windows installations, things get flaky from time to time. What does this mean? Today’s System Reliability graph tells the story pretty well:
In attempting to fix erratic mouse behavior on my production desktop, I discovered the need to visualize what USB devices were connected to which ports on my PC. I also wanted to make sure I had USB 2.0 devices connected to USB 2.0-capable ports and hubs, while I was looking into these matters.
To those ends, I tried to run down a reasonably capable but free USB inspection or reporting tool that could tell me what was what on my PC. Ultimately, I wound up with USBView, a simple but effective Microsoft-made utility.
One interesting thing about this task was how to search for what I wanted. “USB scanner” didn’t do it, nor did “USB mapper,” “USB diagnostics,” or “USB ports.” After flailing about for a while, I went to visit a familiar USB Website I turn to from time to time, EveryThingUSB. They recommended a tool called USBinfo, but all the links I could find to the program (especially the latest version, 2.0) were defunct (though I did find a working link to a Version 1.2 download). I also discovered a USB sniffing tool from HHD Software called USB Monitor Lite, for which a free trial download is available (it’s only good for 14 days, after which the buy-in is $40). I also found a nice-looking utility from Nirsoft called USBDeview but it wouldn’t work properly on my PC, and appeared to cause the very kind of erratic mouse behavior that had prompted me to search for such a tool in the first place!
But once I had some program names and looked at what they called themselves, and how they described themselves, my search terms became more relevant to the actual tools and utilities out there in cyberspace. In fact, a search on “USB utilities” proved most useful, and led me to the site where I discovered Microsoft USBView.
USBView lists the hierarchy of USB devices present on your PC. If you haven’t added a bus-attached USB controller to your system, it lists all of the USB Universal Host Controllers (UHCs) on your motherboard at the top of the hierarchy, followed by the USB root hubs attached to the host controllers. If you do have one or more additional USB controllers, you’ll see extra entires at the top two levels of the hierarchy. At the next level down, you’ll see either Port numbers or any secondary hubs that you may have attached to USB ports on your PC or notebook computer. At each level in the hierarchy, any device you highlight in USBView’s left pane displays its properties in the right pane for inspection. Clicking on any Port to which a “Device connected” notification attaches will usually permit you to identify that device by looking at its associated property values.
USBViewThe usual hierarchy is UHC => Root Hub => (Optional) Hub => Port => Device
For my SuperTalent Pico 8GB Flash drive, however, I had to identify it by process of elimination because USBView failed to resolve its vendor ID. All of the other devices were identifiable by type and by vendor in the properties information pane. As it happens, the Pico’s vendor ID resolves to the chip maker’s name for the Flash RAM it contains, rather than the device builder’s name anyway, as I discovered thanks to a handy unofficial list of USB vendor IDs. When in doubt, I also discovered, you can always remove or insert a device to change your configuration, or do both, to conclusively identify any particular USB device anyway.
For others who are incurably curious about what’s on and in their PC’s, or those who must deal with USB problems, some or all of the utilities mentioned here may come in handy. For me, USBView was just what I wanted, so it was the only one to remain resident on my machine.
[notice]Note: USBInfo 1.2 and 2.0 Incompatible with Vista[/notice]
Just for grins, I decided to install USBInfo version 1.2 on my Vista machine to see how it compared to Microsoft’s USBView. I’ll never know, because the program is incompatible with Vista. It uses several obsolete and deprecated DLLs, some of which are no longer available in Vista, and some of which provoke a “contact Microsoft for more information” warning when the program goes looking for them (most notably msvbm50.dll, which dates all the way back to the Visual Basic 5.0 era).Though there are sources for such things online, I decided to forgo this dubious privilege and immediately used Revo Uninstall to get the program back off my machine, with no apparent ill effects. I also found a download for version 2.0 at www.onlinedown.com through mirror 6 or 7, but it too suffered from exactly the same problems. My advice: don’t bother with this software on a Vista system!