Category Archives: Software Reviews

We are constantly getting a wide variety of hardware and software to test and exercise under a range of conditions. As you might expect, some work better than others, some play nicely with others (or not), and a few are genuinely pleasant surprises. Here you’ll find a collection of reviews on a range of products. We’ll be updating this section frequently as we run across new stuff, so come back soon and often!

{WED} Check Out MS News Bar Beta

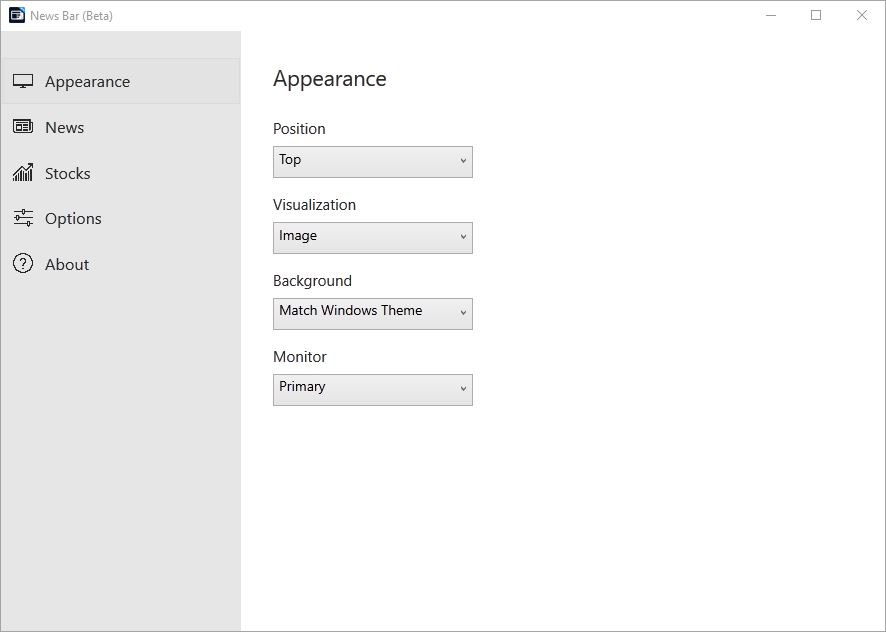
MS has released a new news app through the Microsoft Store. Those interested in a new look for the MS newsfeed will want to check out MS News Bar Beta release. It strikes me as an improvement over the default MSN news pages that come up in Edge. There’s also considerably more control over how (and where) this News Bar appears on your desktop, too. And it can be dismissed instantly with a click on its minimization control when you want to get it out of the way. My opinion: the News Bar is worth downloading and playing around with. It’s a useful tool during this current news-hungry pandemic WFH situation we now live in. Here’s a look at its Appearance pane, from the app’s Settings controls:

Check Out MS News Bar Beta.appearance

The News Bar’s Settings are simple and straightforward. Took me a couple of minutes to work through them, and decide what I liked.
[Click image for full-sized view.]

Download from Store to Check Out MS News Bar Beta

The app is readily available as a free download from the Microsoft Store. Or visit the Store, and search on “News Bar Beta.” It will pop right up. The download is just over 75 MB in size, and takes only a short while to download and install. As the preceding screen cap illlustrates, its controls are both simple and intuitive. After messing about a little while, I chose to position the News Bar at the top of my Primary (#1) Display in Image format. Here’s what a snippet of that looks like, from the left-hand-side of the screen. (It’s about 1/3 of the total display width, but I didn’t want to shrink the thumbnails down TOO much for reproduction here):

---------    ---------    ---------    ---------
| TN 1 |    | TN 2 |    | TN 3 |    | TN 4 | . . .
---------    ---------    ---------    ---------

You can switch between text and images views for newsfeed stories to see a representative photo (image) or a brief description (text).
[Click image for full-sized view.]

[Note added March 15, 2024] Upon receipt of a demand letter from a Canadian firm named PicRights International for US$1,334 for use of two of the five images previously shown above, I replaced those purely illustrative and news reporting images with boxes showing symbolic thumbnails, e.g. TN1, TN2, and so forth. That’s all I meant to convey anyway. IMO such inclusion falls squarely under “fair use” doctrine because I was reporting and showing something about a new Microsoft app by way of explaining what it was and what it showed.

[Note:] Thanks to Nayan at WinCentral for bringing this new (beta) app to my attention in his post “Microsoft bringing ‘Windows News Bar’ to Windows 10 as the on-desktop news source.”

Facebooklinkedin
Facebooklinkedin

{WED} Freezing Visual Basic Signals Impending EOL

Surprise! An interesting item showed up on the Microsoft Devblogs on March 11 (Wednesday). Innocuously enough, it’s entitled “Visual Basic support planned for .NET 5.0.” To begin, the story explains that Visual Basic will get a bunch of capabilities to support .NET 5/.NET Core. Next, it proffers a list of new application types, and benefits of long-term stability. Then comes an interesting paragraph. Its import is that MS freezing Visual Basic signals impending EOL (End-of-life) for this language. Here’s what I’m talking about. (I added the bold emphasis):

Going forward, we do not plan to evolve Visual Basic as a language. This supports language stability and maintains compatibility between the .NET Core and .NET Framework versions of Visual Basic. Future features of .NET Core that require language changes may not be supported in Visual Basic. Due to differences in the platform, there will be some differences between Visual Basic on .NET Framework and .NET Core.

Freezing Visual Basic Signals Impending EOL.oldlogo

Here’s what the Visual Basic (aka VB) logo looked like back in the day. Microsoft Basic first appeared as Altair Basic in 1975!
[Click image for full-sized view.]

What Freezing Visual Basic Signals Impending EOL Really Means

Once upon a time, Bill Gates dropped out of Harvard to jump into computing. He and a Seattle friend, Paul Allen, founded Microsoft on April 4, 1975. Their very first product was a BASIC interpreter for Altair 8800 microcomputer. Later its name became Microsoft Basic. Later still, that changed to Visual Basic. And now, the end of its continued growth and support is in sight.

Gosh! Talk about the end of an era. In fact, it’s more like the the end of one universe, and the beginning of another. Honestly, I see it as a telling sign — amidst a raft of other, similar but lesser signs. Thus, there’s no doubt that Microsoft has reinvented itself completely. Azure and the cloud really do rule this roost, and that’s where Microsoft now lives. The rest of us are just catching up.

Personally, my first encounter with Basic came as a CompSci grad student at UT Austin in 1979. Many years later, I helped teach 5th and 6th graders Microsoft Small Basic at Cactus Ranch Elementary. This happened in 2015 and 2016 through their programming club. (In fact, my son was a participant, and I wanted to help out.) To me, it’s ironic that the URL for Small Basic is https://smallbasic-publicwebsite.azurewebsites.net/. The new already encapsulates the old. Soon, the new will leave the old behind completely. All I can say is: Wow!

Facebooklinkedin
Facebooklinkedin

Interesting Win10 Gadget Conundrum

I can’t help it. I still love Windows Gadgets. They came in — and went out — with Windows 7, supposedly because of security considerations. I’ve never had, nor heard of such issues in the wild. My old friend and security guru, Deb Shinder, also uses Gadgets. She feels the same away about their demise. Helmut Buhler created 8GadgetPack to bring Gadgets to Windows 8. He’s kept up with them, and they work well with Windows 10. (His current version is v29.0, released in May 2019, so it’s pretty up-to-date.) Each time you upgrade Windows, it sees Gadgets and kills them off. So he’s also written a “Restore Gadgets” routine that recognizes this act, and restores the pre-existing Gadget set-up after each OS-based cancellation. Lately, though, I’ve been posed an interesting Win10 Gadget conundrum.

What’s the Condundrum?

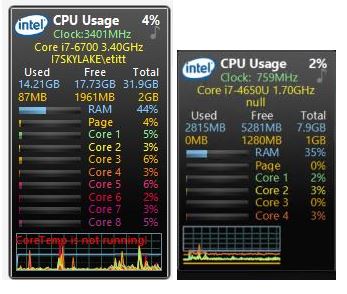
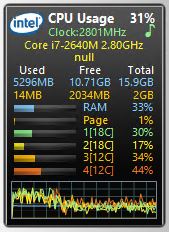
The two following screenshots show the puzzler I’ve been dealing with lately. Notice the display at the bottom of the two CPU Meter Gadget windows that follow. It’s a CPU utilization graph, that shows per-core utilization percentages. The graph on the left-hand-side fills up the entire Gadget panel, while the one on the right-hand-side fills up only about two-thirds. After the most recent Nvidia driver update (which applies to the left-hand item) the Gadget on that PC went from a partial graph area (which applies to the right-hand item) to the full graph area. The PC from which the right-hand item comes is a Surface Pro 3 that uses built-in Intel graphics circuitry that’s built into the i7-4650U processor in that machine. The PC on the left is my production desktop, as the i7-6700 CPU should indicate.

Interesting Win10 Gadget Conundrum.both

Careful inspection shows the utliization graph at the left fills the full Gadget frame, while the one on the right fills about two-thirds of the same area. What gives?

Here’s the conundrum: I’m pretty sure that there’s something in the nexus between .NET and the GPU driver that’s causing the CPU utilization display area issue. Installing Nvidia’s latest GeForce driver (Version 431.60, which shows a 7/23/2019 release date (but which I just installed today, 8/5/2019) on my production PC fixed the issue. It still persists on all of my systems running Intel on-chip GPUs.

A Minor Niggle Still in Search of a Fix

This is the kind of mystery that guarantees lifetime (or at least ongoing) employment for Windows wizards, gurus, and mavens. I’ll keep messing around with those Intel drivers until I find one that works like it’s supposed to. This has been going on at least since last February or thereabouts, though, so Intel’s obviously under no pressure to catch up with this minor and niggling little GUI detail. It gives me something to do when I get bored, so I can’t complain. And so it goes, here in Windows-World!

PostScript Added August 6, 2019

OK, so I updated my Lenovo T520’s graphics driver last night, too. It includes both an Intel on-chip GPU (HD 3000) and an Nvidia Quadro NVS4200M independent GPU. I updated the Nvidia device to Version 392.56 later yesterday afternoon. This machine had also been subject to the “reduced display” layout shown above for the Surface Pro 3. But after I remoted into that machine this morning, I immediately noticed that the CPU utilization graph at the bottom of the gadget now filled the entire pane, to wit:

This time I loaded Core Temp so that the “not running” error message didn’t appear. Makes the utilization graph a little easier to see and appreciate. So somehow, updating the Nvidia driver (even though I’m not using it) fixed the problem. As a consequence, I’m rethinking my theory of what’s causing the problem. But on my Intel-only systems, the problem persists. I’ll keep working on it . . .

Facebooklinkedin
Facebooklinkedin

Bye Bye Secunia PSI

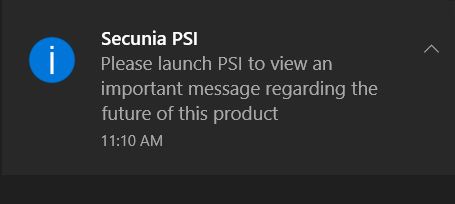
Drat! I knew a notification asking me to “view an important message regarding the future of this product” for Secunia’s Personal Software Inspector probably wasn’t good news. Once again, I took no pleasure in being right. That’s because the message was that it will soon be time to say “Bye bye Secunia PSI!” (That’s almost how the company entitled their explanatory blog post, too: “It’s time to say goodbye to PSI.”) Here are the relevant screen captures:

Bye Bye Secunia PSI notification
Bye Bye Secunia PSI msg txt

Less than two months left before end-of-life comes to Secunia PSI. It’s been a mainstay for me for at least a decade. Bummer!

After Bye Bye Secunia PSI, Then What?

Good question! There’s a Flexera CSI (Corporate Software Inspector), which costs money to obtain. I’ve sent them an email asking about their pricing and availability for 15 seats (I have 8 PCs currently, have had as many as 12 here at Chez Tittel at one time, and want to leave some room for growth). I’m hoping it’s not too horribly expensive, because I really want to keep up with the anywhere from 40-120 applications and apps resident on the local tablets, laptops, and PCs around here. Thanks to the labeling and language on the Flexera website, I’m pretty sure that this fits into their Software Vulnerability Manager product.

But looking around for other drop-in (and free) replacements for PSI, I don’t see a whole lot that provides similar capability with equal ease of use. Sure, there’s the Microsoft Baseline Security Analyzer (MBSA) but it doesn’t automate patching or fixing the holes that it finds. Then there’s BeyondTrust’s free vulnerability scanner, Retina Network Community. But I see that it requires an IIS server and  an MS SQL Server to be installed (and it can’t reside on a domain controller or Small Business Server, either). Sounds like more work that I want to do. But that’s it. All the other programs I read about (see Eric Geier’s 2014 Network World story “6 free network vulnerability scanners” as a typical case in point) either limit the scope or the number of scans you can use their tools for. The level of automation also leaves a lot to be desired.

Hmmmm. This is going to leave an interesting gap in my defenses. Hope it doesn’t prove too time-consuming, effort-laden, and expensive to fill. Sigh.

Facebooklinkedin
Facebooklinkedin

Understanding HomeDev PatchCleaner

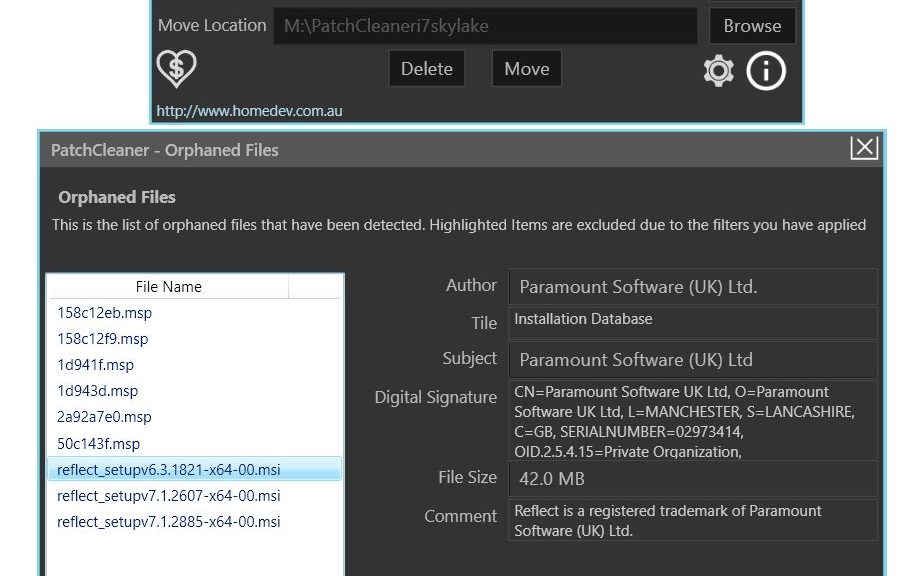
I strongly recommend the PatchCleaner utility from Australian consulting and software company homedev. It keeps an eye on the contents of the %windir%\Installer directory. Usually, that’s C:\Windows\Installer where the OS stashes installer .msi and patch .msp files. At any given moment, you might need one or more of those files. That’s because they can be called on when patching or installing software components (both Windows and third-party items, in fact). That’s why the developers recommend moving “orphaned” files to another drive/directory rather than deleting them outright. However, the tool will happily delete files when so directed. Here’s some output from the program on my production PC. Examined properly, it should aid readers in understanding HomeDev PatchCleaner.

Understanding HomeDev PatchCleaner

The bigger box at bottom is the output from the second details item for orphaned files in the small box at top.

What’s Involved in Understanding HomeDev PatchCleaner?

PatchCleaner shows a line of data that conveys some important information. Namely, it discloses what’s in the Installer folder that isn’t necessary. The tool identifies such orphaned files by seeking out references to their names in other executables and OS files. Those that lack such references are considered orphans. In the preceding screencap, this key line reads “9 files are orphaned, 289.66 Mb details…” Clicking on that blue details item produces the orphaned files window shown below. There, I’ve zeroed in on an older installer file for Macrium Reflect (version 6.3.1821, now completely obsolete and out-of-date).

In general, I agree with homedev’s advice to move files from the C:\Windows\Installer directory to another directory. But, as I’ve been watching and working with the program, I’ve observed there is a specific class of items that it is almost certainly safe to delete rather than move. These items can be generically described as “applications that update often.” As shown, Macrium Reflect — which gets monthly updates, give or take — is one of those items. Another includes various Adobe programs such as the Flash Reader or Acrobat DC. These get updated about as frequently as Reflect (but usually take an .msp extension).

On some heavily-patched and infrequently-cleaned PCs, I’ve seen this number exceed 10 GB. My PCs, of course, are kept pretty clean, so mine seldom approach even 1 GB. As “the boss” (my wife, Dina) likes to say “the more often you clean, the less you have to clean up each time.” That’s as true for PCs as it is for her house, where by her grace and kindness I am also allowed to reside.

Facebooklinkedin
Facebooklinkedin

Oh my! AOMEI OneKey Recovery Gets Interesting

I’ve been working with and learning about recovery partitions on Windows boot/system disks lately. My explorations led me to a decent but flawed tool that does some nice things for Windows OS recovery. It’s called AOMEI OneKey Recovery, and it’s available in both free and commercial versions. In theory, installing this program is easy. You must make space on your system/boot drive. Then, AOMEI OneKey Recovery adds partitions to that disk for boot-up and repair. As a bonus, its recovery partition incorporates a backup of your Windows OS partition. But in practice, AOMEI OneKey Recovery gets interesting. It’s particularly so when it comes to sizing the disk space that the program needs for its partitions. Here’s what the nominal 256 GB SSD drive on my Dell Venue Pro 11 7130 looked like when the program finished its work:

AOMEI OneKey Recovery Gets Interesting

Alas, considerable trial and error was required to properly size the F: partition I had to give AOMEI OneKey Recovery to work with.

Lack of Sizing Data Means AOMEI OneKey Recovery Gets Interesting Indeed!

To begin with, the program provides no guidance on how to size the partition from which it will create its partitions. These are labeled AOMEI and AOMEI Recovery Partition in the preceding screen capture from the Disk Management utility. I started small (at around 2 GB), and went through too many muffed attempts last night. I got increasingly vexed as I kept upping the size of the F: partition that OneKey Recovery used for the AOMEI partitions shown. For each try, I had to use MiniTool Partition Wizard to reduce the size of the C: partition. Then I used that space to expand the F: partition. Things didn’t work until the F: partition hit 44 GB in size. Finally, it created the disk layout depicted in the preceding graphic.

The problem was, resizing the C: partition requires a reboot to do its thing. For each attempt, I used MiniTool Partition Wizard to shrink the C: partition. Then I could grow the F: partition by the same amount. Each iteration took 3-4 minutes to complete because of the time involved in shifting partition boundaries and waiting for the reboot to complete. By the time I’d done this five times I was ready to spit nails. Surely AOMEI could expend the programming effort necessary to analyze the files on the C: partition and estimate the partition size needed to accommodate them? I would have been much happier with my experience in using the software if I didn’t have to keep repeating my attempts to set up those pesky partitions.

It’s Not All Tar and Feathers, However…

To give credit where it’s due, AOMEI OneKey Recovery was reasonably well-behaved aside from the lack or partition sizing information or guidance. It added itself nicely to my Boot Configuration Database (BCD data) on the Dell Venue Pro 11. Better yet, it didn’t mess with the Macrium Recovery Partition already installed on that drive. In testing of its onekey functionality, it worked quite nicely. The program offered to restore my backed-up runtime environment to the C: partition without a hitch. It took about 10 minutes to create the two partitions shown. Thus, I’m guessing it would take about the same amount of time to restore the contents of its Recovery Partition to C:, should that become necessary. I’ll try it out this weekend, when I have some spare time to devote to that task. I’ll follow up with an update then.

On balance I think this is a good tool for a free program. But because it does require resizing of the C: partition to create the space needed for its partitions, a commercial partition manager is needed to put it to work. Not coincidentally AOMEI makes one of those, too. But I prefer MiniTool Partition Wizard, mostly because I already know and understand how to use that program.

Facebooklinkedin
Facebooklinkedin

Machine Crash Prompts Lots of Learning, Especially for Intel Rapid Start

OK, so I’m on the phone last Friday, and I’ve just installed Service Pack 1 for MS Office 2013. After the obligatory post-install reboot, I discover the system won’t boot because it can’t find a boot drive. A long bout of troubleshooting ensues, after which I reluctantly conclude my motherboard’s gone south. My immediate efforts concentrate on moving over to my back-up desktop system, and I put an order into Newegg for a new Z87 motherboard, with a i7 4770K processor.

By the time I got my standby system promoted to production status, and prepared my T520 notebook for backup status (which means it’s got all the apps I use installed, and is ready to play host to my Outlook PSTs and all my usual data files and stuff), the parts arrived from Newegg. Wednesday, I started putting pieces together, and managed to get all the way through the build process for my first shot at a new backup system. But that’s where my first lesson of this adventure came into play: I struggled mightily to get the Corsair CWCH cooler to mate properly with the MSI Z87-G45 mobo I’d selected (good price, with mSATA drive slot), but ended up having to switch for the stock Intel cooler because I had to keep fiddling with the CPU to get it to work.

Turns out my #10 Torx screwdriver came in really handy, because torqueing down the front screw to clamp down more tightly onto the processor was the only way to get things working. This necessitated three tries before I was able to boot into the BIOS. Getting the Corsair cooler in place ONCE was more than enough for me, so I’m using the stock cooler now, watching temps, and plan to drop in a Zalman CNPS95 (had good luck with these before in various earlier builds) if the stock cooler doesn’t cut it. At present, CPU temps mostly fall in the range from 40-50 degrees Celsius (about 10 degrees hotter than on the i7 930 CPU I just replaced, but I think that’s normal when scaling down from 45 to 22 nm technology). The Antec 902 case in which the build is housed is well ventilated, with four 120 mm fans, plus a 200mm venting warm air out the top.

My next big challenge came from a Windows licensing snafu. MS didn’t inform me until one day after the initial install that my key was a duplicate (why couldn’t they check that at initial validation, I wonder?). I wasn’t able to get tech support to issue me a new key (even though I’ve got an MSDN subscription and two unused Windows 8.1 keys, the activation utility would accept neither one of them). After trying every trick I know of, I elected to re-install, as much because I wanted to switch to RAID drivers and try out the Intel Rapid Start Technology, as because I got tired of trying to fix the licensing snafu I’d caught myself in.
rapstar

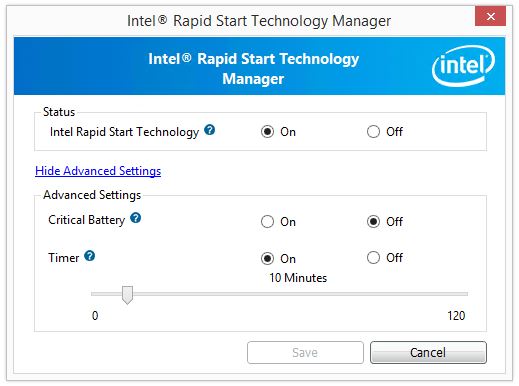
The GUI doesn’t show much, but it takes several contortions to get it working.

That’s where my next big learning adventure began. I quickly learned that I needed an SSD “hibernation partition” in which to shadow memory contents to make Rapid Start work, and I chewed through several sets of instructions before I figured out how to make it work on my MSI-based system:

0. I number this step zero because it occurs when Windows isn’t running (yet): you must get into your system BIOS to enable Intel Rapid Start Technology (and set the hibernation value to “Immediate” if present) before you can get the Rapid Start installer to work properly. You’ll have to catch and set this at an opportune reboot before attempting to install the software.

1. I set up the Intel mSATA 80GB SSD (nominal size; 76.29 GB actual) with a 42 GB partition, to leave 34 GB for the hibernation partition that Rapid Start uses to snapshot or copy memory contents. I used Disk Manager to set up a 42 GB GPT partition, leaving 34 GB unformatted for the series of diskpart commands I figured out I would need. Any SSD will do for the snapshot, and you should leave slightly more space in the hibernation partition than you have memory installed on your PC (mine has 32 GB; hence, a 34 GB partition). Interestingly, while the hibernation partition is visible in Disk Management, it is invisible to Windows Explorer (aka “File Explorer” or explorer.exe in Windows 8.*).

2. Next, I fired up diskpart following the instructions in the Intel Rapid Start Technology Guide for UEFI Mode, with special emphasis on the section entitled “Create a Primary Store Partition on a non-OS drive SSD.”

3. I skipped the convert gpt step, because the format I created in diskmgmt.msc was already GPT-formatted (in Step 12). I followed the create partition step as shown, using 34816 as the size of the hibernation partition in megabytes (34 GB * 1024 (megabytes per gigabyte) = 34816).

4. I jumped over into Intel Rapid Storage Technology, clicked the Performance tab, and made sure the acceleration features were enabled (this turns out to be an essential step in the process, though not very well documented).

5. I cut-and-pasted the exact value for the set id command from the documentation, namely “D3BFE2DE-3DAF-11DF-BA40-E3A556D89593” as shown in the Intel User Guide, then exited diskpart as directed.

6. Before you can get the Intel Rapid Start installer to work, you need to reboot the PC. After that, provided your chipset (Intel 8-series chipsets or better, with spotty 7-series coverage) and setup are copascetic, the program should install nicely and do its thing. One more observation: I had to reboot my machine two more times after installing Rapid Start to start observing the effects that the software promises — that is, a more rapid start. Apparently, it takes two reboots before the hibernation file gets set up and starts working properly, so be patient, please!

My PC now boots to the login prompt in under 10 seconds, which is at least 10 seconds faster than it used to boot before installing the Rapid Start stuff. Is it worth it? The real answer is that it depends on how often you reboot your PC. I mess around with mine all the time, so I think it’s worth giving up 34 GB of SSD space for this purpose. If you don’t reboot often, or you don’t have the SSD space to spare, you may not feel the same way.

But now, at least, I’ve figured out how to install and use Rapid Start on a home-brew PC, and I’ve got a RAID-based disk setup going for this UEFI Windows 8.1 install. The machine currently clocks at 8.1 in the WinAero version of WEI (Windows Experience Index, with the Intel 530 SSD the slowest link in the collection of subsystems measured) so I can’t be too unhappy with the results. By a slim margin (8.10 to 8.05 for my other desktop’s SSD), it’s now the fastest system I’ve got.

Facebooklinkedin
Facebooklinkedin

Get the iPhone/Pad/Pod (iOS) Windrivers without installing iTunes

I’ve got numerous PCs around here and there — I can see two desktops and two laptops as I sit here in my office, and there are two more laptops and one SFF desktop elsewhere in our domicile at this moment; I’ve also got four laptops out on loan right now to various friends and relations. My wife and I both use iPhones (both are 4S models), and we’ve got a family iPad, plus a 32 GB iPod that Gregory used to play on a lot before he got a Nook for his birthday earlier this month. That means we have no shortage of machines into which we might plug one of these iDevices, but there’s an issue in working with them that I wanted to avoid on those machines where I don’t usually play iTunes music or watch much video.

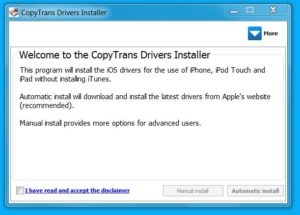
The conundrum pretty much boils down to this: the iPhone driver that Windows loads on its own is pretty ancient, but unless you want to install iTunes, it’s a tricky business to get a more up-to-date driver without carrying all the extra iTunes baggage along with it. Believing there had to be a way to get the drivers without the full-blown package, I searched Google using this string “install iPhone drivers without installing iTunes.” And sure enough, up pops a free utility named CopyTrans Drivers Installer that will do the job for you (here’s a C|Net download link for the 3.35 MB utility in ZIP form, just like the afore-linked product page itself proffers). Download the file, unzip to a directory, then run CopyTransDriversInstaller.exe (version 1.024 as I write this post), and you’re done. Not much to it, really.

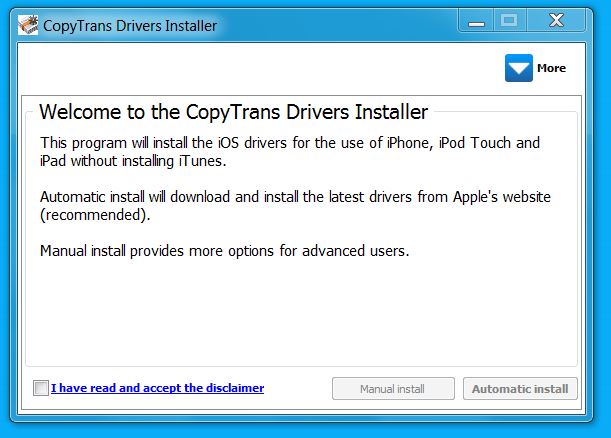
The initial run screen requires you to agree to the licensing terms.

There is one catch, however: the program will download iTunes in its entirety, then extract the drivers from that download and install them for you. That’s what the Automatic install option at the lower right of the installer window above is about: it’s well worth using, because it does all the grunt work for you. It also works with the latest and greatest iTunes download available from the Apple site on your behalf — that was version 11.0.2.26 as I wrote this post — so you don’t have to check or worry about version numbers, either. The iTunes download (it’s nearly 86 MB in size) took far longer than any other parts of the installation activity. Though the whole operation took about 8 minutes or so on my Lenovo T520 laptop, more than half that time was devoted to downloading iTunes so the program could extract the drivers contained therein for installation (which took well under a minute, when it finally got underway).

If you want to dock your iDevice to a Windows PC without installing iTunes, it’s probably worth grabbing a copy of the CopyTrans Drivers Installer. Put it through its paces, and you’ll have the latest and greatest iDevice drivers at your disposal without having to shoulder the burden of iTunes (and the Bonjour protocol, iTunesHelper.exe, and anything else Apple decides to throw into the iTunes mix — see this fascinating and horrifying list of background processes that can show up when you use iTunes on a Windows PC, straight from Apple Support).

[Querelous and Concluding Unscientific Postscript, with apologies to Kierkegaard: I’d love to know what tool or technique the CopyTrans Drivers Installer uses to access the contents of the 32- or 64-bit iTunes installer files. I attacked them with both 7Zip (which is suprisingly capable at taking .exe files apart) and Legroom Software’s Universal Extractor (which is a good tool, but hit or miss, and crashed when trying to unpack this file’s contents) without any luck. Knowing how they did their thing would help me do it with other installers, which is sometimes the only way to get access to Windows drivers that may not otherwise be accessible on some PCs, particularly when, for example, trying to snag a Dell driver for use on an HP machine, or vice-versa.]


Facebooklinkedin
Facebooklinkedin

Disk2VHD Is Just What the Doctor Ordered for Machine Upgrades and Migrations

Anybody who’s followed my Windows experiences and commentary already knows I think the Sysinternals guys (Mark Russinovich and Bryce Cogswell, primarily, but also a host of others over the years) hung the moon when it comes to great tools and utilities. I was recently pondering how to get over the “What did I forget?” hump in finally upgrading my primary desktop from 4 to 12 GB of RAM, and thus also from Windows 7 Ultimate 32-bit to its 64-bit counterpart, when my research led me to their free tool named Disk2VHD.

Continue reading Disk2VHD Is Just What the Doctor Ordered for Machine Upgrades and Migrations

Facebooklinkedin
Facebooklinkedin

Another Nice System Drive Cleanup Maneuver: DriverStoreExplorer

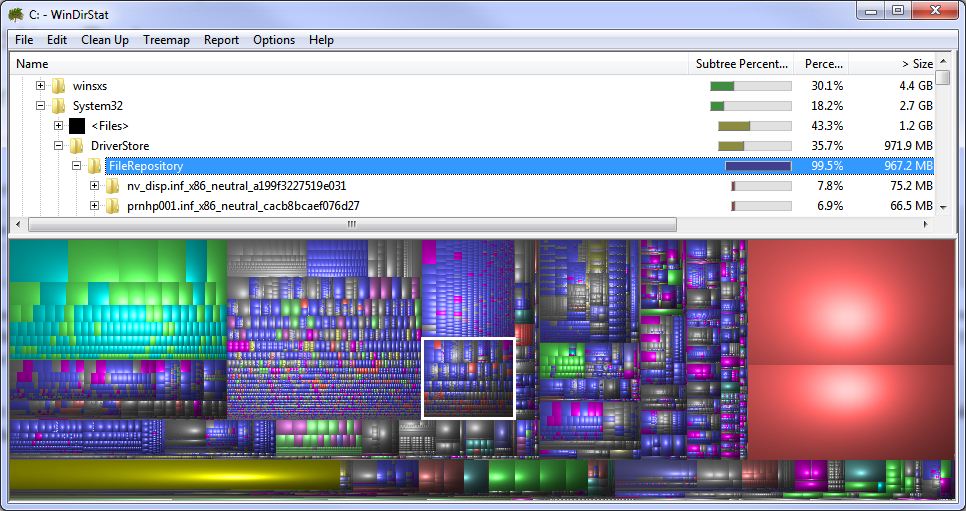
In my continuing quest to find more and better ways to slim Windows 7 down on disk, so as to make the most of smaller, more affordable SSDs, I’ve come across another footprint reducing technique. Exploring space consumption with my favorite visual tool, WinDirStat, I observed that the Windows FileRepository directory (C:WindowsSystem32DriverStoreFileRepository) consumes a fair amount of space (2.2 GB after my initial assay, just under 1 GB after the clean-up I’m about to describe).

Continue reading Another Nice System Drive Cleanup Maneuver: DriverStoreExplorer

Facebooklinkedin
Facebooklinkedin