OK, so I’m on the phone last Friday, and I’ve just installed Service Pack 1 for MS Office 2013. After the obligatory post-install reboot, I discover the system won’t boot because it can’t find a boot drive. A long bout of troubleshooting ensues, after which I reluctantly conclude my motherboard’s gone south. My immediate efforts concentrate on moving over to my back-up desktop system, and I put an order into Newegg for a new Z87 motherboard, with a i7 4770K processor.
By the time I got my standby system promoted to production status, and prepared my T520 notebook for backup status (which means it’s got all the apps I use installed, and is ready to play host to my Outlook PSTs and all my usual data files and stuff), the parts arrived from Newegg. Wednesday, I started putting pieces together, and managed to get all the way through the build process for my first shot at a new backup system. But that’s where my first lesson of this adventure came into play: I struggled mightily to get the Corsair CWCH cooler to mate properly with the MSI Z87-G45 mobo I’d selected (good price, with mSATA drive slot), but ended up having to switch for the stock Intel cooler because I had to keep fiddling with the CPU to get it to work.
Turns out my #10 Torx screwdriver came in really handy, because torqueing down the front screw to clamp down more tightly onto the processor was the only way to get things working. This necessitated three tries before I was able to boot into the BIOS. Getting the Corsair cooler in place ONCE was more than enough for me, so I’m using the stock cooler now, watching temps, and plan to drop in a Zalman CNPS95 (had good luck with these before in various earlier builds) if the stock cooler doesn’t cut it. At present, CPU temps mostly fall in the range from 40-50 degrees Celsius (about 10 degrees hotter than on the i7 930 CPU I just replaced, but I think that’s normal when scaling down from 45 to 22 nm technology). The Antec 902 case in which the build is housed is well ventilated, with four 120 mm fans, plus a 200mm venting warm air out the top.
My next big challenge came from a Windows licensing snafu. MS didn’t inform me until one day after the initial install that my key was a duplicate (why couldn’t they check that at initial validation, I wonder?). I wasn’t able to get tech support to issue me a new key (even though I’ve got an MSDN subscription and two unused Windows 8.1 keys, the activation utility would accept neither one of them). After trying every trick I know of, I elected to re-install, as much because I wanted to switch to RAID drivers and try out the Intel Rapid Start Technology, as because I got tired of trying to fix the licensing snafu I’d caught myself in.
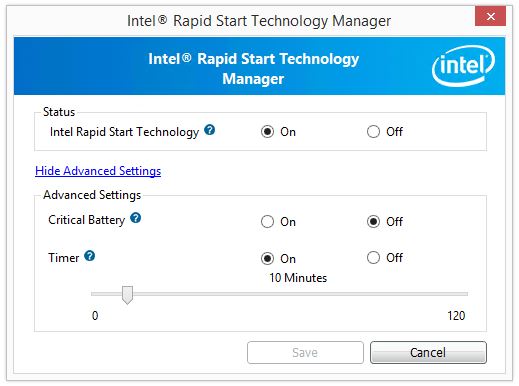
The GUI doesn’t show much, but it takes several contortions to get it working.
That’s where my next big learning adventure began. I quickly learned that I needed an SSD “hibernation partition” in which to shadow memory contents to make Rapid Start work, and I chewed through several sets of instructions before I figured out how to make it work on my MSI-based system:
0. I number this step zero because it occurs when Windows isn’t running (yet): you must get into your system BIOS to enable Intel Rapid Start Technology (and set the hibernation value to “Immediate” if present) before you can get the Rapid Start installer to work properly. You’ll have to catch and set this at an opportune reboot before attempting to install the software.
1. I set up the Intel mSATA 80GB SSD (nominal size; 76.29 GB actual) with a 42 GB partition, to leave 34 GB for the hibernation partition that Rapid Start uses to snapshot or copy memory contents. I used Disk Manager to set up a 42 GB GPT partition, leaving 34 GB unformatted for the series of diskpart commands I figured out I would need. Any SSD will do for the snapshot, and you should leave slightly more space in the hibernation partition than you have memory installed on your PC (mine has 32 GB; hence, a 34 GB partition). Interestingly, while the hibernation partition is visible in Disk Management, it is invisible to Windows Explorer (aka “File Explorer” or explorer.exe in Windows 8.*).
2. Next, I fired up diskpart following the instructions in the Intel Rapid Start Technology Guide for UEFI Mode, with special emphasis on the section entitled “Create a Primary Store Partition on a non-OS drive SSD.”
3. I skipped the convert gpt step, because the format I created in diskmgmt.msc was already GPT-formatted (in Step 12). I followed the create partition step as shown, using 34816 as the size of the hibernation partition in megabytes (34 GB * 1024 (megabytes per gigabyte) = 34816).
4. I jumped over into Intel Rapid Storage Technology, clicked the Performance tab, and made sure the acceleration features were enabled (this turns out to be an essential step in the process, though not very well documented).
5. I cut-and-pasted the exact value for the set id command from the documentation, namely “D3BFE2DE-3DAF-11DF-BA40-E3A556D89593” as shown in the Intel User Guide, then exited diskpart as directed.
6. Before you can get the Intel Rapid Start installer to work, you need to reboot the PC. After that, provided your chipset (Intel 8-series chipsets or better, with spotty 7-series coverage) and setup are copascetic, the program should install nicely and do its thing. One more observation: I had to reboot my machine two more times after installing Rapid Start to start observing the effects that the software promises — that is, a more rapid start. Apparently, it takes two reboots before the hibernation file gets set up and starts working properly, so be patient, please!
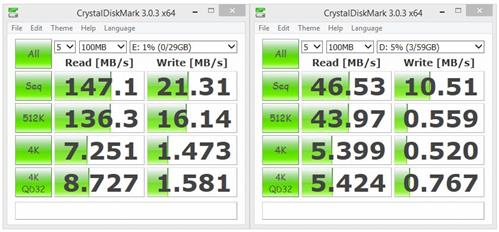
My PC now boots to the login prompt in under 10 seconds, which is at least 10 seconds faster than it used to boot before installing the Rapid Start stuff. Is it worth it? The real answer is that it depends on how often you reboot your PC. I mess around with mine all the time, so I think it’s worth giving up 34 GB of SSD space for this purpose. If you don’t reboot often, or you don’t have the SSD space to spare, you may not feel the same way.
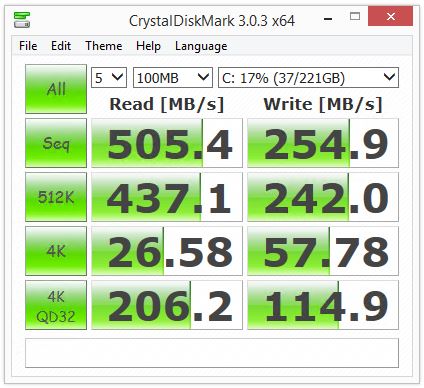
But now, at least, I’ve figured out how to install and use Rapid Start on a home-brew PC, and I’ve got a RAID-based disk setup going for this UEFI Windows 8.1 install. The machine currently clocks at 8.1 in the WinAero version of WEI (Windows Experience Index, with the Intel 530 SSD the slowest link in the collection of subsystems measured) so I can’t be too unhappy with the results. By a slim margin (8.10 to 8.05 for my other desktop’s SSD), it’s now the fastest system I’ve got.