Category Archives: Win7View

Notes on Windows 7, Win7 compatible software and hardware, reviews, tips and more.

Group Policy Edits Fix Broken RDP Credentials

I ran into an interesting problem this weekend. The “Your credentials did not work” error appeared when I added my usual MS admin-level account to the Lenovo X390 Yoga. I checked all the usual suspects with no change in status.  That means: remote access settings, account status, and so forth. Ultimately I had to search the error message via Google. And that, dear readers, is how I learned group policy edits fix broken RDP credentials.

How Group Policy Edits Fix Broken RDP Credentials

Even though I was using the same long-standing Microsoft Account I use for admin level login on all of my Windows 10 PCs, this one wouldn’t work. At one point, error messages informed me about a problem with LSASS (local security authority subsystem service, the OS component that handles logins). Later on, that error changed to “Your credentials did not work.” Sigh.

Because I had no trouble using the same account name and password (plus 2FA authentication through MS) to log into that PC locally, I knew the problem was focused on RDP. And indeed I turned up an extremely helpful article at Appuals.com. Entitled Fix: Your Credentials Did not Work in Remote Desktop, it let me to a working solution.

Group Policy Changes Needed

For me the items I had to enable, and then add the value TERMSRV/* resided in the edit path named
Computer Configuration > Administrative Templates > System > Credentials Delegation

Those items numbered 4, as follows:

1. Allow delegating default credentials with NTLM-only server authentication
2. Allow delegating default credentials
3. Allow delegating saved credentials
4. Allow delegating saved credentials with NTLM-only server authentication

Once I had made those changes, I had to restart the target PC. I also had to manually re-enter the credentials I’d attempted to use beforehand (without success). Then, finally: Boom! RDP accepted my connection attempt on the usual MS admin account. Problem solved. That was an odd one…

Facebooklinkedin
Facebooklinkedin

Best Holiday Wishes For 2020

Dear Readers:

You may not celebrate the same holidays that we do here at Chez Tittel. That’s perfectly OK. But whatever joys and remembrances you can find as 2020 gives way to 2021, I hope you’ll savor and find pleasure in them. We’re gearing up for a nice long holiday weekend right now. Today, I’m sharing an image of my wife Dina’s magnificent rumcake with one and all. I wish you could smell it (heavenly!) but even as a photograph it’s a pretty tasty image. And please: accept our best holiday wishes for 2020, and our hopes that 2021 will manage to improve on this year in every possible way.

After Best Holiday Wishes for 2020, Then What?

I’ll be posting sparely and sparsely until January 4, when I’ll resume a normal working schedule. We’ll be off to a new year of Windows 10 adventures and misadventures. I’ll keep chronicling them as they come my way, so please stay tuned.

High-Tech Goodies from S. Claus

I’d been looking around for a battery pack stout enough to keep our iPad running for the best part of the day. I found it in a RAVPower Xtreme RP-PB41 charger (26800 mAh). My son, Gregory opted in for a Schiit Modi3+ D/A Converter to sweeten his headphone audio. The boss has take over custody of the Dell Optiplex Micro 7080 I’ve been writing about lately as her daily driver. Like her, it’s a boss machine! We’ll have plenty to play with after the formal exchange of gifts tomorrow morning.

Of all the toys I acquired this year, my favorite remains the Sabrent NVMe drive enclosure with an ADATA XPG 256 GB NVMe SSD inside. It’s what I use to store my library of ISO images for use with Ventoy (or ready mounting and rooting around inside). Still peachy!

And again, best holiday wishes from all of us to all of you. May 2021 be a vast step up from 2020 for everyone.


Facebooklinkedin
Facebooklinkedin

Practice Shows Little Speed Difference USB 3.0 versus USB-C

Just for grins, I conducted an experiment on one of my Lenovo X380 Yoga laptops. I hooked up two identical Seagate ST2000LM003 2TB HDDs drives. One is in an Intatek FE2004C USB-C drive enclosure; the other in a StarTech 52510BPU33 USB-3 drive enclosure. Using the two drives, and comparing them in CrystalDiskMark, practice shows little speed difference USB 3.0 versus USB-C. That’s the point of the following graphic in this story, fact.

Practice Shows Little Speed Difference USB 3.0 versus USB-C.3top-Cbottom

USB 3 on top; USB-C on the bottom. Big block transfers favor C, but random access favors 3. It’s a toss-up!

If Practice Shows Little Speed Difference USB 3.0 versus USB-C, Then What?

This makes me feel OK about hanging onto my older USB 3 drive enclosures because there’s only a small performance difference between them. It’s not like the results make me want to surplus all of my old USB 3 enclosures and replace them with their USB-C counterparts. This is good for the general exchequer, if for no other reason.

Check Out Uwe Sieber’s USBTreeView

As it happens, it’s not as easy as I thought it would be to determine what kind of USB interface a specific drive enclosure is using. Nir Sofer’s otherwise excellent USB Device Viewer (USBdeview.exe) didn’t clue me in. I turned to Uwe Sieber’s USB Device Tree Viewer (USBTreeView.exe) instead.

In the summary section, the device information in that utility distinguishes which USB version is in use for a targeted device. It alone was able to tell me that my D: drive (the USB 3 attached device) was running USB Version 3.0.  It also informed me that my E: drive (the USB-C attached device) was running USB 3.1 Gen ? You see the latter info from Sieber’s utility as the lead-in graphic for this story.

That latter designation is less informative than it could be, but I know my X380 only supports Gen 1 anyway. Thus, that particular the mystery is not too shrouded in obfuscation to penetrate.

When Do New-Tech Enclosures Make Sense?

I could see upgrading from USB 3 or 3.1 to Thunderbolt for SSD enclosures, particularly those for NVMe devices. I’m not sure even m.2 SSDs are enough to justify the extra outlay. But hey: that sounds like a great reason to order one or two such items and try it out to see what happens. Stay tuned!

Facebooklinkedin
Facebooklinkedin

Windows 10 Backup Strategies

When it comes to backing up my Windows 10 systems, I’m a belt and suspenders kind of guy. For my production desktop, that means a daily image backup to Macrium Reflect. It also means 12-hour copies of my selected folders from my user account through File History. I’ve savagely pruned what File History copies by default, because my daily image backups catch a lot of that stuff once a day, which is often enough for me. My Windows backup strategies are designed to limit data loss to a 12-hour period, and to get me back to work quickly if I ever need to restore an image. I keep my Macrium Rescue Media updated and ready to go, so I can even do a bare-metal restore should my current OS get hosed.

Deciding on Windows 10 Backup Strategies

Daily image backups catch everything on my C: drive (including the User folders in which I’m active). So I use File History sparingly (I’m already catching a total snapshot once a day). I’ve trimmed the default allocation to eliminate music files. (I have over 4 GB indexed through “My Music” across 2 other drives on my system.) Ditto for Downloads (currently 6.7 GB in size).

If you going to use File History be sure to look over the Folders it covers carefully. You can click on any one of them to see a “Remove” button to get rid of it. I made extensive use of that capability in pruning my File History capture description. You can see my most important File History folders in the lead-in graphic for this story (click here for full-sized view).

Practice Makes Perfect for Backup/Restore

To make sure your backups are working properly, you should make a backup (or use File History) to restore some files. Consider it both a test to make doubly darn sure backup is working and practice for when you need to restore something for real. Practice prepares you for disaster so you can concentrate on doing what’s important rather than trying to remember how to do it.

I recommend a practice run at least once every three months. I don’t usually have to schedule this myself, because I’m always tinkering with my systems. That means that I’m sometimes repairing the unwanted results of a tinker gone bad by — you guessed it! — restoring a backup.

Facebooklinkedin
Facebooklinkedin

KB4586853 Fixes Thunderbolt NVMe SSD Stop Error

A couple of months back, Windows 10 starting crashing when I would plug a USB-C NVMe device into one of my Belkin Thunderbolt docks. I soon learned this was a known gotcha, and simply switched to plugging the device into my USB-C/Thunderbolt port instead (which kept working). As per the Windows 10 20H2 Known and Resolved Issues page, KB4586853 fixes Thunderbolt NVMe SSD stop error.

Checking KB4586853 Fixes Thunderbolt NVMe SSD Stop Error

As an eternal skeptic, I tried my Sabrent-enclosed Samsung 760 NVMe drive through the Thunderbolt dock on the Lenovo X380 Yoga, the X1 Extreme, and the X390 Yoga laptops I have at my disposal. It worked fine on all of them. I haven’t tried it on the Dell Optiplex 7080 Micro (it’s upstairs) yet, but I expect it will be fine as well. Makes one wonder what started this off in the first place.

The Conexant Audio Driver Issue

As you can see in the lead-in graphic, the long-standing error with Conexant audio drivers remains unresolved. I guess I should be glad that it doesn’t affect my newer Lenovo laptops. As you can see from the following Device Manager screen cap, all of them list a Conexant SmartAudio HD device as the first entry under Sound, video and game controllers. Given the gotchas out there, I’m happy when they don’t bite me!

KB4586853 Fixes Thunderbolt NVMe SSD Stop Error.conexant

Although my newer (2018 and later) Lenovo laptops all include Conexant audio chips, none seems affected by the unresolved issue for such devices. Dodged a bullet?

In general when things get weird with devices or their drivers on Windows 10, I usually check the issues list before I go into heavy-duty troubleshooting mode. As with the Thunderbolt NVMe device issue just resolved, such issues do bite some of my PCs some of the time. Thus, this saves me from trying to solve problems that other, better-equipped engineering teams are already working on. Now, if I could just learn to be patient while those fixes are in progress…

Facebooklinkedin
Facebooklinkedin

Wonky Word Launches Standard Windows 10 Repair Drill

It just happens from time to time. Windows 10 goes off the beam. Applications act weird, or OS interface elements disappear or stop working. Over the years I’ve learned this is Windows’ way of telling me that something is damaged, broken, or missing behind the scenes. This morning I had issues trying to edit a revised Word file that Val Potter at ComputerWorld had sent back to me for a typical second pass. In this case, wonky Word launches standard Windows 10 repair drill. Luckily for me, things went back to normal after step 1. That seldom happens!

Whaddya Mean? Wonky Word launches standard Windows 10 Repair Drill

I have a standard sequence of things that I do when MS Office elements get weird or go off on me. Here ’tis (check your wonky app between each step so you know when to quit):

    1. Run sfc /scannow in an administrative PowerShell session
    2. Run dism /online /cleanup-image /scanhealth;
      If it reports any problems, replace that last item with /restorehealth as your next command
    3. Run Programs and Features from Control Panel, select Microsoft Office from the list of programs, and select Repair from the available options. Try the Quick Repair first. If that doesn’t work run the Online Repair instead. (See screen cap below. The online option can take 10-15 minutes to complete, depending on Internet download speeds.)
    4. Use the Microsoft Support and Recovery Assistant to attempt Office repairs (link below)
    5. Get the MS Office Uninstall Support Tool to completely remove all traces of MS Office from your PC (link also below).

If things still aren’t working after Online Repair, you’ll want to download the Microsoft Support and Recovery Assistant. Try its MS Office repair facilities next. If that still doesn’t work, download the MS Office Uninstall Support Tool. Use it to completely uninstall Office from your PC. After that, of course, you’ll need to reinstall it all over again.

When All Else Fails, Uninstall/Reinstall Generally Works

As a last ditch attempt to get Office working, I’ve never had a complete uninstall/reinstall fail on a Windows PC. The only exception is when the OS itself was damaged or corrupted. If it worked for me then, it should work for you now, too. My fervent hope is that you don’t have to take things that far down the list!

Please note: steps 1 and 2 are generally the first two steps for any kind of repair attempts when Windows gets wonky. SFC stands for “System File Checker.” If it finds any damaged or missing system files it replaces them, as it did for me on my temporarily deranged PC. And again, that was enough to set things back to rights. When I checked Word and found it working again, I knew my drill sequence had ended.

If Word hadn’t been working again, I’d have gone onto the next step. Step 2 calls the Deployment Image Servicing and Management utility and checks the contents of the Windows component store (aka WinSxS) with scanhealth. If repairs are needed, restorehealth replaces questionable component store elements with known good working copies.

Facebooklinkedin
Facebooklinkedin

Patch My PC Updater Is Worth Checking Out

Thanks to Tim Fisher at LifeWire, I’ve found a reasonable facsimile for the late lamented Secunia Personal Software Inspector (PSI). It’s called Patch My PC Updater and it does pretty much everything you’d want such a tool to do: scans your PC, inventories installed applications, identifies those that are out of date, and goes off on its own to update them for you. Like Secunia PSI, it’s also free. The lead-in graphic for this story shows all 9 out-of-date programs on a test PC. It also illustrates nicely why Patch My PC Updater is worth checking out.

Grab It to See If Patch My PC Updater Is Worth Checking Out

You’ll find a download link at https://patchmypc.com/home-updater. Commercial versions that plug into SCCM and InTune are also available for IT-level use. The program works from a USB drive — that is, the executable is portable and need not be installed on target PCs.

Before learning about Patch My PC Updater, I had been using a version of KC Software’s SuMO for application updates. But although that program is good at scanning PCs it is less than stellar at handling the update part. Its automation is negligible too. That’s because it requires users to follow update links and handle updates manually for at least some of the out-of-date programs it finds.

All in all, Patch My PC Updater is fast, accurate and covers nearly everything I’ve got installed. Hence, my recommendation that you check it out. If you don’t like it, you can return to Tim Fisher’s LifeWire story and check out 8 more other similar packages he recommends (it also mentions SuMO but puts it in last place).

Updating Applications Goes Better with Expert Help

Whichever tool you choose to keep up with Windows applications, it’s useful to run one at least monthly. That way, you can be sure that you’re getting new features and functions as they get added. Perhaps more importantly, you’ll also be keeping up with security patches and fixes, if other sources of intelligence aren’t already tracking your software more closely for you.

Facebooklinkedin
Facebooklinkedin

Unresponsive Start Menu Gets Easy Fix

First, an admission: I’m a long time user of Stardock Software’s Start10 program. In fact, when I first started using this tool, it was called Start8, in keeping with the version of Windows then in vogue. I think my problem may be related to an unwanted interaction between Start10 and the default Windows 10 Start Menu. Nevertheless, I’m happy to report that an unresponsive Start Menu gets easy fix. Let me elaborate…

Unresponsive Start Menu Gets Easy Fix Explained

I don’t have this problem on unaltered Windows 10 installations where Start10 is absent. That’s what make me think it results from some kind of unwanted or unplanned interaction. I’ve checked the Start10 forums and can’t find any other reports of the same kind, but that’s neither here nor there.

On machines running Start10, when this happens I simply launch Task Manager. Then I right click the Windows Explorer entry beneath the Processes tab. When the resulting pop-up menu appears, one of its options reads “Restart.” When selected, this restarts the primary Explorer process. Among other things, it handles the task bar and the default Start Menu.

Following that restart operation, my access to the default Start Menu is restored. If I’m using Start10, why do I still need the default start menu? Simple: there are some programs and searches (such as using the string “reli” to launch the Reliability Monitor) that work in the default Start Menu but not in Start 10. Thus, I do have the occasional reason to dive into that default instead of sticking solely to Start10’s capabilities.

My old friend and former partner at Win10.Guru, Kari the Finn always said “If there’s a built-in tool or utility in the OS, there’s no reason to use a third-party tool.” Let’s just say that I’ve recently been reminded that he had good reasons to make that assertion. Even so, I remain a fan of third-party tools in general, and a fan of Start10 in particular. I’ve just had to learn to work around this particular issue. Cheers!

Facebooklinkedin
Facebooklinkedin

Recent Laplink PCmover Experience

OK, then. Yesterday evening, after finishing work for the day, I used Laplink PC Mover professional to migrate the Windows 10 installation from the old Jetway mini-ITX PC to the new Dell Optiplex 7080 Micro I’ve been writing about so much lately. I’m pleased to say that, on this latest attempt, the program did what its makers claim it does with reasonably dispatch and facility. I had made an earlier attempt to use it about 10 days ago that failed. I now suspect it had something to do with a pending and incomplete update on the mini-ITX PC. Thus, I must rate my recent Laplink PCmover experience as “mostly positive.”

Preparing for Recent LapLink PCmover Experience

Before I got started on the transfer, I made sure both source and target PCs were completely updated. I also used Macrium Reflect to create an image backup of each PC, and made sure I had the Macrium Rescue Media at my disposal, in case I needed to roll back either or both machines. I also cleaned up the filesystems on both machines using Disk Cleanup, UnCleaner, and manual file deletions from the user account subfolders Documents and Downloads.  With all that behind me, I was ready to go.

Working Through Recent LapLink PCmover Experience

As is often the case, the prep work took longer than the transfer. With the source PC upstairs and the target PC in my office, connected via my wired in-home GbE, the whole transfer involved 2.3 GB of data across 48K-plus folders and just under 8K files. along with a merge from source to target registry of 82K-plus values just over 9 MB in size.

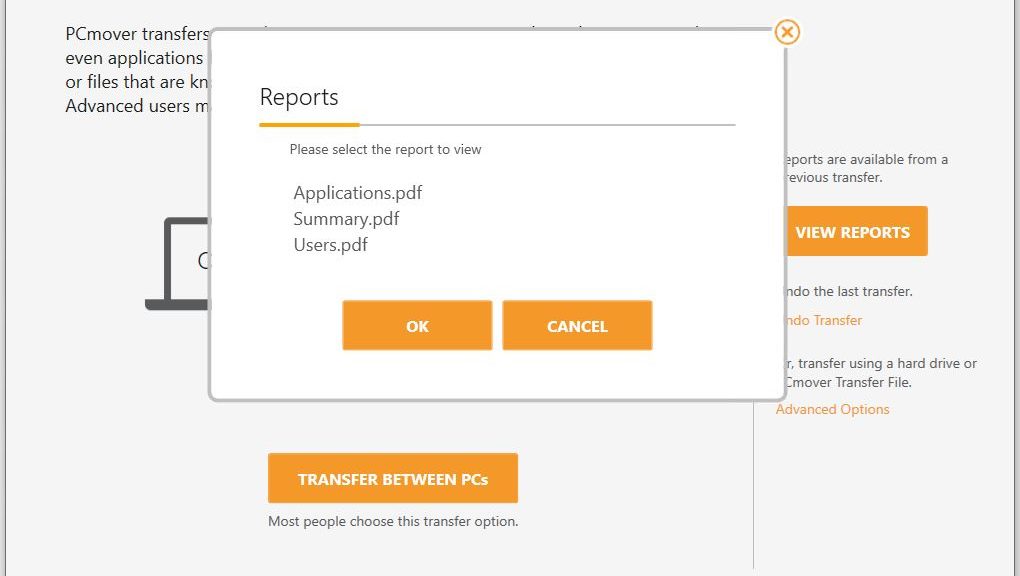
To my surprise, the whole process took just over 11 minutes, according to the program’s Summary.pdf report file. I’ve used Laplink’s PCmover before and I don’t ever remember things going that fast. Best guess: this machine has a relatively small number of applications installed and no huge file holdings under the various user account folders. Thus, it stands to reason that it wouldn’t take too long to migrate from one machine to the other. I was able to confirm that licensed applications from the source PC did work on the target after the process concluded, though I did have to provide (or re-activate) licenses before I could use those programs.

Benefits of LapLink PCmover Experience

I paid full retail for the software last December (I purchased it just over a year ago on December 6, 2019 and the price hasn’t budged since then). It cost me $42.45 ($39.99 MSRP plus $2.50 sales tax).

The obvious benefits of using PCmover are speed, ease of migration, and convenience. I’ve used this tool before, and I imagine I’ll use it again. I could have turned to the Microsoft User State Migration Tool (aka USMT) but here’s what its DOCs file says about that tool’s limitations:

USMT is intended for administrators who are performing large-scale automated deployments. If you are only migrating the user states of a few computers, you can use PCmover Express. PCmover Express is a tool created by Microsoft’s partner, Laplink.

I used the Pro rather than the Express version of PCmover. Express is free, but only for non-commercial use. Because I’m writing about it for publication I naturally chose the for-a-fee version. The Express version does most of what the Professional version did for me, but does not transfer applications, permit image based migration, or copy hard disk contents from source to target PC.

Where LapLink PCmover Experience Fell Short

I did have a little bit of cleanup to do after the migration process concluded. PCmover does not, as I discovered, move all browser settings and preferences from source to target PC. Thus, I had to go in and install some extensions, and change default home page settings in Chrome, Edge and Firefox. It did move favorites/bookmarks, though, as far as I could tell.

All in all, it was a positive experience and resulted in a running PC that worked properly with 99+% of user, account, preference, settings, and files from the old machine ready, available and working on the target PC. As far as I’m concerned the US$40-odd PCmover cost me was worth it, and produced the desired outcome. ‘Nuff said.

Facebooklinkedin
Facebooklinkedin

Implicit Perils When Multiple Accounts Get Interlinked

I went through an interesting adventure this weekend. I found myself trying but unable to reset the password for my Apple ID account — or so I thought, anyway. It wasn’t until I spent a couple of hours trying to fix things on my own that I gave up and turned to Apple Support instead. To my relief, the support rep recognized my problem more or less instantly. He showed me that I had logged into different accounts for iCloud and the Apple Store. Then he explained there are implicit perils when multiple accounts get interlinked in that way.

What Are the Implicit Perils When Multiple Accounts Get Interlinked?

Long, long story short when I was trying to change my password for one account I ended up changing it for another. The iCloud account took precedence over the Apple ID account for whatever reason. I didn’t see any visual cues to tell me that’s what I was doing. Thus, it took a call to tech support to clear up my misunderstanding.

Now, though, things have been set straight. I’ve got known usable passwords for both Apple accounts and have disentangled use of the two IDs on my iPhone which caused that immensely frustrating and bizarre set of symptoms and circumstances.

One More Thing, Though…

Right now, I can use my credentials on Firefox to access appleid.apple.com. But those same credentials don’t work on Chrome. I’m mystified and mortified, but I have no earthly idea why this is happening. Aha! Internet research tells me it’s likely a cookies or history issue (apparently old cached credentials trump newly entered ones at the keyboard). Just another wonderful aspect of living large as a digital person, I guess.

I swear! Sometimes I spend more time digging through login and credentialing issues to access accounts than I actually spend using those accounts directly. Sigh.

Facebooklinkedin
Facebooklinkedin