Category Archives: Win7View

Notes on Windows 7, Win7 compatible software and hardware, reviews, tips and more.

About 21286 News and Interests

OK, then. Right after I upgraded to the latest Dev Channel Insider Preview Build (21286.1000) I expected to see the new “News and interests” item show up in the notification area on my Taskbar. No dice on my Lenovo X380 Yoga test machine. But as I learned more about 21286 News and interests I came to understand that the Edge Browser is involved in its inner workings. So, I checked the update level on Edge on that PC. And sure enough: it needed to come up to the current version 87.0.664.75 to be fully up-to-date.

More About 21286 News and Interests

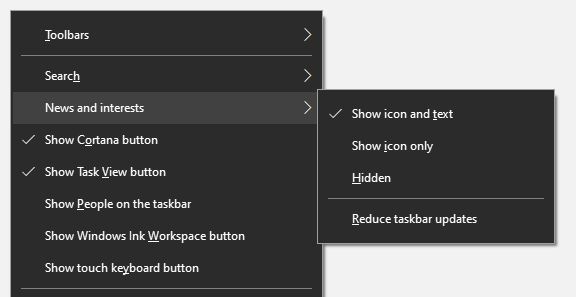
After updating Edge, and another reboot, News and interests showed up. You can see it in the lead-in graphic for this story, which shows the notification area on my taskbar. It’s off to the left. It shows the sun occluded by a cloud, and reads “45°F Partly sunny.”

If you’re running this Dev Channel release and News and interests fails to appear, try upgrading Edge. Another reboot, and you should see something like the lead-in graphic for this story. That’s because in this build, News and interests is turned on by default. What if you want to turn it off, or see less of what it has to show? Easily done!

Managing This New Taskbar Item’s Appearance

To manage News and interests, right-click on a blank area in the taskbar. A menu will pop up that includes the “News and interests” item (see below). Click on the fly-out symbol to the right, and a fly-out menu with controls appears. Set the one you want. It’s just that easy.

Tip: Hidden means you won’t see it. Or you can Show icon only, if you don’t like the default value Show icon and text. ‘Nuff said.

About 21286 News and Interests.controls

If you don’t like the default value (“Show icon and text”), here’s where you change related settings.

Facebooklinkedin
Facebooklinkedin

MS Docs Names Windows 10 Upgrade Four Phases

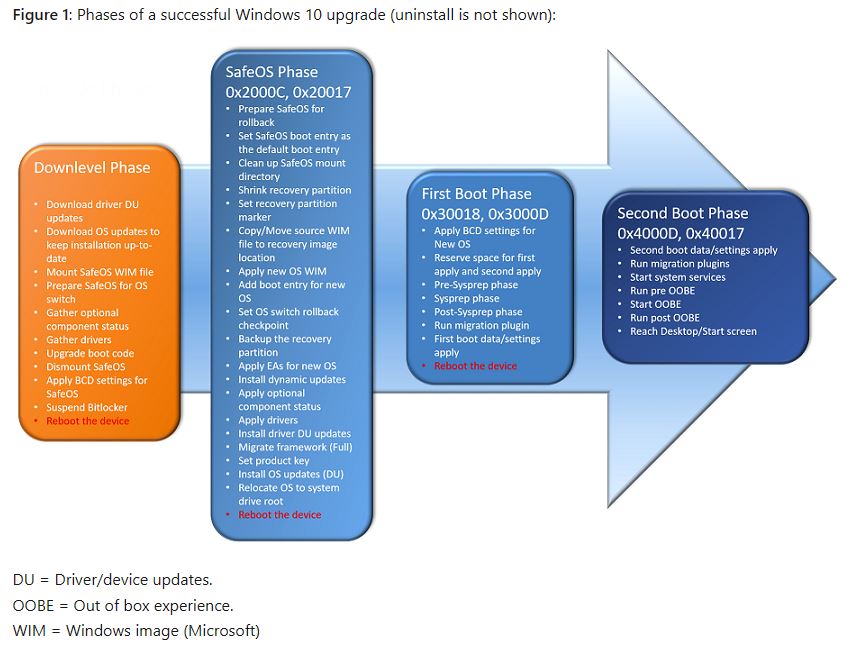
OK, then. I just struck a small lode while mining for Windows 10 gold. I found it in a Windows 10 Docs item named “Troubleshooting upgrade errors.” Therein, MS Docs names Windows 10 upgrade four phases. This document describes four phases during the upgrade process, and provides pointed troubleshooting suggestions and identifies useful error codes wherever it can. Good stuff!

If MS Docs Names Windows 10 Upgrade Four Phases, What Are They?

In the afore-linked Docs item, the four phases of Windows 10 Upgrade are named as follows:

Downlevel phase

This occurs while the old OS is still running (hence the name). This is the phase that runs right up until the initial reboot, at which point the old OS is no longer running. During this phase MS downloads all the pieces and parts it needs to perform the upgrade, so it’s apt to label this as an initial set-up and preparation phase. Errors that occur at this phase are most likely related to file access or download issues encountered as setup.exe attempts to pull all the pieces onto the target PC.

SafeOS phase

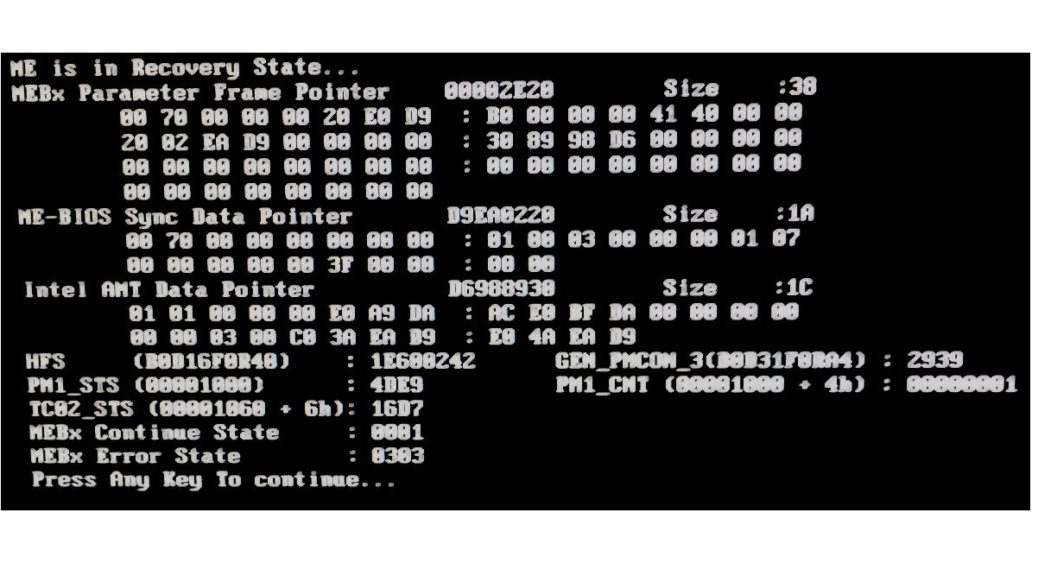
At this point you see something like the screencap shown in the lead-in graphic for this story. Following the initial reboot, Windows PE boots from the install image supplied as part of the source files for the upgrade. Those files might come from Windows Update, or an ISO obtained (and mounted) from the Media Creation Tool, Visual Studio downloads, or any number of other reputable Windows 10 image sources (Heidoc.net, UUPdump.ml, and so forth). Errors that occur at this phase at most likely device driver related.

First boot phase

About 30% into the “Working on updates” (SafeOS) phase, Windows 10 will reboot again to load key drivers for graphics and networking adapters or circuitry. Here again, driver issues are the most common cause of problems. Microsoft wisely advises those who encounter problems during this phase “[d]isconnect all peripheral devices except for the mouse, keyboard and display.  Obtain and install updated device drivers, then retry the upgrade.”

Second boot phase

About 70% into the “Working on updates” phase, Windows 10 reboots one or more times as needed. Now it is running the new OS with its new drivers. When errors occur during this phase, they most commonly originate from anti-virus software or filter drivers. Key advice: “Disconnect all peripheral devices except for the mouse, keyboard, and display. Obtain and install updated device drivers, temporarily uninstall anti-virus software, then retry the upgrade.” This phase is sometimes called the OOBE boot phase, during which final settings are applied.

Those who make it through all four phases complete their successful upgrade when they go through (or bypass) the “Out-of-box” phase (“Hi! We’ve got some updates for your PC. This might take several minutes.”)

Here’s a helpful diagram of the process that MS provides in the afore-linked Docs file:

[Click image for full-sized view. Much more readable!]

Notice it provides ample technical details about what’s going on in each phase. IMO, this is the most informative element in the whole document. Definitely worth reading right away (and returning to when handling upgrade or clean install issues). Enjoy!

Facebooklinkedin
Facebooklinkedin

Web-only Project Monarch May Replace Outlook.exe

Here’s an interesting item that makes me squirm just a little. Zac Bowden at Windows Central reports on an upcoming initiative at MS code-named Monarch. As he explains it, this will be a web-based app modeled on the current Outlook Web App (aka OWA). Where the squirming comes in is that this single new app targets all platforms. If I understand what’s going on, that means the web-only project Monarch may replace Outlook.exe. As a long, long-time Outlook.exe user who’s flirted with OWA from time to time, this prospect is scary.

If Web-only Project Monarch May Replace Outlook.exe, Then What?

Let me explain the source of my terror upon this news. Indeed, Bowden reports this changeover is planned for 2022, with plenty of time for improved understanding and more info to come. But I run my professional life around Outlook. My Archive. pst file goes back to the mid-1990s and is over 13GB in size. I use Outlook search to keep up with current and ongoing work. It also helps me research past activities, expenditures, and communications as I need them.

What happens when the .exe file gives way to a browser-based app? Can it still access and maintain my local PST snapshots and archives? This is the real cause of my most immediate concerns, because I depend on my “email trail” to make sense of my professional (and to a large extent, personal) activities.

So Far, There’s Not Enough Detail Available…

Here’s what Bowden says about MS’s plans for Monarch:

Microsoft wants to replace the existing desktop clients with one app built with web technologies. The project will deliver Outlook as a single product, with the same user experience and codebase whether that be on Windows or Mac. It’ll also have a much smaller footprint and be accessible to all users whether they’re free Outlook consumers or commercial business customers.

I’m told the app will feature native OS integrations with support for things like offline storage, share targets, notifications, and more. I understand that it’s one of Microsoft’s goals to make the new Monarch client feel as native to the OS as possible while remaining universal across platforms by basing the app on the Outlook website.

This all sounds well and good, from the perspective of reading and writing, and sending and receiving email. But from the perspective of building and maintaining a long-term business history around an email trail, it makes me wonder. Too bad, I guess, that for two-plus decades that’s been a primary strategy of mine with a huge lode of data to back it up. Looks like I may need to start rethinking that strategy, and look for ways to keep mining that data — outside Outlook, if necessary. Sigh.

Stay tuned. You can bet I’ll be following this with more than usual interest, because it has huge implications for how I work and ply my trade as a freelance writer, consultant and occasional expert witness.

Facebooklinkedin
Facebooklinkedin

Top 3 2020 Windows 10 Utilities

Over the past year, I’ve worked with numerous Windows 10 tools and utilities. IMHO, my top 3 2020 Windows 10 utilities have to be:

This doesn’t mean the tools were first introduced in 2020: PatchMy PC has been around for some time, in fact. But all 3 were new to me in 2020. They also quickly became incredible favorites used frequently. Let me briefly introduce them in upcoming sections, with links to longer explanations and information.

Top 3 2020 Windows 10 Utilities #1: Ventoy

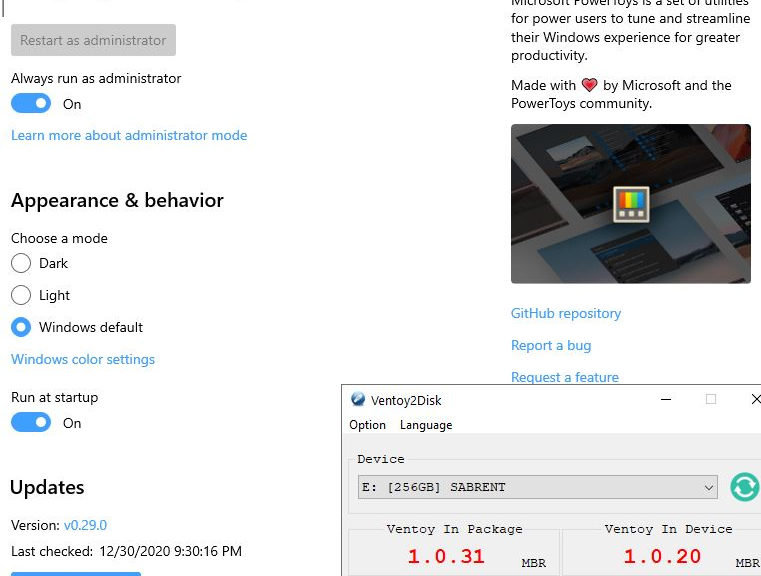
Ventoy is sheer genius. It partitions any USB drive into a 32 MB FAT EFI partition named VTOYEFI, and the rest of the drive into an exFAT partition named Ventoy. There’s enough smarts in the EFI partition to let a PC boot. It then mounts any ISO in the Ventoy partition from a pick list. Finally, it passes boot control to that mounted ISO image.

This means you can use a USB drive to store all your ISOs  for Windows 10, repair,  and so on. That includes low-level operational images such as MemTest86 for extended RAM testing. I currently have a nominal 256 GB (238 GB actual) NVMe SSD mounted in a Sabrent NVMe enclosure for my Ventoy drive. Any time I grab a new Windows 10 ISO that’s where it goes. It’s a blast.

Read more about it through this Google search, which provides links to all the great Ventoy coverage at Win10.Guru.

Top 3 2020 Windows 10 Utilities #2: PatchMyPC

For many years I was a big fan of Secunia’s excellent Personal Software Inspector (PSI) and Corporate Software Inspector (CSI) tools. When Secunia got acquired a few years back, it didn’t take long for PSI to fall by the wayside and become obsolete. I like KC Software’s Software Update Monitor, aka SUMo, but its free version is painful to use and its for-a-fee version doesn’t handle automatic updates as well as it could. PatchMyPC doesn’t recognize as much software as SUMo, but it’s free. Plus,  it updates everything it finds automatically and with minimal muss and fuss. There’s an enterprise version, too, that works with SCCM and InTune. Definitely worth getting to know (or at least playing with).

I blogged about PatchMyPC here at EdTittel.com in a piece entitled “Patch My PC Updater is worth checking out” on December 14, 2020.

Top 3 2020 Windows 10 Utilities #3: PowerToys

The original PowerToys utilities go back to the Windows 95 days. The current GitHub version is a major reboot in the form of an Open Source project under Clint Rutkas’ able leadership. Instead of operating as a bunch of independent tools under a general PowerToys label, the latest version (v0.29.0 as I write this) brings all of these tools together under a single umbrella for download, install and update purposes. All kinds of cool stuff going on here, and worth using.

I wrote a PowerToys Intro for ComputerWorld on October 9, 2020, and have written lots of other stuff on this tool here and at Win10.Guru in the past year.

Any or all of these tools will make a great addition to your Windows 10 toolbox, if you’re not using them already. Happy New Year, too!

Facebooklinkedin
Facebooklinkedin

Resolving BitLocker Recovery Key Confusion

In removing the last vestiges of Adobe Flash Player from my Surface Pro 3 (SP3) yesterday, I found myself in need of a BitLocker Recovery key. Why so? That system has BitLocker turned on. Thus, one can’t get access to the C: drive’s content without providing its 48-digit recovery key. Because that’s what I needed to do, I quickly found myself resolving BitLocker Recovery Key confusion.

Secrets to Resolving Resolving BitLocker Recovery Key Confusion

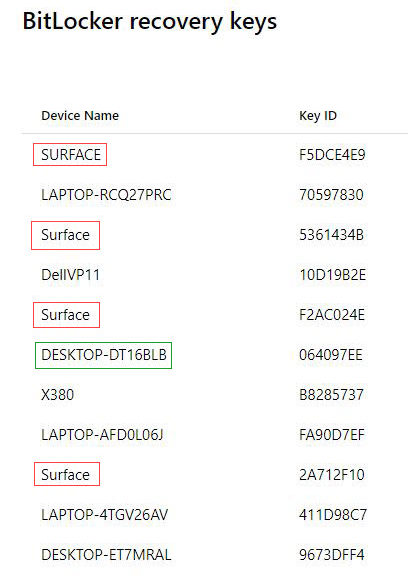
Because I didn’t realize the SP3 had BitLocker turned on, I turned to my Microsoft Account’s recovery key page. That’s when I got confused. As you can see from the lead-in graphic, there are four devices named Surface in the list shown. “Simple,” thought I to myself “I’ll just grab the Surface item with the most recent Key Upload Date and that should do it.” (Note: Key Upload Date is another column on the afore-linked key recovery page, not shown in the screencap above.) Wrong! In fact, it turned out that NONE of the recovery keys for devices named “Surface” worked to provide access to the drive. Uh-oh!

Key ID to the Rescue

Knowing there had to be a way to link the recovery key to the information that BitLocker provided at bootup, I noticed the on-screen prompt supplied a Key ID tied to the recovery key. (It’s the right-hand column in the lead-in screencap.) On close examination, the first 8 HEX digits in that ID match the key column for Device Name DESKTOP-DT16BLB. And in fact, it is tied to the Recovery Key that allowed me access to the SP3’s BitLocker-protected C: drive.

An Ounce Of Preparation…

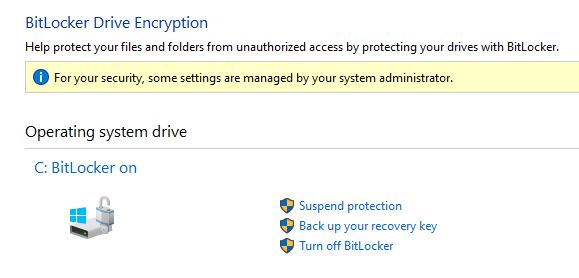
If you should ever wish to manually edit otherwise protected files in an OS installation at the command line, you’d be wise to check to see if BitLocker is turned on for the target drive.  Easily done, using the Bitlocker Drive Encryption utility in Control Panel. Here’s what running it on the SP3 produces, with some info and fields of particular interest.

Resolving BitLocker Recovery Key Confusion.cpl-output

Notice this Control Panel item shows BitLocker turned on for Drive C: Notice further, the link that reads “Back up your recovery key.”

The “Back up your recovery key” entry lets you save it to your MS account, save it to a file, or print the recovery key information to any available printer. It showed me the complete recovery key ID as well as the complete recovery key itself. And it confirmed what I’d already figured out. Indeed, none of my devices named “Surface” hold the valid recovery key for the SP3 device.

As it turns out, I did a clean install on that machine around October 4 2018. This produced a randomly generated device name DESKTOP-DT16BLB whose Recovery Key is the one the SP3 uses. Afterward, I changed the Device Name back to Surface, without realizing that related Recovery Key info at my MS account did not change along with it. Live and learn! I’m also taking the opportunity to delete a bunch of now-obsolete BitLocker Recovery keys, too.

PowerShell Tools for BitLocker Automation

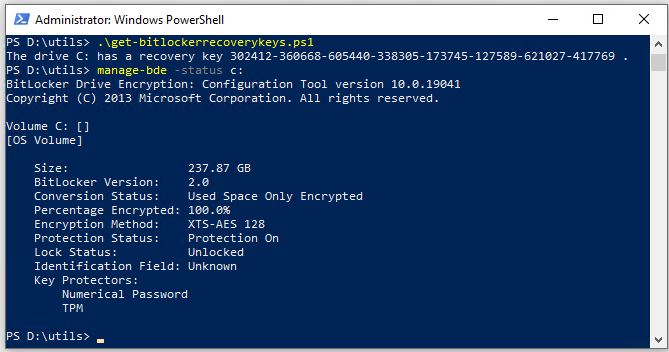
Knowing that admins like to work through SCCM or similar tools, and work on systems using scripts, I found a useful PowerShell script to grab BitLocker Recovery keys. Here’s its output (best directed to a text file with additional identification info, if run against a slew of remote PCs), along with the handy built-in PS cmdlet manage-bde.

Resolving BitLocker Recovery Key Confusion.ps-stuff
Use them in good health, to good effect, please.

Facebooklinkedin
Facebooklinkedin

Adobe Flash EOL December 31 2020

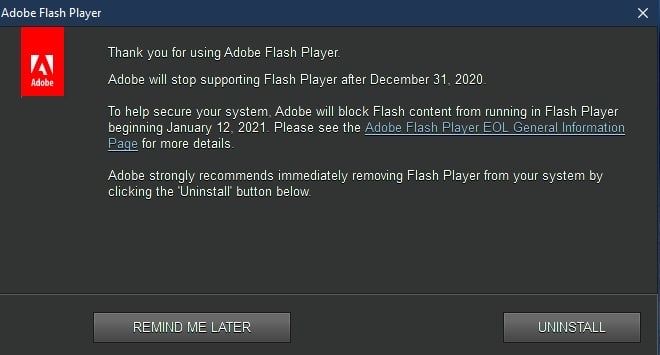
Here it comes! With the end of 2020, Adobe Flash will also hit end-of-life (EOL). If you can find a webpage that still uses Flash, and you have the Adobe Flash Player installed on some PC, you’ll get the warning message shown in this story’s lead-in graphic. I couldn’t find one on the only machine I’ve got that still has Flash Player installed. It’s stiil present on my 2014-vintage Surface Pro 3 (SP3).

If Adobe Flash EOL December 31 2020, How Else To Remove?

Glad you asked. Because I couldn’t find Flash content to provoke the warning (and uninstall button) on my SP3, I turned to other means. The Microsoft Update Catalog offers a plethora of KB4577586 versions for all supported Windows 10 releases. The name of this item starts with “Update for Removal of Adobe Flash Player…” and then goes onto specify various Windows versions, Server and desktop, to which it applies. Note: for all versions 1903 and later, grab the one labeled Update for Removal of Adobe Flash Player for Windows 10 Version 1903 for x64-based systems (or x86 or ARM as circumstances dictate).

For my x64 SP3, this appeared as a file named
windows10.0-kb4577586-x64_ec16e118cd8b99df185402c7a0c65a31e031a6f0.msu
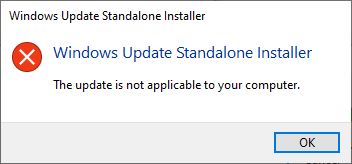
in my Downloads folder. As an MSU file, it works with the Microsoft Update Standalone Installer utility. And, to my surprise, running the update produces this error message:

Surprise: unless some installed browser has Flash Player installed, the update won't run.
Surprise: unless some installed browser has Flash Player installed, the update won’t run.

Turns out the SP3 has only Edge and Chrome installed, so no Flash Player is present in any browser to be removed. But the machine still has Flash Player on the C: drive, so I’d like to make it go away. Fortunately, Adobe might offer a tool for that very job. Let’s see.

Flash Player Uninstaller to the Rescue?

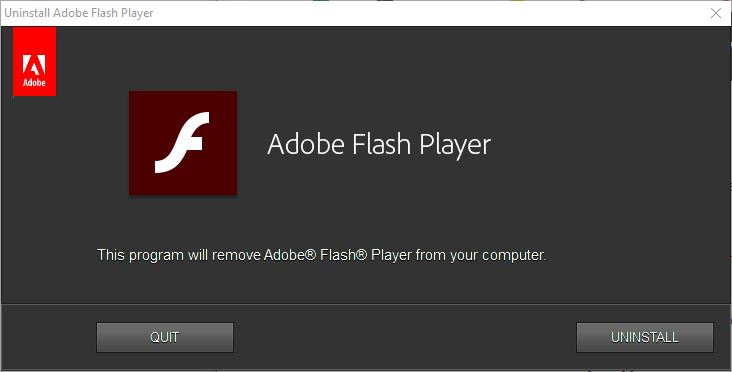
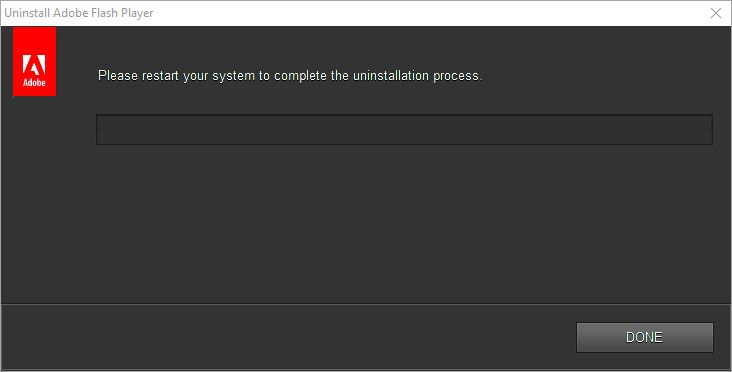
When it comes to getting rid of programs, uninstallers are the tools of choice. Adobe has one for Windows, so I downloaded same to give it a try. It gets off to a promising looking start:


Upon completion it reports Done, and advises me to restart the system. OK, I can do that.

After the restart I run the uninstaller but it doesn’t tell me anything new. That said, the Flash Player 32-bit control remains present in Control Panel, so it didn’t impact that item (more on this below). That said, the preceding download page also has manual uninstall instructions, so I follow them to remove the contents of the following folders:


C:\Windows\system32\Macromed\Flash
C:\Windows\SysWOW64\Macromed\Flash
%appdata%\Adobe\Flash Player
%appdata%\Macromedia\Flash Player

Some of these folders belong to TrustedInstaller, so I end up booting into recovery mode and manually deleting the files from the command prompt.  That takes care of the Flash Player itself.

One More Thing: Turning Off The Control Panel Element

The cpl file that brings up the Flash Player Settings Manager remains present unless you do one more thing. It’s invoked through the file that normally resides at:

C:\WINDOWS\SysWOW64\FlashPlayerCPLApp.cpl

As outlined in this Adobe Support Community item, this is an artifact of the NPAPI or PPAPI versions of Flash Player that works with Firefox or Edge, respectively. If you simply rename this file with a different extension, it won’t load into Control Panel anymore. I imagine I could also delete it offline, as I did with the other files in the preceding folders, but that’s enough for today. It’s sufficiently gone for me!

Facebooklinkedin
Facebooklinkedin

Group Policy Edits Fix Broken RDP Credentials

I ran into an interesting problem this weekend. The “Your credentials did not work” error appeared when I added my usual MS admin-level account to the Lenovo X390 Yoga. I checked all the usual suspects with no change in status.  That means: remote access settings, account status, and so forth. Ultimately I had to search the error message via Google. And that, dear readers, is how I learned group policy edits fix broken RDP credentials.

How Group Policy Edits Fix Broken RDP Credentials

Even though I was using the same long-standing Microsoft Account I use for admin level login on all of my Windows 10 PCs, this one wouldn’t work. At one point, error messages informed me about a problem with LSASS (local security authority subsystem service, the OS component that handles logins). Later on, that error changed to “Your credentials did not work.” Sigh.

Because I had no trouble using the same account name and password (plus 2FA authentication through MS) to log into that PC locally, I knew the problem was focused on RDP. And indeed I turned up an extremely helpful article at Appuals.com. Entitled Fix: Your Credentials Did not Work in Remote Desktop, it let me to a working solution.

Group Policy Changes Needed

For me the items I had to enable, and then add the value TERMSRV/* resided in the edit path named
Computer Configuration > Administrative Templates > System > Credentials Delegation

Those items numbered 4, as follows:

1. Allow delegating default credentials with NTLM-only server authentication
2. Allow delegating default credentials
3. Allow delegating saved credentials
4. Allow delegating saved credentials with NTLM-only server authentication

Once I had made those changes, I had to restart the target PC. I also had to manually re-enter the credentials I’d attempted to use beforehand (without success). Then, finally: Boom! RDP accepted my connection attempt on the usual MS admin account. Problem solved. That was an odd one…

Facebooklinkedin
Facebooklinkedin

Best Holiday Wishes For 2020

Dear Readers:

You may not celebrate the same holidays that we do here at Chez Tittel. That’s perfectly OK. But whatever joys and remembrances you can find as 2020 gives way to 2021, I hope you’ll savor and find pleasure in them. We’re gearing up for a nice long holiday weekend right now. Today, I’m sharing an image of my wife Dina’s magnificent rumcake with one and all. I wish you could smell it (heavenly!) but even as a photograph it’s a pretty tasty image. And please: accept our best holiday wishes for 2020, and our hopes that 2021 will manage to improve on this year in every possible way.

After Best Holiday Wishes for 2020, Then What?

I’ll be posting sparely and sparsely until January 4, when I’ll resume a normal working schedule. We’ll be off to a new year of Windows 10 adventures and misadventures. I’ll keep chronicling them as they come my way, so please stay tuned.

High-Tech Goodies from S. Claus

I’d been looking around for a battery pack stout enough to keep our iPad running for the best part of the day. I found it in a RAVPower Xtreme RP-PB41 charger (26800 mAh). My son, Gregory opted in for a Schiit Modi3+ D/A Converter to sweeten his headphone audio. The boss has take over custody of the Dell Optiplex Micro 7080 I’ve been writing about lately as her daily driver. Like her, it’s a boss machine! We’ll have plenty to play with after the formal exchange of gifts tomorrow morning.

Of all the toys I acquired this year, my favorite remains the Sabrent NVMe drive enclosure with an ADATA XPG 256 GB NVMe SSD inside. It’s what I use to store my library of ISO images for use with Ventoy (or ready mounting and rooting around inside). Still peachy!

And again, best holiday wishes from all of us to all of you. May 2021 be a vast step up from 2020 for everyone.


Facebooklinkedin
Facebooklinkedin

Practice Shows Little Speed Difference USB 3.0 versus USB-C

Just for grins, I conducted an experiment on one of my Lenovo X380 Yoga laptops. I hooked up two identical Seagate ST2000LM003 2TB HDDs drives. One is in an Intatek FE2004C USB-C drive enclosure; the other in a StarTech 52510BPU33 USB-3 drive enclosure. Using the two drives, and comparing them in CrystalDiskMark, practice shows little speed difference USB 3.0 versus USB-C. That’s the point of the following graphic in this story, fact.

Practice Shows Little Speed Difference USB 3.0 versus USB-C.3top-Cbottom

USB 3 on top; USB-C on the bottom. Big block transfers favor C, but random access favors 3. It’s a toss-up!

If Practice Shows Little Speed Difference USB 3.0 versus USB-C, Then What?

This makes me feel OK about hanging onto my older USB 3 drive enclosures because there’s only a small performance difference between them. It’s not like the results make me want to surplus all of my old USB 3 enclosures and replace them with their USB-C counterparts. This is good for the general exchequer, if for no other reason.

Check Out Uwe Sieber’s USBTreeView

As it happens, it’s not as easy as I thought it would be to determine what kind of USB interface a specific drive enclosure is using. Nir Sofer’s otherwise excellent USB Device Viewer (USBdeview.exe) didn’t clue me in. I turned to Uwe Sieber’s USB Device Tree Viewer (USBTreeView.exe) instead.

In the summary section, the device information in that utility distinguishes which USB version is in use for a targeted device. It alone was able to tell me that my D: drive (the USB 3 attached device) was running USB Version 3.0.  It also informed me that my E: drive (the USB-C attached device) was running USB 3.1 Gen ? You see the latter info from Sieber’s utility as the lead-in graphic for this story.

That latter designation is less informative than it could be, but I know my X380 only supports Gen 1 anyway. Thus, that particular the mystery is not too shrouded in obfuscation to penetrate.

When Do New-Tech Enclosures Make Sense?

I could see upgrading from USB 3 or 3.1 to Thunderbolt for SSD enclosures, particularly those for NVMe devices. I’m not sure even m.2 SSDs are enough to justify the extra outlay. But hey: that sounds like a great reason to order one or two such items and try it out to see what happens. Stay tuned!

Facebooklinkedin
Facebooklinkedin

Windows 10 Backup Strategies

When it comes to backing up my Windows 10 systems, I’m a belt and suspenders kind of guy. For my production desktop, that means a daily image backup to Macrium Reflect. It also means 12-hour copies of my selected folders from my user account through File History. I’ve savagely pruned what File History copies by default, because my daily image backups catch a lot of that stuff once a day, which is often enough for me. My Windows backup strategies are designed to limit data loss to a 12-hour period, and to get me back to work quickly if I ever need to restore an image. I keep my Macrium Rescue Media updated and ready to go, so I can even do a bare-metal restore should my current OS get hosed.

Deciding on Windows 10 Backup Strategies

Daily image backups catch everything on my C: drive (including the User folders in which I’m active). So I use File History sparingly (I’m already catching a total snapshot once a day). I’ve trimmed the default allocation to eliminate music files. (I have over 4 GB indexed through “My Music” across 2 other drives on my system.) Ditto for Downloads (currently 6.7 GB in size).

If you going to use File History be sure to look over the Folders it covers carefully. You can click on any one of them to see a “Remove” button to get rid of it. I made extensive use of that capability in pruning my File History capture description. You can see my most important File History folders in the lead-in graphic for this story (click here for full-sized view).

Practice Makes Perfect for Backup/Restore

To make sure your backups are working properly, you should make a backup (or use File History) to restore some files. Consider it both a test to make doubly darn sure backup is working and practice for when you need to restore something for real. Practice prepares you for disaster so you can concentrate on doing what’s important rather than trying to remember how to do it.

I recommend a practice run at least once every three months. I don’t usually have to schedule this myself, because I’m always tinkering with my systems. That means that I’m sometimes repairing the unwanted results of a tinker gone bad by — you guessed it! — restoring a backup.

Facebooklinkedin
Facebooklinkedin