Category Archives: Uncategorized

KB5012170 Can Provoke BitLocker Recovery

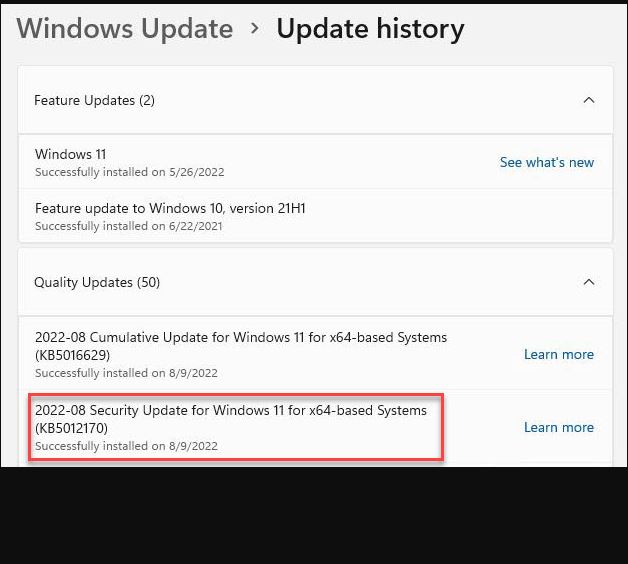
Here’s an interesting tidbit that’s making the rounds right now. KB5012170 appeared on August 9 on the latest Patch Tuesday. According to various sources — see this Neowin story, for example — some users’ PCs boot into BitLocker Recovery after the mandatory post-update restart, rather than business as usual. Thus, applying KB5012170 can provoke BitLocker Recovery (though unintentionally).

Of those affected, some have been able to get back to rights by applying the PC’s BitLocker Recovery key. Others have had to update their UEFI before that key application “takes.” In my case, I apparently dodged that bullet, because none of my production Windows 11 machines (four Lenovo laptops of various descriptions, and a Ryzen 5800X desktop) fell prey to this gotcha.

You can see the “success” report for this KB item boxed in red in the lead-in graphic for this story, in fact…

If KB5012170 Can Provoke BitLocker Recovery, Then What?

BitLocker keys can be stored in at least three ways. 1. On paper, 2. Electronically (usually on a USB drive). 3. Associated with a specific MSA (Microsoft Account). I prefer method 3 because it’s easy to set up and MS manages it automatically on your behalf.

You must log into your MSA online (I go through account.microsoft.com). Then go to Devices, and pick the affected PC. Next, click on Info & Support. There you’ll find a Bitlocker data protection item that includes a link to “Manage recovery keys.” That’s what you want. It will show you recovery keys for all the devices associated with that MSA (I show 11, of which I’m actually using 2, so I just got rid of the rest after saving a backup copy to an encrypted disk).

BTW, that means it’s essential to add all devices you might ever want to recover to your chosen MSA. Do so right away, if you haven’t already!

Facebooklinkedin
Facebooklinkedin

Tracking Windows Releases Gets Challenging

I have to laugh. I found myself re-reading numerous recent Windows 10 and 11 news stories, trying to figure which OS is which. It doesn’t help, either, that sometimes the news outlets themselves get their wires crossed. I believe that tracking Windows releases gets challenging because we’ve got so many of them to consider. Let me explain…

Why Say: Tracking Windows Releases Gets Challenging?

Windows 10 has two release tracks right now — namely, Release Preview and Production (current release). Windows 11, OTOH, has four: (1) Production; (2) Release Preview; (3) Beta and (4) Dev channels. Each of these releases has its own Build numbers. In those numbers, feature upgrades change the front and major part, and cumulative updates (CUs) change the minor and rear part. Thus, for example 22000.778 describes Windows 11 Production right now. The 22000 part comes from the Windows 11 feature upgrade to 21H1. The 778 part comes in the wake of KB014668 (6/29/2022).

Not too challenging with 1 or 2 such items to keep track of. But with 2 tracks for Windows 10, and 4 tracks for Windows 11, it’s a bit trickier. MS offers web pages to track this kind of stuff, but I don’t always find them terribly informative. It’s probably my fault.

Check Out the Release Info at UUPdump.net

If you look at the intro graphic for this story, you’ll see it’s comprised of the “release buttons” at the head of the UUPdump.net web page. Click any button, and you’ll get a complete release history for the selected release track, in descending chronological order. The info is comprehensive and all-inclusive.

You have to learn how to read release names and numbers to recognize and distinguish cumulative from feature updates in this presentation, though. That’s because UUPdump builds update ISOs to clean-install Windows images that include slipstreamed CUs.

So, if a release name there says “Feature Update” that doesn’t mean it’s really a feature update. Instead, you must recognize that feature updates usually include a minor (right-hand) component labeled “1” or “1000” to the right of the period in the build number. Once you understand those are the only “real” Feature Updates, the update history there makes sense. Works for me, anyway.

So when I want to get straight info, UUPdump.net is where I head. You can do likewise, but also check the MS clearinghouse named Windows release health. It, too, offers good info about production releases and updates. For Insider Previews, the MS web pages named “The Changelog” and “Flight Hub” are equally helpful. Cheers!

Facebooklinkedin
Facebooklinkedin

In-Place Repair Install Basics Revisited

OK, then. I’ve been messing about with one of my Dev Channel test PCs lately. And it’s for the usual reason: experimentation leads to self-inflicted damage. Right now, the X12 Hybrid is limping along. It’s having driver problems with Windows Hello and Thunderbolt. The standard response when things get weird gives cause for in-place repair install basics revisited. I’ve been reminded of some important elements worth sharing (and repeating).

Why Are In-Place Repair Install Basics Revisited?

Generally, an in-place repair install involves running the setup.exe from an ISO to replace the OS files in the running image with known, good working equivalents. All this is wonderfully described in Shawn Brink’s terrific ElevenForums tutorial Repair Install Windows 11 with an In-Place Upgrade.

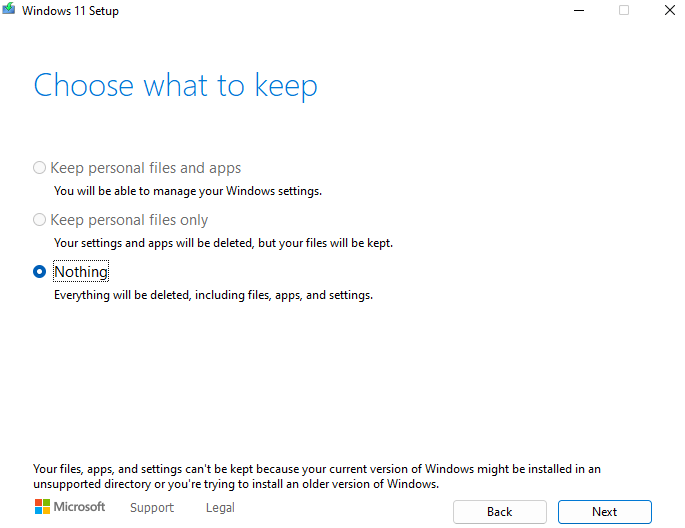
I started my exercise by visiting the Windows Insiders Using ISOs page. But I noticed that ISO version is 21540, whereas I’m running 25145 on my test PC. Alas, that explains why, after mounting the incompatible ISO on said test PC, it offers only the “Keep nothing” option. That’s what’s shown in the lead-in graphic for this story. It was my profound clue that I needed a different ISO.

Of course, the “Nothing” option is exactly what I DON’T want. So I went to UUPdump.net instead, and grabbed the ISO for 21545. And sure enough, once mounted it provides access to the “Keep personal files and apps” option I really want.

The Requirements Tell the Story

If you look at the “Repair install requirements” at the tip-top of the afore-linked tutorial, item 2 therein reads:

  • The Windows 11 installation media (ISO or USB) must be the same edition, same version, and same or higher build as the currently installed Windows 11.

That’s what was holding me back. And that’s why I needed to remind myself of the basics, so I could get the repairs I wanted. Indeed: back to basics turns out to point me where I needed to go.


Facebooklinkedin
Facebooklinkedin

Box App Update Secret Revealed

In many ways, Windows remains a “learn as you go” kind of thing. So it was upon returning home to update my PCs. The team I worked with used the Box Drive app to exchange big files. Thus, I found myself asking “How does one update Box Drive?” It took a bit of digging, but here is the Box App update secret revealed.

Getting to Box App Update Secret Revealed

It’s an app, so my first update thought was to go to the Windows Store, where such things normally get handled. No go. Next, I tried the winget command in Powershell. Nothing doing. And my typical auto-update tools — namely PatchMyPC and SUMo — didn’t help, either. Obviously, there had to be another way…

When I went poking around for help online, I couldn’t seem to find much insight there at first. Then I found a Box Support article with the essentials of this operation:

1. Find the Box Drive entry in the notification icons (click the up-caret if it’s not already showing on the toolbar).

2. Click that entry, then click the Settings (gear) icon at lower left.

3. If an update is pending, an update option appears in the resulting pop-up menu. Once up-to-date, though, the item no longer appears.

And that’s really all there is to it. Like much else about Windows, it’s dead easy if you know how to do it. Otherwise, it’s a bit of a runaround figuring things out.

Why Not Stick to Standard Methods?

Good question! Given that Box Drive is a Windows app, why did its maker decide not to use the Windows Store to deliver updates? I can’t say, except to observe that Box Drive is concerned with security and file protection, as well as offering file exchange services. My best guess is they opted for explicit control to help maintain security, rather than relying on less visible background updates through the store.

Again: it’s pretty easy to accomplish, once you understand how it works. And thus, I’ve got another item to add to my usual update drills.

Facebooklinkedin
Facebooklinkedin

MS Explains Windows 11 Taskbar Clock Missing Seconds

OK, now we know. Windows tinkerers and tweakers have often wondered why the Taskbar clock in Windows 11 shows no seconds. Nor does it provide a registry tweak to display same. Raymond Chen lays things out in an Old New Thing blog post. Entitled “Now that computers have more than 4MB of memory, can we get seconds on the taskbar?” it provides the answer: “No.” Along the way, MS explains Windows 11 Taskbar clock missing seconds. In a word: “Performance.”

How MS Explains Windows 11 Taskbar Clock Missing Seconds

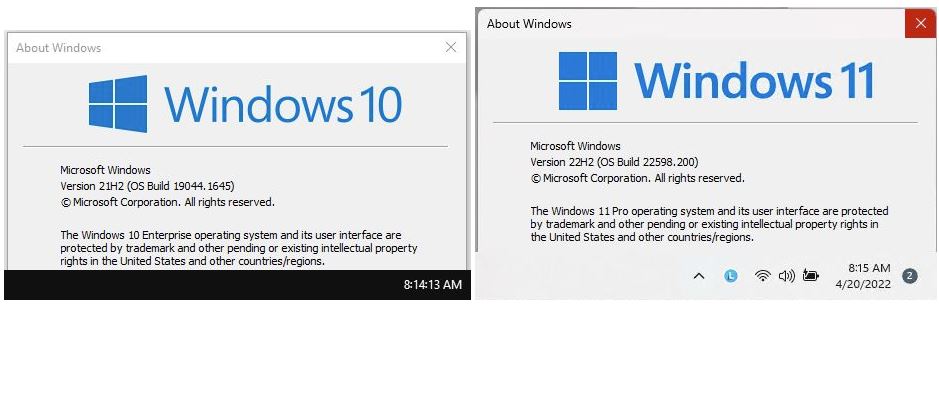
As you can see in the lead-in graphic — Windows 10 on the left, 11 on the right — the 10 clock happily displays a seconds count. 11 does not, nor does  it offer controls to display same. Why that difference?

Chen’s explanation is interesting and hinges on performance issues when many clocks are involved, all in need of ongoing updates. Here’s a lengthy, but informative, quote from the afore-linked blog post:

On multi-users systems, like Terminal Server servers, it’s not one taskbar clock that would update once a second. Rather, each user that signs in has their own taskbar clock, that would need to update every second. So once a second, a hundred stacks would get paged in so that a hundred taskbar clocks can repaint. This is generally not a great thing, since it basically means that the system is spending all of its CPU updating clocks.

This is the same reason why, on Terminal Server systems, caret blinking is typically disabled. Blinking a caret at 500ms across a hundred users turns into a lot of wasted CPU. Even updating a hundred clocks once a minute is too much for many systems, and most Terminal Server administrators just disable the taskbar clock entirely.

He goes onto say that even PCs that lack a Terminal Server role are still subject to performance constraints. Indeed, “periodic activity prevents the CPU from entering a low-power state.” He also adds “Updating the seconds in the taskbar clock is not essential to the user interface. . .”

Now we know. For those still inclined to stay on top of time at the second level (performance concerns aside) check out this ElevenForum thread: Taskbar Clock Replacement. ‘Nuff said!

Facebooklinkedin
Facebooklinkedin

Windows 11 Makes Marketshare Radar

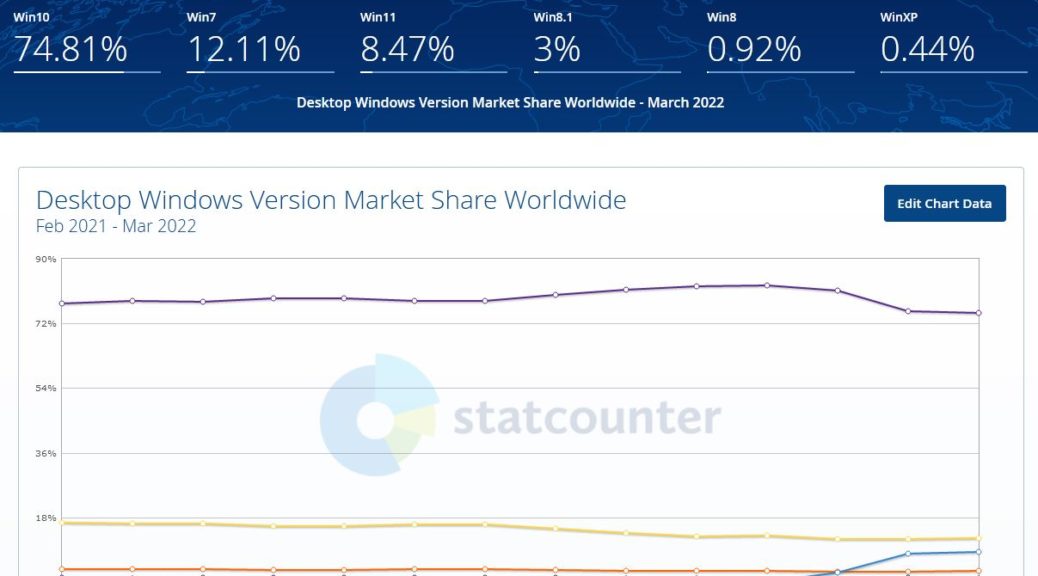
In other posts here, I’ve groused about AdDuplex and its (IMO) over-reporting of Windows 11 marketshare. My February 1 item is a good example. Just yesterday, I noticed that a major desktop OS marketshare tracker — namely Statcounter –registers Windows 11 amidst the versions it follows. The lead-in graphic above, in fact, refreshed just this morning (April 1) grants Windows 11 an 8.47% share of Windows desktops overall. Good-oh! Now that Windows 11 makes marketshare radar I can trust, those numbers will get increasingly real.

What Windows 11 Makes Marketshare Radar Means

This means major tracking sites (NetMarketShare, Statcounter, Statista, and analytics.usa.gov) are instrumenting their sites to track Windows 11. This is a bit trickier than it seems, because Windows 11 presents itself as Windows 10 in its basic user agent info. One must use agent-hints to pick Windows 11 out from that crowd. Indeed, some programming effort is required to make this happen.

To me, that goes a long way toward explaining why Windows 11 has been off that radar since it made its initial debut on June 28, 2021. (Its public debut occurred on October 4, 2021.) Now it’s finally on at least one real radar (I don’t count AdDuplex, as I explain in the afore-cited post) so we finally have some statistically defensible means to figure out how many Windows 11 instances might be in use.

What’s the Frequency, Kenneth?

If indeed there are 1.5B instances of Windows in use (as MS has recently claimed) and 8.47% of them are Windows 11, that’s a simple calculation. The result is 127M, give or take 50,000. I had guessed in February that the number could be between 50 and 100 million. Looks like I wasn’t too far off the mark. Using the latest AdDuplex value of 19.4 percent, that number would be 291M. I just don’t believe it’s that big: now how, no way.

As more tracking sites start reporting Windows 11 desktop share numbers — and I have to believe they will, and soon — we’ll be able to refine our understanding of Windows 11 numbers further. Stay tuned, and I’ll keep you posted.

Facebooklinkedin
Facebooklinkedin

Windows Reset Data Wipe Sometimes Falls Short

For some time now, Windows has included a “Reset this PC” option. Among other uses, it lets sellers provide buyers with a pristine OS installation on used PCs. Or so runs the theory, when the “Remove everything” option is elected. However, researchers have observed that Windows reset data wipe sometimes falls short of this goal. Let me explain…

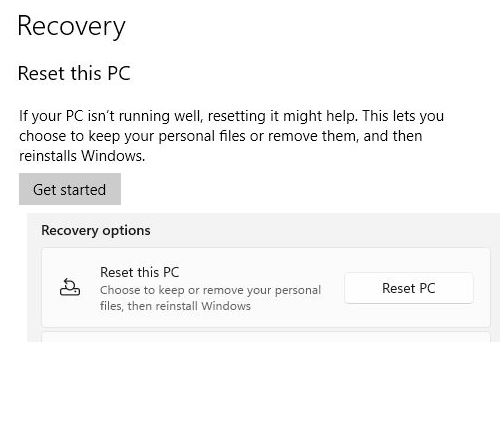
[NOTE: the lead-in graphic above shows what “Reset this PC” looks like in Windows 10 (above) and Windows 11 (below).]

How Windows Reset Data Wipe Sometimes Falls Short

Two data sources sometimes persist after running “Reset this PC” using the “Remove everything” option:

1. Windows.old remains behind. It includes all kinds of sensitive or interesting data about prior users.
2. When local OneDrive file copies exist, they could persist after the reset.

This info appears in the February 24 edition of Microsoft’s Windows 11 Known Issues. Indeed, there’s a section entitled “Files might persist after resetting a Windows device.” It reports which Windows versions manifest this failing: Windows 11, version 21H2;  and Windows 10, versions 21H2, 21H1 and 20H2.

What Known Issues Says

Here’s a verbatim quote from that page:

When attempting to reset a Windows device with apps which have folders with reparse data, such as OneDrive or OneDrive for Business, files which have been downloaded or synced locally from OneDrive might not be deleted when selecting the “Remove everything” option. This issue might be encountered when attempting a manual reset initiated within Windows or a remote reset. Remote resets might be initiated from Mobile Device Management (MDM) or other management applications, such as Microsoft Intune or third-party tools. OneDrive files which are “cloud only” or have not been downloaded or opened on the device are not affected and will not persist, as the files are not downloaded or synced locally.
Helpfully, two known fixes address these issues. First, disconnect from or disable OneDrive before initiating the reset. Second,  remove Window.old after reset completes. Taking these two simple steps ensures no personal info survives reset . Worth remembering!

For more information…

Use Disk Cleanup (or some useful analog like TheBookIsClosed’s Managed Disk Cleanup) or Storage Sense to remove Windows.old from a Windows PC. Indeed, MS provides a helpful how-to link for that latter operation.

Signing out of, or unlinking from, OneDrive before the reset operation prevents local OneDrive files from hanging ’round. Likewise, MS provides an equally helpful how-to link for this maneuver, too.

MS plans fixes for these shortcomings. In the meantime, if you simply disconnect from OneDrive before the Reset, then remove windows.old afterward, you’re covered. Good to know!

Note Added March 9, 2022: Issues Fixed (with Caveat)

With the release of Patch Tuesday fixes for Windows 10 and 11 yesterday (KB5011487 for 10; KB5011493 for 11) MS has fixed these “file hangover” problems. That said, both announcement include this language:

Some devices might take up to seven (7) days after you install this update to fully address the issue and prevent files from persisting after a reset. For immediate effect, you can manually trigger Windows Update Troubleshooter using the instructions in Windows Update Troubleshooter.

Thanks to Mary Jo Foley at ZDNet for bringing this to my attention.


Facebooklinkedin
Facebooklinkedin

Build 22563 Makes Advanced Startup MIA

Over the past couple of weeks, I’ve observed something odd and interesting. Many of my Windows 11 PCs were missing the Advanced Startup option. Ordinarily, it’s in Settings → System → Recovery → Recovery Options. Just yesterday, undeniable curiosity let me observe that Build 22563 makes Advanced Startup MIA again. This time, I’m NOT going to create an ISO and run an in-place upgrade repair install. Though I think it would fix it, I won’t do that this time. Instead, I’m convinced this needs reporting to Feedback Hub as a recurring problem.

Build 22563 Makes Advanced Startup MIA Again: FB Hub Report In

I upvoted and added to a thread on the Feedback Hub entitled “The Advanced Startup option is missing from the recovery menu.” I’m now convinced this is a recurring problem that can occur when upgrading an Insider Preview to a new Insider Build, or when applying a Cumulative Update to an RTM Build. I’ve had it happen on 3 of my 5 Windows 11 machines in the last week, in fact. That’s disheartening, after spending a half-day repairing the issue. See my Feb 21 post about the fix for all those gory details.

But now, I know there’s a problem across the board in Windows 11. The only thing I don’t know is if the problem is just across the board on MY Windows 11 PCs, or more of them than that. That’s why I’m reporting to Feedback Hub and hoping for results. Peferably, sooner rather than later. We’ll see.

I will observe that my lone “native Windows 11” PC seems immune to this issue. All of my other Windows 11 PCs were (a) upgraded from 10 to 11, and (b) regularly manifest this issue. I’d be curious to understand the connection, if any, that might be involved…

Facebooklinkedin
Facebooklinkedin

Costing Windows 11 Widgets and Teams

Just read a short and fascinating blog post from Michael Niehaus. It’s entitled The overhead of Widgets and Teams in Windows 11. In it he looks at the memory overhead from Widgets and Teams Chat. In costing Windows 11 Widgets and Teams using Sysinternals Process Explorer, he produces interesting numbers.

If Costing Windows 11 Widgets and Teams, What’s the Charge?

Numbers vary from installation to installation but his numbers are close to mine on Dev Channel, RP Channel and Production PCs. Thus, I’ll reproduce his. (Note: I show mine from a production PC in the lead-in graphic above).

Niehaus reports that the version of Teams that loads by default with Windows 11 consumes around 390MB RAM. Widgets, on the other hand, consume about 210MB RAM. Add the two together and you get around 600MB.

On my system, private bytes (memory that cannot be shared with other processes, which is what Niehaus is reporting) show up in the left-hand column. Working set (which includes page file entries touched by the process but not in active use) show in the right. The total for private on my X1 Carbon is ~485MB, for working set is ~988 MB.

Long story short: leaving those defaults alone on a Windows 11 PC will add between 0.5 and 1.0 GB to the memory overhead.

What to Do About This, If Anything

As Taras Buria observes in his WinAero reporting on this phenomenon, this doesn’t matter on PCs with plenty of RAM and sufficient CPU power. But on lower-end PCs, laptops and tablets, one need only remove the Teams and Widgets icons from the taskbar, and restart the PC to get rid of that resource drain. On a low-end i3 or equivalent, with less than 8 GB of RAM, it actually could make a difference.

All in all it’s an interesting bit of analysis, and a nice demonstration of the kinds of things that Sysinternals Process Explorer can tell you. Cheers!


Facebooklinkedin
Facebooklinkedin

Zoom Mystery Gets Interesting Resolution

For the past month or so, I’ve been unable to run Zoom on my primary desktop PC. That’s actually OK, because it doesn’t have a video camera, so it’s been no major gotcha to switch over to the laptop I keep at the left-hand side of my desk. There, a camera is built-in and it works fine with my Jabra 75 USB plug-in headset. Today, determined to find a solution, I stumbled across a revelation in the Zoom Community forums. There, my Zoom mystery gets interesting resolution: because the PowerToys “Video Conference Mute” is enabled by default, it crashes Zoom. Turn that feature off. Presto! No more crashing.

Flailing About Leads to Zoom Mystery Gets Interesting Resolution

At the same time, I’ve also had to switch from my Jabra 75 headset to the older Logitech H750e headset on the production PC. Though the sound widget in Control Panel shows sound input/output, it’s not audible on the headset itself. That’s working properly now, too.

If it hadn’t been for some inspired Google search, I’d never have found this by myself. Turns out it’s a “known thing” in GitHub (where PowerToys development is run). There a bug report about this there. It’s entitled “Zoom continuously crashes with Video Conference Mute enabled.”

I’m very glad this finally popped up on my radar. I’m even gladder there’s an easy fix. Shoot! I’m just glad to see the Zoom dashboard popping up and working on my production desktop PC. This fix was a long time coming, but I’m glad to see it finally in place. Sigh.


Facebooklinkedin
Facebooklinkedin