Category Archives: Troubleshooting

So Long Adobe Add-ons Shockwave & Air

At the end of last year, the Adobe Flash Player hit end of life (EOL). Yet today, when I ran the excellent free Patch My PC Updater on one of my test machines, I noted that Adobe Air was still present, plus Shockwave. too. My thought was; “Time to say so long Adobe add-ons Shockwave & Air!” Upon checking into both, my presumption proved valid. When I checked for Adobe elements on my 2012 Vintage X220 Tablet, I found serveral related elements, all of which I’m removing post-haste (see lead-in graphic).

Why say: “So long Adobe Add-ons Shockwave & Air?”

Both Shockwave and Air are at End-of-Life, at least as far as Adobe is concerned. HARMAN International has taken over Adobe Air support. But I hardly ever use this, so I’ve decided to uninstall on PCs where it’s still present. Not surprisingly it’s absent on all of my PCs acquired in 2018 or later, including 2xLenovo X1 Yoga 380, X1 Yoga 390, and X1 Extreme, among others. The free version of Revo Uninstaller is more than equal to this task. That’s why I used it to generate the lead-in screencap for this story, and to remove Air and Shockwave from machines where they’re still hanging ’round.

For the record, uninstalling Air left 2 registry keys and one value behind, as well as 3 files. Revo happily cleaned those up. Shockwave left 1 key with 13 values and no files behind, and took care of two entries (the one I selected, plus another) on its own.

More Info on Air & Shockwave

Read more about the future and status of these Adobe components online. Check out “The future of Adobe AIR” (5/30/2019) and “End of life/…Shockwave Player” (April 9, 2019). Going, going gone, and (hopefully) soon forgotten. Don’t need ’em or want ’em anymore. Sayonara!


Facebooklinkedin
Facebooklinkedin

Using Microsoft Safety Scanner MSERT.exe

With each Patch Tuesday, MS releases a new version of the Malicious Software Removal Tool (MSRT). Just yesterday, I learned about a similar but different tool named Microsoft Safety Scanner (MSERT.exe). At first, I did a double-take to make sure it wasn’t a typo. It’s not, as the Safety Scanner Docs page attests. (Here are live links to the 32-bit and 64-bit downloads mentioned in the lead-in graphic.) Here, I’ll explore what’s involved in using Microsoft Safety Scanner, aka MSERT.exe.

Explanation Precedes Using Microsoft Safety Scanner

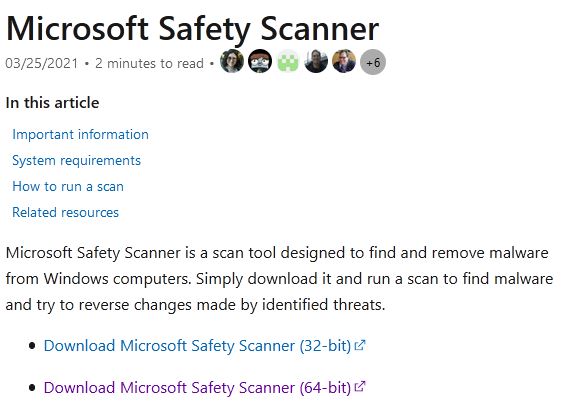
MS explains the tool thusly “a scan tool designed to find and remove malware from Windows computers.”  It goes on to says “Simply download it and run a scan to find malware and try to reverse changes made by identified threats.” Like the MSRT, the MS Safety Scanner gets updates and new signatures all the time, so MS recommends that you always download a fresh copy any time you’d like to use it. They also observe that it’s only worth using for 10 days, after which one MUST download a new version.

Here’s how MS describes the MSRT on its download page:

Windows Malicious Software Removal Tool (MSRT) helps keep Windows computers free from prevalent malware. MSRT finds and removes threats and reverses the changes made by these threats. MSRT is generally released monthly as part of Windows Update or as a standalone tool available here for download.

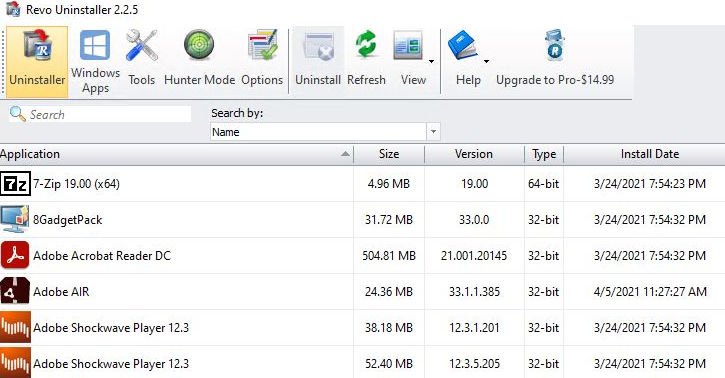
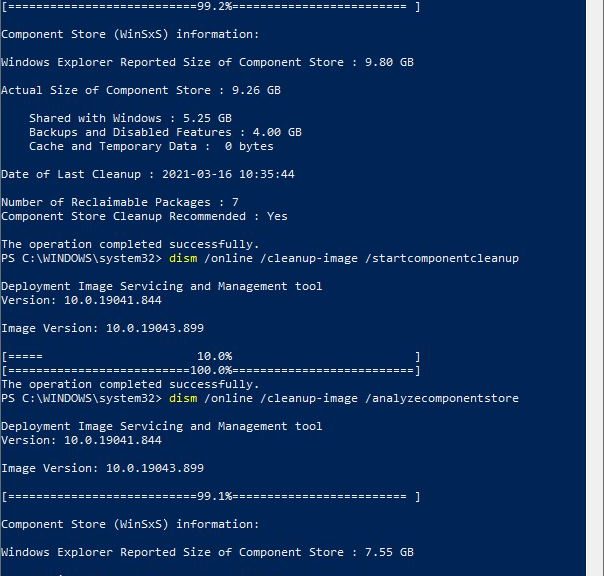
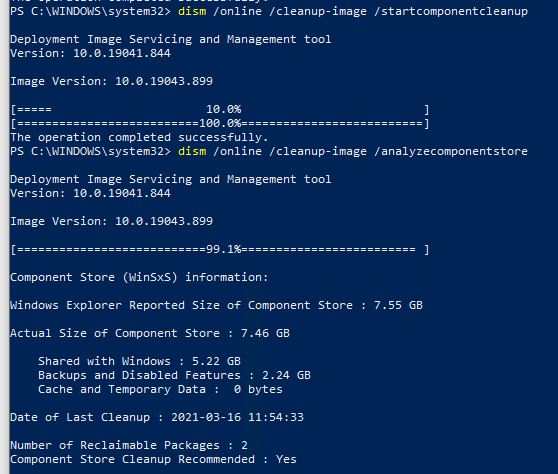
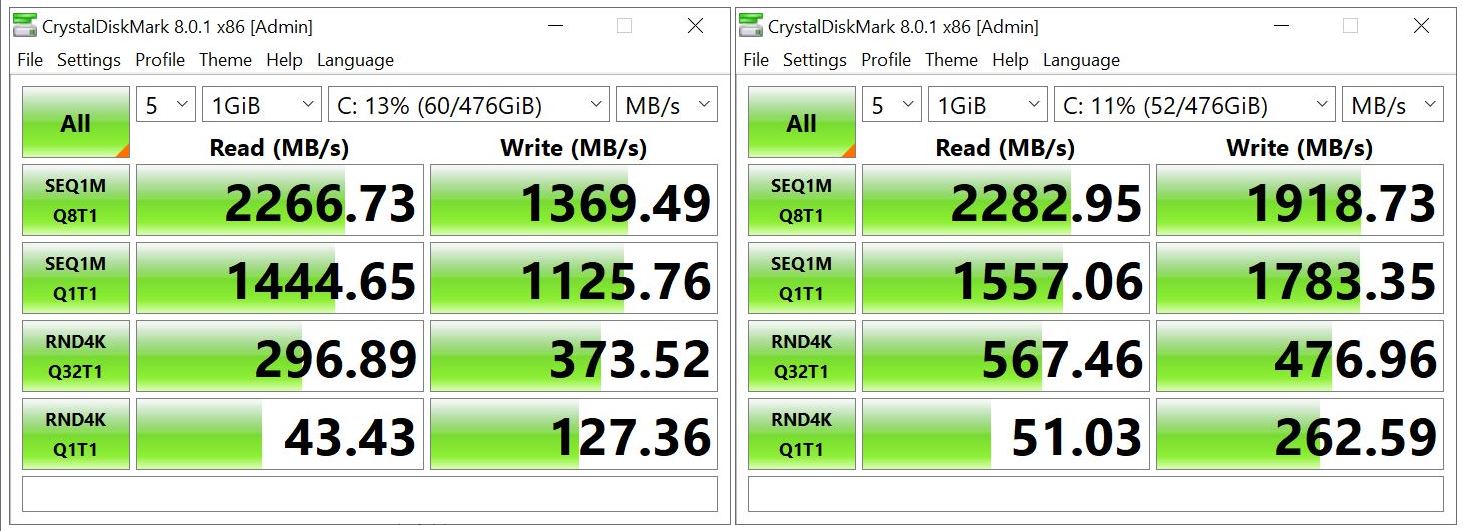
I’ll be darned if I can tell much difference between them. Nor do I see much distinction in third-party coverage. That said, Explorer sees big differences in size between the two, to wit:

Using Microsoft Safety Scanner.sizesNotice that MSERT.exe shows up as itself, while MSRT shows up as KB890830, version 5.87. Because MSRT is released monthly through WU, it apparently keeps the same KB number, but gets a new version number with each release. MSERT is not so readily obliging but does show that information on its Properties/Details page. That’s where I learned that MSERT stands for “Microsoft Support Emergency Response Tool.”

Using Microsoft Safety Scanner.details

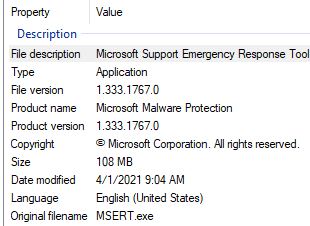
Full name plus file version info readily available here.
[Click image for full-sized view.]

Let’s just say this is another tool from MS you can run at your own discretion to check a Windows PC for malware, and attempt cleanup. All this makes me curious to understand why we have access to not one, but two, such tools. Even the best of third-party explanations/explorations tend to be a bit shaky, like this Tom’s Hardware Forums item. Even my home forums community at TenForums is pretty much mum on differences, to my consternation and regret.

Using Microsoft Safety Scanner

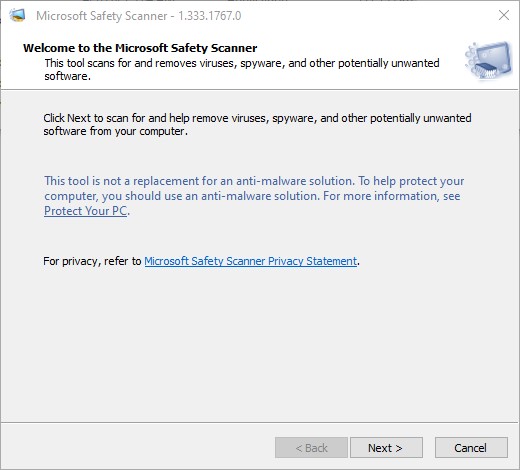
The .exe file is portable and runs from anywhere (including the Downloads folder). The Docs don’t say one should run the program as administrator, but I did so anyway. It presents a EULA to which you must agree before it does its thing. Next you get a welcome/disclosure screen:

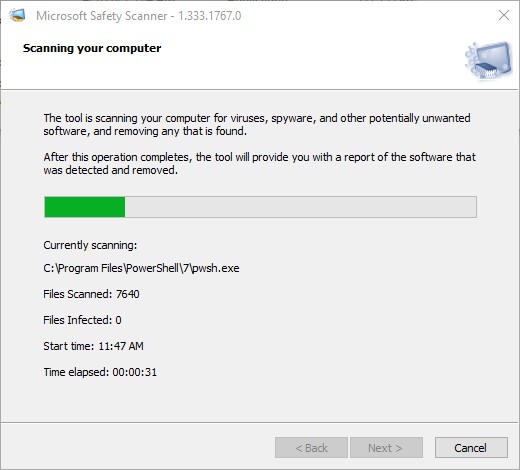
Click Next, and you get your choice of scan types (quick, full, or customized).

Then, it scans your “most likely compromised” files under quick scan.

On my production PC, the whole process took about 3:00 and produced the following results.

Nothing to see here folks, please move along. A clean bill of health, in other words.

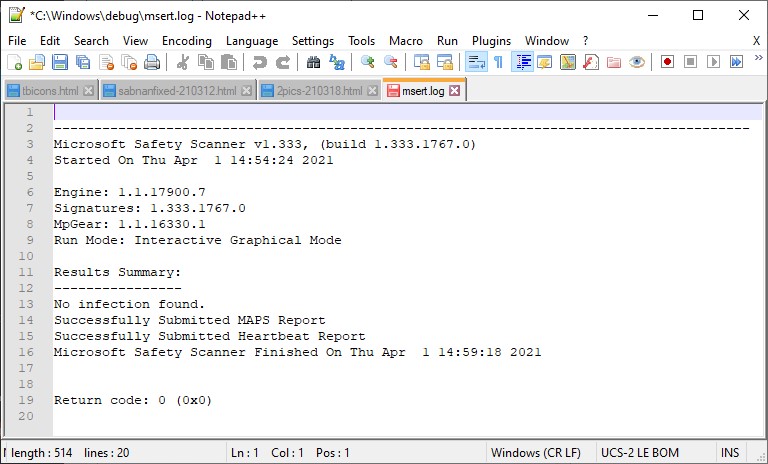
Upon completion,  the log file (named msert.log) shows nothing informative about cleanup or actions taken (probably because it found nothing to clean up). Here’s a NotePad++ view of its contents (click to view full-sized, as it’s a little hard to read in native WordPress resolution):

I’m still not sure if you and I really need this tool or not, but it’s nice to know it’s available on demand should you wish to make a malware scan and clean-up pass over your Windows PC. The whole thing still has me wondering…


Facebooklinkedin
Facebooklinkedin

Further Windows Explorer Restart Follies

First: an admission. I occasionally have problems with losing access to the Start Menu, and getting Taskbar icons to respond to mouse clicks. I’m pretty sure my troubles are self-inflicted, and come from some interaction with Stardock Software’s Start10. I’ve used some variant of this software since Windows 8 Release Preview emerged in May 2012. Recently, I’ve experienced further Windows Explorer restart follies, as I’ve attempted repair and recovery. That said, the never-fail fix for these symptoms remains “restart Windows Explorer in Task Manager.” In attempting that fix recently, I came a across a new and amusing wrinkle this week. Let me explain…

What Do Further Windows Explorer Restart Follies Entail?

As I mentioned, the fix involves restarting Windows Explorer. When I went to attempt that fix earlier this week, Windows Explorer wasn’t showing under the Apps heading in Task Manager’s Processes view (see lead-in graphic for example). What to do?

You can’t right click something that’s absent to get to the Restart option in the menu shown above. So I did the obvious: I launched an instance of Explorer by clicking its folder icon in the Taskbar. This launched Explorer.exe, and caused the Windows Explorer item to appear where it was needed. Then, it was simple to right-click that entry, pick Restart and forcibly restart the explorer process.

Thankfully, as it always has before, this fixed whatever was wrong with my Taskbar icons and the built-in Start Menu. I’m not sure how long this has been going on. It’s been a while since I last had this problem. But my recollection is that because the Explorer process always runs in the background — it’s necessary to support the Start Menu, Taskbar, Notification Area and Action Center — it used to appear by default under Apps in Task Manager, too. Apparently, that’s no longer the case in 19042 and 19043 builds.

I proceeded from this principle: “If no Windows Explorer shows in Task Manager Apps, then put one there.” That makes it easy to restart. ‘Nuff said.

Facebooklinkedin
Facebooklinkedin

Two Commands Boot Into WinRE

I had the good fortune to provide copy edit and feedback to an MS person who works with Windows 10 recovery tools recently. From the blog post involved in our back-and-forth, I learned that two commands boot into WinRE (that is, the Windows Recovery Environment). Of course, a restart is required to make this happen. It’s not like Advanced Startup in Settings → Update & Security → Recovery → Advanced Startup. That is, you won’t immediately restart your PC as you do when clicking its “Restart now” button. I almost fell over when I tried that out for the first time!

Which Two Commands Boot Into WinRE?

One I already knew about, the other is a welcome and interesting surprise. The surprising one uses a special switch for the Windows RE configuration tool — namely REAgentC. Turns out there’s a special option named “boottore” that does the trick. If you parse the string properly, it’s self-advertising: “boottore” = “Boot to R(ecovery )Environment.” Thus, that complete command is:

reagentc /boottore

The second one is a special version of the good old, familiar shutdown command. It takes two parameters–namely:

  • /r Restarts the computer after shutdown
  • /o Goes to Advanced boot options menu and restarts device, then boots into WinRE

Thus, the complete command is:

shutdown /r /o

What’re These Commands Good For?

Good question. In this modern era, transfer of control to the Windows loader often occurs extremely fast. This means that it can be difficult to impossible to interrupt the initial bootstrap process to divert over to an alternate boot menu — such as WinRE, BIOS/UEFI, boot device menus, and so forth. These commands put you in control over what happens after your next boot in advance. This has become my preferred method, because of the degree of control and guaranteed results that occur.

Shoot! Give one or both of them a try. You might come to like one or the other of them, too! For best results, run them in an administrative command prompt window or PowerShell session.

Facebooklinkedin
Facebooklinkedin

When WU Repairs Fail Try UUPDump

I’ve got two test machines on the Beta Channel release right now. The older of the pair — a 2014 vintage Surface Pro 3 — is stuck on KB5000842 and keeps throwing install errors. Others reporting into the TenForums thread on this update have had success using the terrific UUPdump tool to build a customized image to install 19043.906. So that’s what I’m trying, too. In general, my strategy is “When WU repairs fail try UUPDump” next anyway. Glad to see others use that strategy, too.

When WU Repairs Fail Try UUPDump.WUerror

A couple of failures, including a complete WU reset, means it’s time to change update strategies.
[Click image for full-sized view.]

Why Say: When WU Repairs Fail Try UUPDump?

The update installs fail each time with an error code of 0x800F081F. This is interesting, and a bit strange, because the error is often associated with the Windows Update Assistant nowhere present in this situation. It can also pop up when items are missing from the download packages that WU delivers to the desktop.

That latter reason explains why a switchover to UUPDump makes sense. It grabs the ISO-based image for the base OS version from MS servers  (19043 aka 21H1 in this case). Then, it uses DISM to apply all newer updates packages up to and including the problematic KB5000842 item that’s throwing the error here. It’s perfectly safe because it uses only Microsoft Servers as the source for its OS and update files.

Building the 19043.906 ISO File

Running UUPDump to build an ISO for a patched OS takes some time because of the many and various steps involved. For the SP3 PC, it took over an hour before it got stuck mounting the image for Build 19041.1. That’s when I realized it makes sense to run UUPdump batch files on the fastest PC around.

Thus, I ran the same job on my Lenovo X1 Extreme, with its 6-core i7-8850H CPU. Given more threads and a faster CPU and much faster Samsung OEM PCIe x3 SSDs, it ran noticeably faster, though the KB5000842 cab file update still took 5 minutes to complete (click “view image” inside the lead-in graphic for this story). The whole thing still took 35 minutes from start to finish.

And it went that fast only because we have fast (nominal GbE, actual 900 Mbps or so) Internet service here at Chez Tittel. What takes the real time, however, is bringing the windows image (.wim) file up from base level Build 19043.844 to the current/highest level Build 19043.906. This takes several steps, each one involving mounting the image, adding packages, the dismounting the image, and continuing forward. There’s some mucking around with a WinRE.wim file along the way, too.

Performing the In-Place Repair Install

This is the easy part: mount the image, run setup.exe and let the installer do its thing. This takes a while, too — considerably longer than applying the update would (checking the PC, agreeing to the EULA, checking for updates,  and so forth; then finally into OS installation). This entire process took another hour or so to complete. But here’s the end result, straight from winver.exe:

When WU Repairs Fail Try UUPDump.final

All’s well that ends well: here’s Build info from the upgraded SP3, right where I want it to be

More About UUPDump

I’ve written about UUPDump for numerous other sites, including TechTarget and Win10.Guru, both for my Windows Enterprise Desktop blog. Here are some links, if you’d like to learn more:

  1. UUPDump Invaluable Resource (TechTarget)
  2. A Peek Inside UUPDump (Win10.Guru) includes a brief interview with its developer who goes by the handle “Whatever”
  3. UUPDump Outdoes Windows Update (Win10.Guru)

Cheers!

Facebooklinkedin
Facebooklinkedin

Lenovo Vantage Updates Take Patience

Here’s a sticky situation I’ve found myself in more than once. I’m reasonably fond of the Lenovo Vantage update tool, which handles BIOS, firmware, driver and ancillary software updates pretty well. Occasionally, two or more updates requiring a reboot appear together therein. That’s what happened today, as an Intel Manage-ment Engine (IME) firmware update and a BIOS update appeared in tandem. It’s also what reminded me that Lenovo Vantage updates take patience.

Why Say: Lenovo Vantage Updates Take Patience?

This doesn’t happen with Windows Update, but when you’re applying low-level updates to a system, items that require a reboot must be applied one at a time. I’ve learned this working with Vantage over the past few years. If a firmware update and a BIOS update show up on the same day, it’s best to download and install one by itself. Then, repeat for the second item.

What happens if you try to do more than one? When you attempt to install the second item with a reboot pending, installation fails because it is smart enough to recognize that two separate and distinct reboots are needed.

I don’t always remember this, so I got bitten today when Vantage finished the pre-reboot phase of the BIOS update and transitioned into the IME update. As soon as the IME update got going, it stopped itself and reported an error. Part of the text read “An installation failed to complete properly. Please reboot and try again.”

The Reboot’s the Thing

Of course, as soon as the reboot got through shutdown and into restart, the BIOS update ran to completion and the system rebooted again. After that reboot, I returned to Vantage to generate the lead-in graphic for this story that shows the IME firmware update still pending. As soon as I clicked install, I got an explicit reboot warning, to wit:

If I’d run the sequence IME first, BIOS second, I’d have seen this warning right away, and not been caught in an error. Sigh.

In general, it’s a good idea to make firmware and BIOS changes piecemeal anyway. You don’t want more than one thing at a time to blow up. That could complicate troubleshooting beyond belief. That’s NOT what anyone wants when making deep-level system changes.

Live and learn — or in my case, keep living and get an occasional reminder. Cheers!

Facebooklinkedin
Facebooklinkedin

Zen and the Art of USB Troubleshooting

Back in the 1970s, Robert Pirsig’s Zen and the Art of Motorcycle Maintenance made its debut. I was a year out of college, working in a somewhat technical job as an audio engineer at the Library of Congress. I devoured that book and many of its thoughts have stayed with me over the intervening years. None has stuck better than his discussion of the scientific method (that link goes to a reprint of that section). It always struck me afterward that when somebody wants to get serious about troubleshooting, it’s time to invoke the awesome majesty of “the formal scientific method.” That’s why I call this blog post, with tongue in cheek: “Zen and the Art of USB Troubleshooting.”

What Good is Zen and the Art of USB Troubleshooting?

Early in the cited section on the scientific method, Pirsig makes two great observations. First he says “Actually, I’ve never seen a cycle-maintenance problem complex enough really to require full-scale formal scientific method.” Second, he compares that method to “an enormous juggernaut, a huge bulldozer — slow, tedious, lumbering, laborious, but invincible.” As I’ve been troubleshooting a vexing issue with a recently-acquired Sabrent Nano 1 TB M.2 2242 NVMe SSD lately, I’ve had reason to revisit and ponder Pirsig’s thinking and  problem-solving toolset.

Here’s the Deal

Here’s the combination of the four-plus ingredients that go into my problem set:

  1. A Sabrent NVMe SSD enclosure, model EC-NMVE
  2. The Sabrent 1 TB Nano SSD, model SB-1342-1TB; for comparison I also have an M.2 ADATA XPG 256GB 2280 NVMe
  3. The USB-C  cable (with USB 3.1 female to USB-C male adapter) that Sabrent shipped with the enclosure
  4. The USB port on Windows PC into which I plug enclosure (1) using cable (3)

The only time I have problems with the enclosure is when the Sabrent Nano device is plugged in. It works reliably and constantly if I use the enclosure, its cable and the ADATA SSD. When the Nano is plugged in, however, the device goes offline if I leave it plugged in overnight. When I come into my office, the controller light on the enclosure is blinking constantly. At other times, and at irregular intervals, the device goes offline while it’s idle.

I take the constant blinking to mean the USB controller in the PC is trying — and failing — to handshake with the drive controller in the enclosure. If I unplug the device (either end) and plug it back it, it resumes working.

The scientific method tells me that you must vary only one item in a collection of possible causes for trouble at a time to determine which item is the actual cause. The only collection of the items listed in 1-4 above that causes a fault occurs when the Sabrent Nano is present. Therefore, the Sabrent Nano is the faulting item.

Filing a Tech Support Case

I’m going to use this article as the documentation for a tech support filing, and re-open my trouble ticket with Sabrent. I believe I have shown that the Nano is not working as it should be, and that it faults regularly. I am hopeful Sabrent will agree with my analysis, and send me a replacement SSD. I’ll keep you posted, and share their response(s) here. Stay tuned.

[Note Added 3/17 Afternoon]

Sabrent simply asked for a copy of the invoice (easy to retrieve from my Amazon order history) and the ship-to information. Let’s see how long it takes for a replacement to get here. Interesting, and satisfying, so far!

Facebooklinkedin
Facebooklinkedin

Interesting Partial 21H1 Component Store Cleanup

I’m running the Beta Channel Insider Preview on my Surface Pro 3. I just bumped it to Build 19043.899 thanks to KB5000842. Out of curiosity, I then ran the DISM commands to analyze and clean up the component store as shown in the lead-in graphic for this story. A final analyze shows interesting partial 21H1 component store cleanup occurred. Let me explain…

What Does Interesting Partial 21H1 Component Store Cleanup Mean?

If you take a look at some detail from the lead-in graphic then check the screencap below, you’ll see they show 7 reclaimable packages before clean-up. After cleanup, 2 reclaimable packages still remain behind.

Notice that 2 reclaimable packages persist, event after running the cleanup option.

Reclaimable packages persist after dism cleanup for one of two reasons AFAIK:
1. At some point, the user ran the /resetbase parameter in an earlier dism cleanup.
2. Something odd or interesting is going on in the component store, and dism can’t clean up one or more packages (in this case, two).

I don’t use /resetbase on test machines as a matter of principle. So something interesting and odd is going on here.

Another Try Produces No Change

Having seen this before on other Insider Previews (and production Windows 10 versions), I had an inkling of what would happen. I repeated the cleanup and got the same results: 2 reclaimable packages still show. In my experience, this means they’re “stuck” in the component store. What I don’t know is if taking the image offline and trying again would make any difference. What I do know is that this won’t change until Microsoft finalizes the 21H1 release for general availability (or issues a specifically targeted fix).

Trading on my connections with the Insider Team at MS, I’ll be letting them know about this curious phenomenon. We’ll see if anything changes as a result. My best guess is that this gets a cleanup as part of the final release work sometime in the next 2-3 weeks. That said, only time will tell. Stay tuned!

Facebooklinkedin
Facebooklinkedin

Strange Sabrent Rocket Adventures

Last Friday, I blogged about swapping out my review unit Lenovo Thinkpad X1 Nano SSD. I purchased a US$150 Sabrent Rocket Nano (Model SB-1342 1 TB). It replaced a Samsung OEM 512 GB SSD (NVMe PCIe 3.0 x4). Check the Friday post for details on performance, installation and so forth. Today, I’m writing about the strange Sabrent Rocket adventures I’ve had since taking that device out of the laptop. Frankly, it’s a continuing and wild ride.

Strange Sabrent Rocket Adventures: Drive MIA

First, I used Macrium Reflect to clone the original Samsung drive. Then, I made the swap, ran some tests and replaced the Sabrent with the original SSD. Things got intersting after I plugged the drive back into the Sabrent NVMe drive enclosure (EC-NVME). The drive was MIA: it showed up as 0 bytes in size and generated a “fatal device error” if I tried to access it. Ouch! I immediately reached out to vendor tech support.

Sabrent Tech Support quickly coughed up a link to a terrific tool, though. The name of the tool is lowvel.exe, and it performs a complete low-level format of the drive, zero-filling all locations as it goes. That turned out to be just what I needed and put the Rocket Nano back into shape where DiskMgmt.msc could manipulate it once again.

Then, I initialized the drive as GPT, and set it up as one large NTFS volume. For the next 12-14 hours, I was convinced this was a final fix. But my troubles are not yet over, it seems.

More Strange Rocket Adventures

The next morning, having left the device plugged in overnight, I sat down at my desk to see it blinking continuously. When I tried to access the device, it was inaccessible. It’s not throwing hardware errors to Reliability Monitor, but I have to unplug the device and plug it back in, to restore it to working order. Something is still weird. Temps seem normal and the Sabrent Rocket Control Panel utility (shown in this story’s lead-in graphic) gives the device a clean bill of health.

I’ve got an intermittent failure of some kind. I need more data to figure this one out. I’m leaving the Control Panel running on the test laptop where the Rocket Nano is plugged in. We’ll see if I can suss this one out further. It’s not inconceivable I’ll be going back to Sabrent Tech Support and asking for a replacement — but only if I can prove and show something definite and tangible. Sigh.

Info Added March 25: All Is Quiet

Who’d have thought a Sabrent NVMe enclosure and a Sabrent NVMe drive might be ill-fitted together? Apparently, that’s what ended up causing my intermittent failures. On a whim, I bought the cheapest NVMe enclosure I could find — a US$26 FIDECO USB 3.1 Gen 2 device — into which I inserted the Sabrent Nano SSD. It’s now run without issue, pause, hitch, or glitch for a week. I did not insert the device pad that normally sits between the case and the device (already present in the Sabrent enclosure). I’m inclined to blame some kind of heat buildup or connectivity issue resulting from an overly tight fit in the Sabrent enclosure, which I may have avoided in its FIDECO replacement. At any rate, it’s working fine right now. Case closed, I hope!

Facebooklinkedin
Facebooklinkedin

Swapping X1 Nano NVMe Drives

OK, then. I went and sprung US$150 for a Sabrent 1TB M.2 2242 NVMe drive at Amazon. It is depicted in the lead-in graphic above. The high-level sequence of events is as follows. Ordered on Wednesday, received and experimented on Thursday, reported on Friday (today). Alas, I seem to have hosed the drive and have started RMA negotiations with Sabrent. Along the way, I learned most of what’s involved in swapping X1 Nano NVMe drives.

Be Careful When Swapping X1 Nano NVMe Drives

As is almost always the case, there’s a YouTube video for that. It showed me everything I needed to do. Disassembly/reassembly were easy and straightforward. I had no mechanical difficulties. But once again, my US$7 investment in a laptop screws collection saved my butt. I mislaid one of the two NVMe holder screws (found it later during  cleanup). I lost one of the 6 battery restraint screws (fell on the floor into neutral brown carpet). Both were easily replaced from the collection.

Cloning Works, But Proves Mistaken

For whatever odd reason, the Sabrent drive shows up pre-formatted. The disk layout is MBR and the primary partition is ExFAT. Both of those got in my way as I cloned the original drive to the replacement. First, I had to clean the drive, convert to GPT, then format it as a single NTFS volume. Then, I used Macrium Reflect to clone the contents of the Samsung OEM drive to the Sabrent. Along the way Reflect told me it had turned off BitLocker and that I would need to re-enable it after boot.

Replacing the Samsung with the Sabrent, I went into BIOS and turned secure boot off instead. This let the X1 Nano boot from the cloned drive just fine. I was able to run CrystalDiskMark to compare their performance. Here’s what that looks like:

Swapping X1 Nano NVMe Drives.side-by-side

Samsung OEM results left; Sabrent results right. Best improvement where it counts most!
[Click image for full-sized view.]

What do these results show? Indeed, the Sabrent is faster on all measurements, and more so on the most important random 4K reads and writes (lower two rows). It’s not a night-and-day difference, but IMO the added capacity and increased speed justify the expense involved. It’s a good upgrade for the X1 Nano at a far lower price than Lenovo charges. Also, performance is somewhat better than what their OEM stock delivers.

Here’s a summary of performance row-by-row (count 1-4 from top to bottom):
1. Read speeds increase by <1%; write speeds by >28%
2. Read speeds increase by >7%; write speeds by >36%
3. Read speeds increase by  >52%; write speeds by >21%
4. Read speeds increase by >14%; write speeds by >51%

Where Did I Go Wrong?

Cloning was a mistake. I saw it in the disk layout, which showed over 400 GB of unallocated space. Better to have done a bare-metal backup using Reflect with their Rescue Media. Next time I’m in this situation, that’s what I’ll do.

Something untoward also happened when uninstalling the Sabrent drive. When I stuck it back in my M.2 Sabrent caddy (which fortunately handles 2242 as well as other common M.2 form factors), it came up with a fatal hardware error. None of my tools, including diskpart, diskmgmt.msc, MiniTool Partition Wizard, or the Sabrent utilities could restore it to working order. I suspect that removing the battery, even though the power was off on the laptop, spiked the drive with a power surge. It’s currently non-functional, so I hope my warranty covers this and I’ll get a replacement. If not, it will prove a more expensive lesson than I’d planned, but still a valuable one.

Facebooklinkedin
Facebooklinkedin