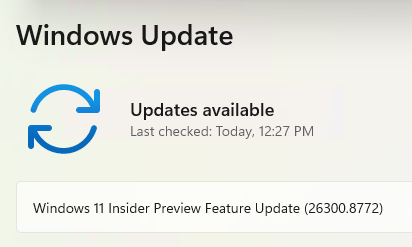
Windows Update (aka WU) has always been something of a “black box.” One clicks “Check for updates,” and watches a progress bar lurch along. At it sticks at various points along the way to completion, one wonders what’s going on inside the PC. The answer comes from two little-known components that handle updates behind the scenes. These are the Windows Update Orchestrator and Arbiter. As MS promises it’s overhauling WU Orchestrator and Arbiter, it’s a good idea to dig in and understand what they are, and what they do. Buckle up! Here we go…
Why Is MS Overhauling WU Orchestrator and Arbiter?
Simply put, the progress bar as it currently works doesn’t do its job. Also, when the update process finishes, post-update cleanups don’t exactly bring Windows up to full performance any time soon. TLDR version: this overhaul intends to address those things, probably in the upcoming August 11 Cumulative Update, due next Patch Tuesday.
What Is the Windows Update Orchestrator?
The Windows Update Orchestrator — formally the Update Orchestrator Service, or UsoSvc — is the scheduling brain of the entire update pipeline. It decides when your PC checks for updates, when downloads begin, and when installation kicks off, all without direct user intervention.
Think of the Orchestrator as an air traffic controller. It coordinates between your active hours, battery and network conditions, and Microsoft’s own delivery servers. When conditions align, it clears the update to land.
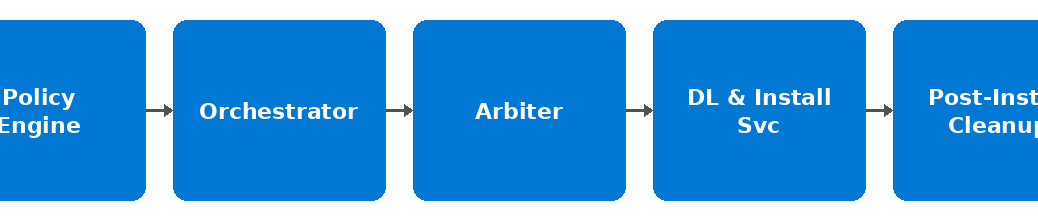
The Orchestrator talks to Windows Update’s policy engine, reads Group Policy and MDM settings on managed machines, and queues work for downstream services. It runs quietly in the background, even when you’re not thinking about updates at all. You can see a schematic of this workflow as the lead-in graphic above.
What Does the Arbiter Do?
If the Orchestrator is the scheduler, the Arbiter is the referee (as its cognomen is meant to declare). The Arbiter’s job is to resolve conflicts between competing update requests — for example, when a driver update and a cumulative security patch both want to run at the same time, or when a pending restart faces an active user session.
The Arbiter also decides which updates take priority. It weighs patch criticality, determines if a reboot is already pending, and whether or not the device is on a metered connection. When the Arbiter approves an update, it signals the Orchestrator to proceed. Without that handshake, nothing moves.
Together, the Orchestrator and Arbiter form a tightly coupled scheduling and arbitration layer that sits above the actual download and install services — but below what you see inside Settings.
Why They’ve Frustrated Users for Years
The problem has never been that the Orchestrator and Arbiter do their jobs poorly. Generally, they do not. The problem is that they remain nearly opaque to the progress reporting layer that feeds Settings. It’s more than a bit of a disconnect, in fact!
For example, you might see the Windows Update progress bar freeze at 0 percent, spike to 74 percent, then crawl back to 12 percent. That odd behavior is not the update failing. It’s the Orchestrator and Arbiter operating normally. Alas, their internal state isn’t accurately mapped to a UI percentage value. The progress bar has essentially been guessing. When it guesses wrong, things jump around. That happens…pretty regularly.
Post-update sluggishness is a related phenom. Once installation completes, Windows leaves temporary staging files, old component-store fragments, and residual update scaffolding behind. It then cleans up lazily over the next few minutes. On lower-powered PCs (the kind that technically meet Windows 11’s TPM 2.0 and CPU requirements but aren’t exactly fast) such cleanup makes some systems feel broken right after reboots.
What Microsoft Is Fixing Right Now
In builds 26200.8968 and 26100.8968 Microsoft has shipped two targeted improvements. These represent the latest Release Preview updates for 25H2 and 24H2, respectively and just appeared last week.
First, progress reporting among the Orchestrator, Arbiter, and the Settings UI is rebuilt. The percentage displayed now reflects actual download and installation state rather than a guesstimate. Going forward, a progress bar that stalls at 45 percent genuinely means the update is 45 percent complete. It’s no longer because the Orchestrator just stopped talking to the UI.
Second, post-install cleanup runs more aggressively at the end of the update cycle rather than spreading work across the next several minutes. Systems should reach full responsiveness faster. This should be a welcome change for anyone who reboots after Patch Tuesday and wonders why things feel sluggish for the next 10 minutes (or more).
When Will Orchestrator and Arbiter Change?
These changes are in Release Preview now and should show up for mainstream Windows 11 users via a Patch Tuesday cumulative update within one to two months. I’m thinking August 11, but it could be September 8, depending on telemetry from these latest Release Preview CUs. MS will hold them back if it needs to tinker some more. Hopefully, it happens sooner, not later.
Neither fix is glamorous, but both address complaints that Windows users have logged for years. A trustworthy progress bar and a snappy post-update experience are not unreasonable expectations for a modern OS. Here in Windows-World, we’ll wait and see how things go. Stay tuned: I’ll keep you posted…


 Accessed via on-disk WinRE, there it is!