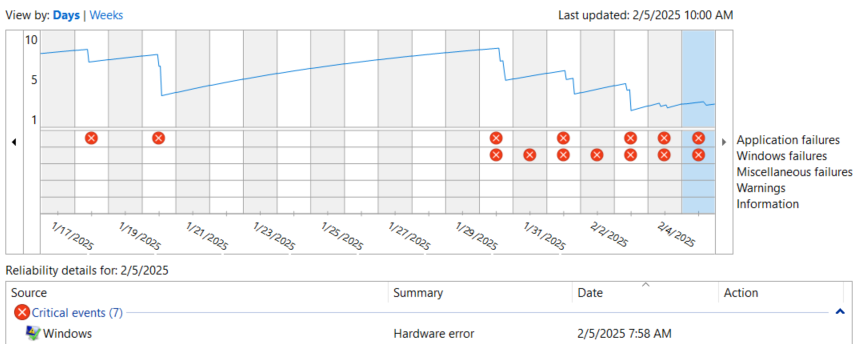
Take a look at the lead-in graphic. It shows multiple daily crashes — hardware errors mostly — on my production desktop for the past week. As it turns out, my switchover from Game-Ready to Studio NVIDIA driver did not fix my dual monitor problems. I had to forcibly reload the graphics driver (WinKey+Ctrl+Shift+B) to get both displays working after sleep even after the switch. Resolved to undo recent updates, I learned that NVIDIA rollback gets interesting on this PC. Let me explain…
Why NVIDIA Rollback Gets Interesting
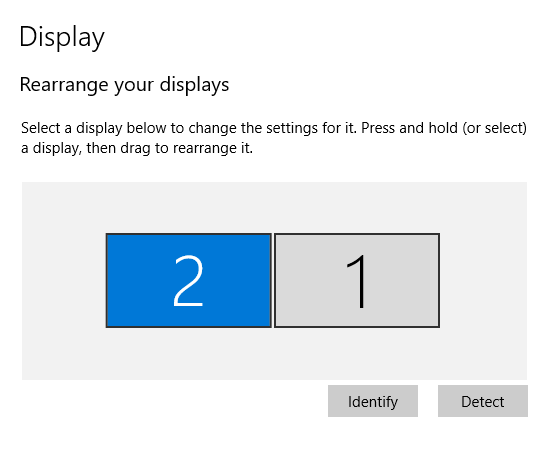
It doesn’t seem to matter which January 30 version of the NVIDIA driver I try to run on this PC and its RTX 3070 Ti GPU. Both posed stability and “wake from sleep” issues. Thus, I knew I had to roll back to the previous version.
Alas, the rollback button in Driver properties was not lit up, so I had to find and download the driver from the NVIDIA website. Once I identified the next-most-recent version — namely 566.36 — I was able to download its installer file from the older drivers listing for my graphics card, filtering on the Studio Driver tab.
Just to be safe, I also told the installer to do a clean install of that driver. This flushes out all associated files and registry settings found on the PC and replaces them with clean new (in this case, older) copies.
Rollback Success?
I was able to reboot and get into the OS with both monitors working just fine. I just put the PC to sleep, and was able to wake into both monitors without difficulty. I’d hazard the hypothesis that this might have fixed the issues I was experiencing. But after being too quick to declare victory in my Febuary 3 post after switching to the 572.16 Studio driver, I think I’ll wait and see if things keep working before calling this one “fixed for sure.”
Stay tuned! I’ll report back tomorrow and let you know if ReliMon throws any more errors. So far, so good even after “forced sleep and wake…”
Info Added 25 Minutes Later
I just came back from lunch. The PC woke up with a single keystroke (Enter) and both monitors are working as they should be. I’m encouraged.