Category Archives: Cool Tools

Dev Home Goes Drag’n’drop

With the latest version in the Canary Channel, Windows 11 Dev Home goes drag’n’drop with dashboard widgets. I read a tweet about it from Kayla Cinnamon this morning. And sure enough, once I’d downloaded the latest MS Store updates, it worked as advertised.

Details for Dev Home Goes Drag’n’drop

In this utility, the dashboard is where you can pin widgets. Once that little detail is taken care of, it takes version 0.301.198.0 or higher to exercise the drag’n’drop capability. If you look at the initial lineup in the lead-in screencap you’ll see this widget order: CPU-GPU-Network-Memory. Just for grins the screencap below shows Memory in first position, with the original CPU-GPU-Network order still intact (just shifted one position right).

Dev Home Goes Drag'n'drop.after

To institute the new order, I dragged Memory from the rightmost to the leftmost position. [Click image for full-sized view.]

There’s a Blog Post for That

For all the details about version 0.3, see the July 19 Windows Blogs post entitled “Dev Home Preview 0.3 Release.” In addition to this visible and welcome change, it also mentions various bug fixes and a raft of “Miscellaneous improvements.” There’s also a handy link to the Dev Home docs site that’s worth following. Good stuff, all the way ’round!

Facebooklinkedin
Facebooklinkedin

WinGet Upgrade PowerShell Working

At the end of last month, I blogged about an interesting issue: when you used WinGet to upgrade PowerShell (in PowerShell) that operation would complete, but the screen wouldn’t update properly. As I reported, it showed cancelled and required opening a new PS session to see the current, upgraded version number. No more: now, MS has WinGet upgrade PowerShell working as it should be. See the lead-in graphic for visual proof.

If WinGet Upgrade PowerShell Working, Then What?

No more weirdness in the self-upgrade process, I guess. The lead-in graphic shows that PowerShell updated the initial session window to match the current version (7.3.6) with the version number at the top of the that window. Indeed, I’m forced to *SWEAR* it said 7.3.5 when I started, and appeal to the 2nd line of the WinGet upgrade output because I didn’t think to capture “before” and “after” screencaps. LOL, it didn’t occur to me that the developers would rewrite the terminal window to update the version number. But they did!

I contacted Demitrius Nelon, Team Lead for WinGet at MS to report this weirdness, which he confirmed for me. What he didn’t tell me was that they fixed this in the 7.3.6 release. But its behavior, as shown in the lead-in graphic, speaks for itself. Good stuff and thanks, people: good job.

Got It on Another PC!

I went to upgrade another PC and *DID* capture the initial screen showing 7.3.5 at the top. No more swearing: here’s the screen before the 7.3.6 upgrade completes so you can see the old version number in its top line.

WinGet Upgrade PowerShell Working.X390

See!? There’s the old version number before the 7.3.6 update completes. It’s like magic!

Note added 7/19: looks like this capability (no cancelled and updating version number) may only be in Windows 11. When I updated my sole remaining Windows 10 physical PC this morning, the cancelled message recurred as in my earlier blog post on this subject. Go figure!

Facebooklinkedin
Facebooklinkedin

Canary Build 25905 Gains Upgrade Repair Install

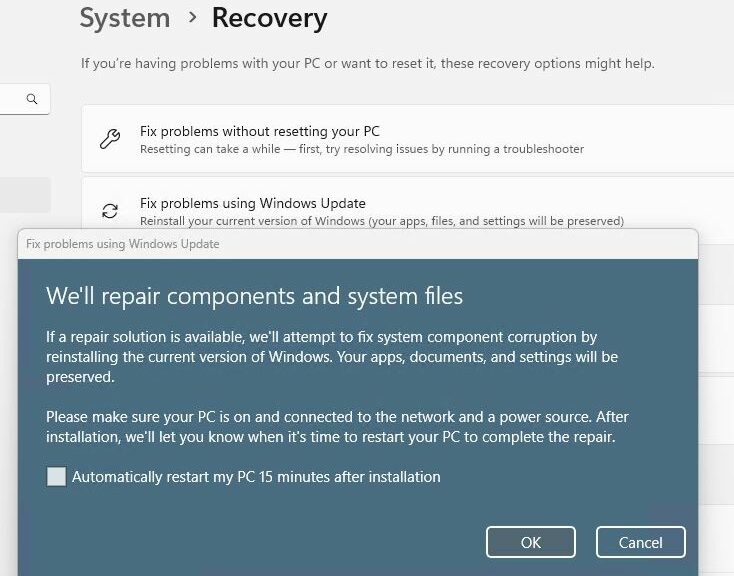
I guess it’s been a long time coming, because MS has waltzed around this topic for two years or more. The latest top-level Insider Preview now includes the option shown in the lead-in graphic. That’s right: Canary Build 25905 gains upgrade repair install capability via WU, built-in. This may make it unnecessary to visit UUPDump to generate ISOs which may then be mounted for such use.

What Canary Build 25905 Gains Upgrade Repair Install Means

Visit Start → Settings → System → Recovery, then look for the item labeled “Fix problems using Windows Update” (as shown in the lead-in graphic). This takes you through a number of screens en route, as shown here:

Canary Build 25905 Gains Upgrade Repair Install.01
First you must grant permission for the repair to start

After you click OK (irrespective of whether or not you allow a timed reboot), you’ll move into Windows Update where you’ll see a display like this one:

Windows downloads and installs a repair version of your OS, before moving into the post-GUI phase.

This can take a while: on my 2018 vintage Lenovo ThinkPad X380 Yoga, it took an astonishingly long 45 minutes to download and install to the first reboot. I was able to keep working until then, but after that, the installer took the desktop away for about another 10 minutes. When it’s time to reboot to continue the repair install you’ll see something like this:

Canary Build 25905 Gains Upgrade Repair Install.restart warning

Once the GUI installer gets done, you will restart to complete repairs.

After the restart warning, it takes another 3 minutes to get to the actual reboot. Then the real post-GUI work begins. All in all it took 55 minutes to get to a desktop as the repair install completed: 45 minutes for download and initial install; 10 more minutes for reboot and post-GUI install.

Trade-offs, Trade-offs

Here’s the deal: it takes about 12 minutes on the same PC to use a mounted ISO to get through the same process. But that means building a current ISO from UUPDump which takes about 25 minutes to complete. Thus it’s a matter of more personal effort to do it manually via UUPDump (37 minutes) for a little less time versus the ease and convenience of letting WU handle it for (but taking 55 minutes to complete). Interesting!

Facebooklinkedin
Facebooklinkedin

Android Subsystem Gets Easy-Peasey

In reading over yesterday’s news, I found Paul Thurrott’s story on GA for the Amazon Appstore on Windows 11. Being both curious and adventurous, I went ahead and installed same on one of my Lenovo test PCs (a beast: the P16 Gen1 Workstation with i9-12950HX, 128 GB RAM, 1.5 TB NVMe SSDs). There’s a little more going on behind the scenes than meets the eye, but things are arranged now so that for Windows 11 Android Subsystem gets easy-peasey. Let me explain…

What Android Subsystem Gets Easy-Peasey Means

Amazon has built its Amazon Appstore as a Windows Store download. If you grab and install it, and the Windows Subsystem for Android is absent on the target PC, the installer first makes sure this underlying environment is up and running. Then it installs itself. The whole process took about 3 minutes on the admittedly over-powered P16 Workstation. But it required no extra effort on my part to get the Amazon Appstore installed and running.

Just for grins, I downloaded and installed Wordle from the Appstore to make sure things were working. It’s been a while since I ran the Android version. I’d forgotten how obnoxious and ad-laden the free version of that app really is. Suffice it to say: NOW I remember!

Android Subsystem Gets Easy-Peasey.wordle

Android apps run in their own self-contained windows on the desktop, inside the WSA (Windows Subsytems for Android) container process as shown in Task Manager at top.

Overall, Amazon has done an excellent job of making the install-to-download-to-desktop process simple, fast and easy. Feel free to give it a try on Windows 11. As far as I can tell it runs on all current versions, production and Insider Preview releases alike. Good stuff!

Facebooklinkedin
Facebooklinkedin

Gadget Fixes Notification Issue

I have to laugh. Sunday morning, I was at my desk before 8 AM having made it back from my daily walk kinda early. I forgot that I’d turned on the external speakers (I usually use headphones). No sooner did I get to my desktop than my speakers started chiming as a flood of notifications bonged in — pretty loudly, too. And because those notifications appear on top of the notification area of the taskbar, I couldn’t get to the volume control to turn the volume down. This caused some mild panic, because I didn’t want to wake up other family members still asleep Ultimately, I used the Sound item in Control Panel to reduce the volume. But a gadget fixes notification issue one and for all, after I get past that initial flurry.

Gadget Fixes Notification Issue.controlpanel-sound-speakerlevels

The Levels pane in the Sound item for the default output lets me turn things down…”

How a Gadget Fixes Notification Issue

Gadgets appear elsewhere on the desktop, so they aren’t rendered inaccessible when a flood of notifications appears. I can go to the Volume Control gadget shown as the lead-in graphic above any time, and click on the sound level I want to raise or lower volume levels.

The name of the gadget depicted is “Volume Control.” It appears on Page 3 in the 8GadgetPack collection (lower right; details at bottom).

Volume Control 1.2 makes it easy to raise or lower volume without accessing the notification tray Volume Control.

This may not seem like a big thing, but when you’re trying to let sleeping … err … family members …err lie, it’s kind of a lifesaver. ‘Nuff said!

Facebooklinkedin
Facebooklinkedin

PowerToys Team Closes WinGet Gap

Now THAT’s what I like to see. Yesterday morning, I noticed a new version of PowerToys (v0.71.0) was out. So quite naturally, I ran WinGet to upgrade same. No dice. At 11:45 AM (Central) I tweeted  about this. I observed it was “kind of surprising to see a new PowerToys release…without a matching WinGet upgrade manifest.”  8 minutes later, the team leader responded “we’re working on it.” And by that afternoon, the PowerToys team closes WinGet gap. There’s a working manifest for version 71 in place. Neat-o, and thanks, people!

PowerToys Team Closes WinGet Gap Quickly

It’s a real testment to the energy and drive of the teams involved that things were already in progress as I reported in. (In fact, I heard from the WinGet team lead, too.) This morning I installed PowerToys on the Lenovo ThinkPad X1 Extreme (8th-gen i9, 32 GB RAM, 1.5 TB SSD) and got the latest version. That sequence appears as the lead-in graphic above.

If you look at that graphic, you’ll see that WinGet found only a Zoom upgrade. Oops! That’s because PowerToys wasn’t installed on this PC — yet. But when I did install the .exe version (Microsoft. Powertoys) 0.71.0 (shown as v0.71.0 in the thumbnail at lower right) appears. That’s exactly what should have happened,. It also shows the WinGet manifest for that version of PowerToys is present and working properly.

Always Nice When Things Work Out…

I must say that both the WinGet and PowerToys teams have always been great to work with. They respond to input, questions, and feedback quickly. And when they have to act, they tend to do so sooner than later. Thus, my thanks to Demetrius Nelon (WinGet team lead) and his merry munchkins, as well as Clint Rutkas (PowerToys team lead) and his peppy people, too.  Please: keep up the good work.


Facebooklinkedin
Facebooklinkedin

Sussing Out WinTerm Color Schemes

In my writing and research work for TekkiGurus, I’m pursuing a GitHub project that works within the Windows Terminal environment. It’s called ColorTool. Simply put, ColorTool shows the colors used in the console window; it also lets you tweak them. Its color charts are kind of interesting and I’ve trying to figure them out. MS has a tendency to show them inside an Ubuntu command session inside Windows Terminal. I show them as they pop up in PowerShell in the lead-in graphic. As I’m learning how this all works, I’m sussing out WinTerm color schemes, too.

Bing Chatbot Helps When Sussing Out WinTerm Color Schemes

I’ve been reading a lot, and asking around to try to learn how to decode the values that show up in the display form of a Windows Terminal color scheme. So far, it’s proved rather more challenging than I had expected. So far, I’ve been attacking output strings to tease out their meanings. This is what I’ve learned so far, mostly thanks to the Bing Chatbot in Windows 11 Canary (Build 25393):

  • The string “gYw” that appears in the columns of rows 2-10) stands for gray, yellow and white. It uses prevailing foreground color, whatever that may be.
  • The values 30m through 37m that appear as row heads (first column left) are ANSI escape codes for foreground colors
  • The values 40m through 47m that appear as column heads (second column through 9th column left) are ANSI escape codes for background colors.
  • Looking at the color chart, the text strings “gYw” show the foreground color, while the solid bar for each column shows the background color.

In profound contrast, Ubuntu puts foreground colors as columns, and background colors as rows. I also shows escape sequences instead of color names. Initially, this bamboozled me. But now I see what’s going on…

Sussing Out WinTerm Color Schemes.ubuntu

Notice that background appears as double rows with escape codes at left in column 1, and foreground colors appear as the text for escape codes in rows 2-9).

Wow, it’s all starting to make a certain amount of sense. And I mostly have the Bing Chatbot to thank for explaining such extremely low-level details. Apparently, those who work with terminal/console color charts know all this stuff already.

Now, I finally understand that a color scheme assigns a range of color values to the 8 ANSI escape codes for the foreground colors 30m through 37m (which may also be expressed as ESC[30m …). It does the same for the 8 ANSI escape codes for the background colors, too (40m through 47m, likewise ESC[30m).

OK, Now I Know What’s What

Suddenly, I feel armed with the information I need to make sense of the Windows Terminal color schemes and their related color charts. This should make my jobs of explaining them, and their customization, a WHOLE LOT easier. I’m jazzed…

Facebooklinkedin
Facebooklinkedin

Understanding Windows Validation OS

Here’s something new to me that’s apparently been a thing for some time now. It’s called a “Validation OS” and includes an image file named ValidationOS.wim. When I tell you it’s a mere 193 MB in size and represents a (mostly) read-to-run image for Windows 11 22H2, that should raise your eyebrows. By comparison the 22H2 Download from the Download Windows 11 page weighs in at 5.4GB! One key point in understanding Windows validation OS is that it’s minimalist and limited by design. That’s why I show adjacent file listings from the Explorer Download folder as the lead-in graphic here.

Overview: Understanding Windows Validation OS

Here’s how MS describes this Windows 11 OS version and its purpose (from MS Learn’s Microsoft Validation OS documentation; bold emphasis mine):

Microsoft Validation OS is a lightweight, fast, and customizable Windows 11-based operating system that you can use on the factory floor to diagnose, mitigate and repair hardware defects during Windows device manufacturing. Validation OS boots into a Command Line environment to increase reliability on the factory floor and supports running Win32 apps, smoothing the transition from early hardware bring-up to retail OS and apps development.

The Validation OS offers only a command line interface as delivered. But by using DISM to operate on the .wim file you can add whatever packages you like to this bare-bone OS image. The list of optional packages available for use with this image includes (paraphrased from the afore-linked) Validation OS reference at MS Learn:

  • PowerShell: provides PS and basic modules/cmdlets
  • Basic connectivity (HID, USB and Serial device connections)
  • Disk tools (built-in Windows disk tools, including diskpart.exe)
  • GDI Plus: add graphics capability through GDI Plus support
  • .NET Framework 4.5: permits use of basic .NET features
  • Plug and Play: provides support for plug-and-play devices
  • Windows Device Portal: lets OS access WDP server for driver downloads
  • Other drivers: by class, includes memory, core system extensions, network drivers, and more

What the Validation OS Good For?

It is intended for developers and OEMs to provide a quick-to-boot-and-run, lightweight version of Windows 11 they can use to test specific hardware configurations. Developers can use it to simplify and speed up driver creation and maintenance.

But gosh, a lightweight version of Windows 11 is also handy for rescue and recovery purposes, too. Those who know how to use DISM will be able to use its add-package capabilities to extend and customize this Windows image (it will also be necessary to take this approach for updates as well).

This one’s definitely worth exploring and possibly putting to work, for admins who test configurations and updates prior to deployment, and for anyone in search of a good starting point for a customized, bootable repair/recovery environment.

Note: here’s a shout-out to Sergey Tkachenko at WinAero, whose July 4 story “Microsoft’s Validation OS Again Received and Update (Quietly)” clued me into this version of Windows 11. Thanks!


Facebooklinkedin
Facebooklinkedin

Testing Bing Chat AI Text Generation

Hmmm. This has been interesting… I’ve been using the Bing Chat tool in the Canary Channel version of Windows 11 lately. I just asked it to shed some light on a Windows Console (aka Windows Terminal) tool that I’ve been working with lately. Let me provide the query I used while testing Bing Chat AI text generation:

“Give me 400 words about the Winodws Console colortool”

I’ll provide the results as a blockquote under the next heading. Then I’ll explain what’s good about it and where — IMO at least — it falls a little short.

Results from Testing Bing Chat AI Text Generation

Notice that the chatbot correctly interprets my mistyping of Windows as “Winodws” in the input, and gives me the answer I wanted. Good stuff! Here’s what it told me:

The Windows Console Colortool is a utility that helps set the color palette of the Windows Console. It can be used to apply the new default color scheme and several alternate pre-defined color schemes or even schemes of your own1The tool is open source and hosted on GitHub2.

To use the Colortool, open up Command prompt and run: colortool [scheme name in schemes/ e.g: campbell]. Right-click on the window title to access the ‘Properties’ dialogue box. Once the properties dialogue box opens press OK (which saves the color change)1.

Notice it provides highlighted, hyperlinked text to additional references (which show up in the lead-in graphic as footnotes 1 and 2). It’s essentially a rewrite of descriptive information from the colortool’s github page. Curiously, that does not show up as the primary reference here (it’s number 2, though). Concerns about the accuracy of the material I’ve seen voiced in other analyses are apparently NOT an issue when you ask the chatbot to keep the text short. Everything it says it 100% accurate and verifiable.

OK Then, What’s Missing?

The text does not explain that the ZIP file for the colortool must be downloaded and unpacked into a folder that’s either included in the $PATH environment variable, or made the focus of the Command Prompt (or PowerShell) session in which the tool gets invoked. It just assumes all those details have been handled and jumps straight into the syntax and behavior of the tool itself.

That’s all well and good, but makes a telling demonstration of why AI chatbots can help, but not necessarily take over, for knowledgeable human actors with a more nuanced understanding of the context in which they’re operating. At least not yet, anyway…

It’s extremely interesting stuff, and is definitely going to help me with my job of explaining things to readers in the future. If you’re running the Canary Build (25393) for Windows 11, click the Bing symbol at the upper right of the default Edge window to dig in and try it for yourself. Great fun!

Facebooklinkedin
Facebooklinkedin

WinGet Upgrade PowerShell Shows Cancelled

Here’s an interesting observation. Winget will happily upgrade PowerShell from one version to the next, but things can sometimes get a little weird at the end of that process in a PowerShell window. As you can see in the lead-in graphic, a WinGet upgrade PowerShell shows cancelled at the end of that process. I opened a second PowerShell tab, then formatted it to appear beneath the open command session above. Notice the version number in the top reads 7.3.4 and below 7.3.5. That means the upgrade process completed successfully and PowerShell is running the higher-numbered version.

Interestingly, this doesn’t happen on all Windows 10 or 11 PCs. As I upgraded my local fleet from the old version to the new, this situation popped up on about half the machines involved. WinGet team lead Demetrius Nelon (@DenelonMs) explained things to me this way:

Yes, we have the same behavior when we use winget to upgrade winget via `winget install “App Installer” -s msstore –force`. We actually special case that scenario in the latest preview to show completion even though the process is killed which is what is happening in the upgrade PowerShell scenario.

What WinGet Upgrade PowerShell Shows Cancelled Means

Once PowerShell is updated the process where the upgrade happens appears unable or unsure what to do with itself. It’s apparently still running the old version in the top pane. But when a new pane opens below it shows the new version of PowerShell is running. IMO, that makes the “Cancelled” output an artifact of the bootstrapping process rather than a genuine error message. Indeed that’s a function of the “CTRL-C” like behavior of what happens as Mr. Nelon explained further:

Essentially the running process is “killed” [ctrl]+[c] equivalent. When the process is killed an exception is thrown. A child process would continue to run, however, so it actually completes successfully

And indeed, if you close the open Windows Terminal instance and open another one, it comes up with only 7.3.5 visible and available. I don’t know if others find this kind of thing interesting and entertaining. But gosh, I sure do. These little details are what makes working with the Windows OS and its supporting cast of tools — Windows Terminal and PowerShell, in this particular case — so interesting and beguiling.

Learn More About Windows Terminal

I’m about halfway through a series of articles on Windows Terminal for TekkiGurus.com right now. Here’s what’s done so far:

Overview: Understand Winget: MIcrosoft’s Windows Pkg Manager
Part 1: Dealing with Windows Upgrade Issues
Part 2: Working with Winget Settings

Still to come, among other items, is a story on WingetUI, a GUI-based alternative to the native command-line Winget tool. Be sure to check them out!

Facebooklinkedin
Facebooklinkedin