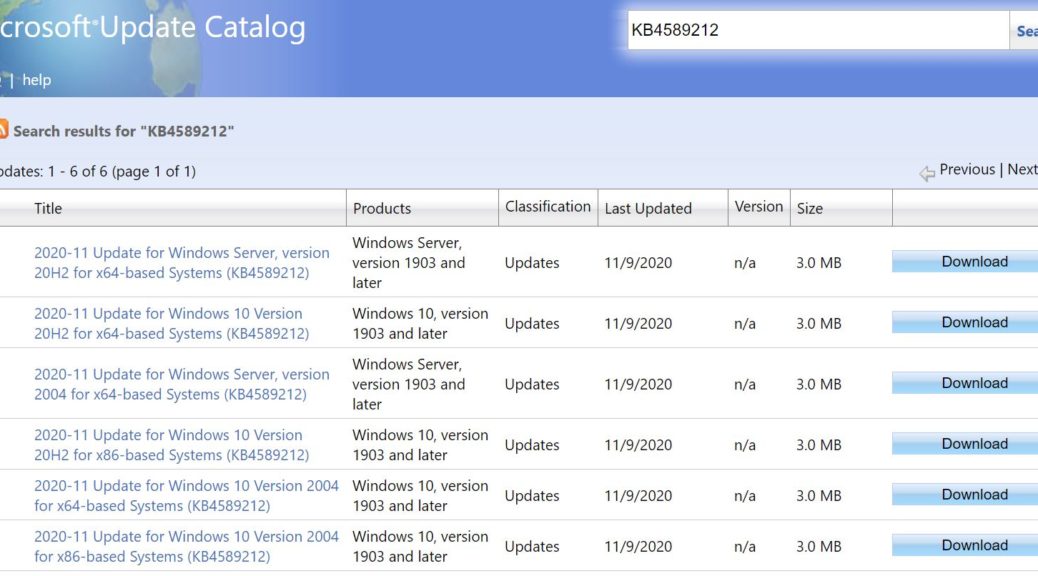
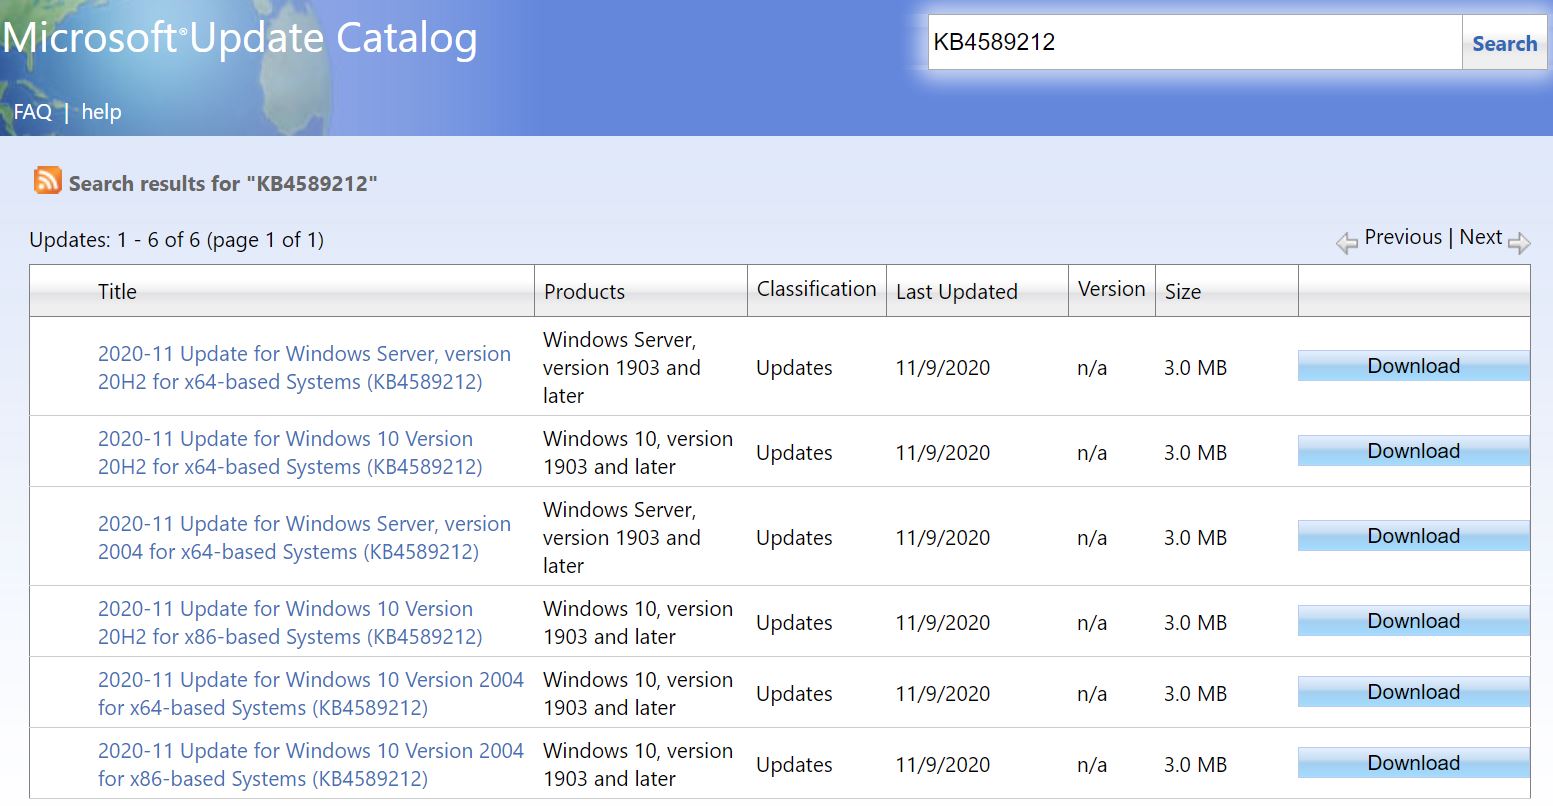
On November 10, Microsoft rolled out KB4589212. That support note is entitled “Intel microcode updates for Windows 10, version 2004 and 20H2, and Windows Server, version 2004 and 20H2.” It is currently available only from the Microsoft Update Catalog, where a search on KB4589212 provides links to related downloads. As you can see from the following screencap, KB4589212 offers Intel microcode updates as downloads that apply to Windows Server and Windows 10 for X64 and X86 systems, versions 20H2 and 2004.
If you read the note, you’ll see this update applies to all Intel processors back to Ivy Bridge (circa 2011-2012).
[Click image for full-sized view.]
If KB4589212 Offers Intel Microcode Updates, What’s Covered?
In addition to covering most Intel processors still in use back to Ivy Bridge (which is as old as anything I’ve got, from the 2012 mini-ITX box), this microcode update covers 7 different CVE items (3 from 2018, 2 from 2019, 3 from 2020). Here’s that table of items, plucked verbatim from the Microsoft Support note:
I’ve run this on half-a-dozen different 20H2 PCs of all vintages from 2012 to 2019 with no ill effects. This one’s definitely worth downloading and installing sooner, rather than later. That said, note that microcode vulernabilities do require physical access to PCs to foist. Once foisted, though. they’re mostly indetectible and difficult to remove, too. Take no chances: schedule this update for your next maintenance window. You can access the CVE links in the preceding table to learn more about the vulnerabilities involved. In fact, the most recent CVE is fascinating: it decrypts data based on detailed voltage consumption over time simply by carefully monitoring and plotting CPU power usage. Zounds!
Suddenly, the usual login prompt from my Credit Union, where my wife and I both bank, has become inaccessible on my local network. No PC, no browser, no nothing will open the login URL. Errors proliferate like mushrooms after the rain instead. What gives?
VPN Works Around Weird Credit Union Access Issue. VPN login works, other access doesn’t.
I’ve been working in and around IP networks professionally since 1988, and with IP networks since 1979. I’ve seen many weird things, and now have another to add to that list. From my LAN right now, no PCs can login to our credit union on the web. Nobody, that is, unless I go through a VPN link. Otherwise, when we (my wife and I bank together) try to access the login page, a raft of error messages presents. Only the VPN works around weird credit union access issue, which throws up beacoup HTTP error codes. (Explanatory text verbatim from Wikipedia.):
400 Bad Request: The server cannot or will not process the request due to an apparent client error (e.g., malformed request syntax, size too large, invalid request message framing, or deceptive request routing).
401 Unauthorized: Similar to 403 Forbidden, but specifically for use when authentication is required and has failed or has not yet been provided.
403 Forbidden: The request contained valid data and was understood by the server, but the server is refusing action.
404 Not Found: The requested resource could not be found [(aka “File not found/Page not found”)].
501 Not Implemented: Server either does not recognize the request method, or it lacks the ability to fulfill the request.
502 Bad Gateway: The server was acting as a gateway or proxy and received an invalid response from the upstream server
How VPN Works Around Weird Credit Union Access Issue
I can only assume that the address resolution for the specific login URL is somehow malformed or invalid. Changing DNS server assignments at the Windows 10 clients (in the TCP v4 Interface properties) does not help. When I switch to VPN, though, that bypasses the local DNS infrastructure. That connection uses the VPN provider’s DNS infrastructure instead. Then, we have no problems accessing the bank URL.
Now, here’s where things get interesting. I can’t remember the login credentials for the Spectrum device that acts as a Wi-Fi AP and router at the network boundary. Thus, I can’t check the DNS situation on that device, which is where DHCP tells all my Windows 10 machines to get their DNS information from. I’ve got a call into Spectrum to see if they can help me break into my router without having to do a factory reset. In the meantime, we’re using the VPN to access the credit union stuff, and plain-vanilla networking for everything else. It’s strange and unfathomable, but at least there’s a workaround.
For Want of a Nail…
Last night, I drove to the nearby Spectrum outlet and swapped my Technicolor cable modem/VoIP device for an identical replacement unit. The theory was that something about this device was behind the issue. It was sheer hell trying to get back online because Spectrum’s activation drill requires providing account, password, and other identity characteristics. I keep all that stuff in Norton Password Vault, and I couldn’t get access to that info through my iPhone nor did I have another path onto the Internet to grab the necessary data. I eventually had to spend another 45 minutes on the phone with tech support as they FINALLY activated our Internet service, TV, and VoIP phone. Reminded me too much of Catch-22 “How can you see you’ve got flies in your eyes when you’ve got flies in your eyes?” Last night, I couldn’t see much of anything for far too long!
Because our son attends school online, doing without Internet is impossible. Thus, I ordered a 5G hotspot from Verizon last night, so we have a medium performing fallback. They tell me the hotspot I ordered delivers about 200 Mbps downstream and 25 Mbps upstream in our neighborhood. I’ll be finding out — and making sure the fallback works — when it shows up via USPS early next week. Sigh.
Router Reset Solves Resolution Hiccup [Added 1 Day Later]
With a little more time to think about what could cause my problem, I formulated a hypothesis about the cause — and a likely fix — for my troubles. All nodes on my LAN had an issue with that one specific URL. But neither the site operator nor my ISP could replicate that problem. Thus it had to be on the boundary between my LAN and the ISP’s aggregation network. That means only one possible culprit: the Spectrum router. It sits at my network boundary. It also provides DHCP to the nodes on the LAN and acts as the DNS server for all internal nodes.
“Aha” I thought, “I bet resetting the router will fix this issue because it reloads — or repopulates, rather — the DNS cache.” I was right. After powering off the router, letting it sit for a minute or two, then powering it back on, our name resolution issue was gone. Glad to have it fixed because it was deucedly inconvenient without credit union account access. Ultimately, it was the “VPN trick” that led me to the solution. Sigh again.
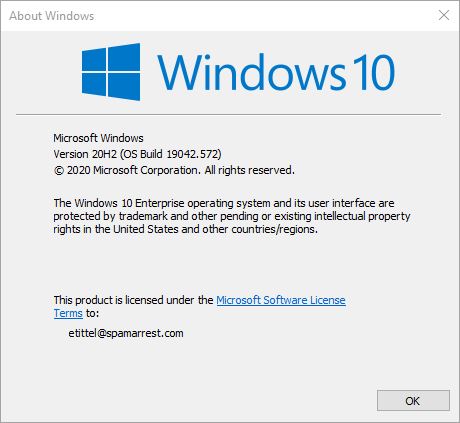
Because Impatience Prompts Production PC Forced 20H2 Upgrade, that PC is now up-to-date.
OK then, I admit it: I just flat-out got tired of waiting. It’s been 20 days since 20H2 went GA, and my production PC still hadn’t gotten “the offer” from Windows Update. Having long ago downloaded the ISO for 20H2 using the Media Creation Tool, I used it. The process took almost 40 minutes from start to finish. That’s much longer than it took my PCs that did get “the offer” to finish the task. At least 4 times as long. Right now, I’m pausing for this blog post. Next, I’ll do my usual post-upgrade cleanup, now that impatience prompts production PC forced 20H2 upgrade is done.
After Because Impatience Prompts Production PC Forced 20H2 Upgrade, Then What?
My usual post-upgrade cleanup routine of course. This consists of:
Running TheBookIsClosed/Albacore’s Managed Disk Clean (mdiskclean.exe) utility to get rid of Windows.old and other stuff
Using Josh Cell’s nifty (but increasingly dated) UnCleaner tool to get rid of about 310 MB of junk files.
Running Macrium Reflect to capture an image of this pristine OS update
Getting on with business as usual
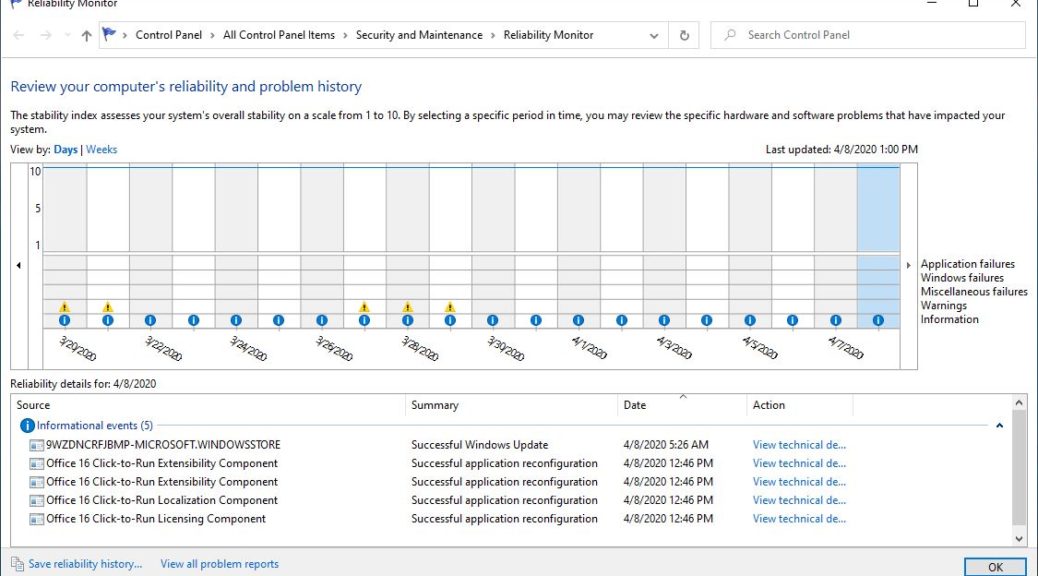
Just for grins, I ran DriverStore Explorer to see if it would find any outmoded drivers. As you’d expect, everything was ship-shape. Ditto for DISM ... /analyzecomponentstore, which tells me no updates since the GA date of October 22 have left old, orphaned packages behind. And because this kind of upgrade really is like starting over, Reliability Monitor gets a clean slate (in fact, it’s “dead empty” right now):
Right after a feature upgrade (which is what happens when you install from setup.exe), Reliability Monitor is devoid of data, and runs only forward from there.
[Click image for full-sized view.]
Status: 2004 to 20H2 Upgrades at Chez Tittel
This is the last and final machine to transition from 2004 to 20H2. My upgrades are done. One profound impetus for this change came from the three new Dell PCs — two review units, and one new purchase — that showed up over the past two weeks. All of those new 11th-gen PCs got “the offer” as soon as they booted up for the first time. I know that my production PC is solid and reliable and I’ve long since worked out any driver kinks on this machine. Seeing the Dell units transition painlessly (and incredibly quickly), I bet that the production PC would also get over the hump. But while it worked, I can’t say it was fast. But all too often that’s how things go here in Windows World. Stay tuned!
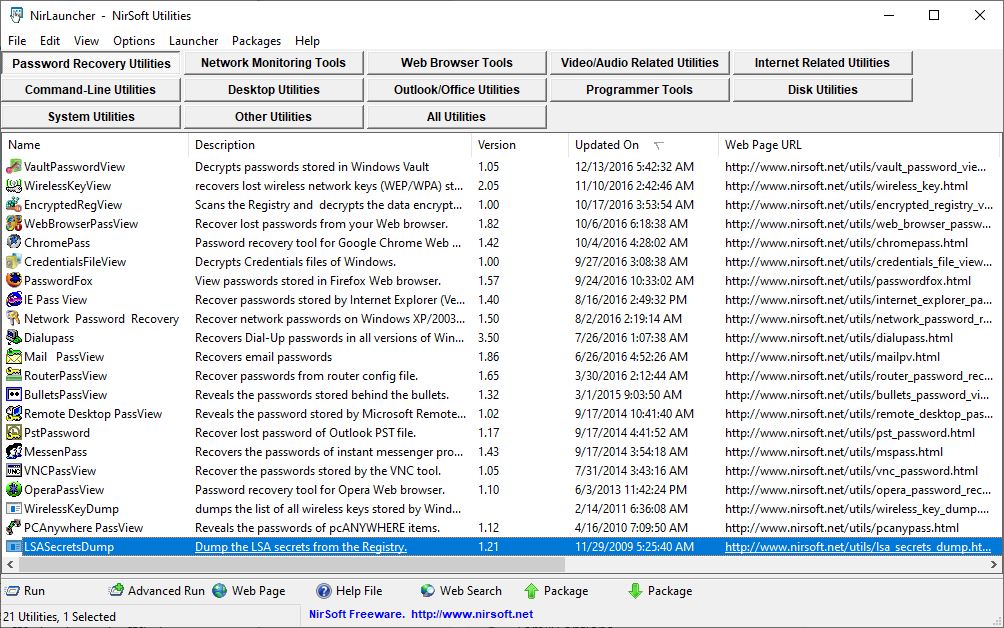
The other day, I had Windows Defender scan all of my disk drives. This action artificially provoked a performance alert on one of my Lenovo laptops. While it was running it reported 8 malware items on my D: (Data) drive. Please note: all of these are categorized as “HackTool” items. MS correlates them with specific malware items and known exploits. After overcoming my initial alarm, I looked where those items were found. All resided under parent directory D:\NirLauncher. Immediately, certain things became clear. Every one of the suspect elements is a password sniffing and capture tool in Nir Sofer’s collection of Windows Utilities. In fact, he’s got a category within that collection of 200-plus tools called “Password Recovery Utilities,” which comprises 20 items (see below). All of them popped up here. Aha!
Once it found these items, Defender forced me to have it ignore these threats to retain access to them.
[Click image for Full-Sized View.]
If Certain Legit Tools Generate Windows Defender False Positives, Then What?
Once Defender finds something suspect, you must remove that item from its clutches before you can use it again. That meant I had to open Windows Security → Virus & threat protection, then click on each item it found. Next, I clicked “See details,” and then explicitly told it to ignore each threat one at a time.
As you might expect, there’s a better way to deal with this kind of thing if you prepare in advance. If you click “Manage settings” inside the Virus & Threat protection pane, you’ll find an Exclusions setting right below Controlled folder access. Click “Add or remove exclusions” and you can instruct Defender to bypass specific files or folders. I simply added an exclusion for the D:\NirLauncher folder and it will now be ignored in future complete system scans (the Quick Scan option only accesses the Windows C: drive anyway).
Pre-emption Beats Reaction Whenever Possible
Currently, I use several utilities that Defender flags as threats. In addition to NirSoft’s password utilities (which NirLauncher includes amidst its collection of tools), I’ve had to exclude Gabe Topala’s System Information for Windows (siw.exe). In days of yore, before I started using Superfly’s ShowKeyPlus, I used a tool called Magic Jelly Bean Finder that likewise got flagged. I excluded it, too.
The moral of the story is this: if you’re planning to install (or copy standalone) tools that find passwords or keys, chances are pretty good that Defender will flag them as Hacktools. If you take steps to exclude them in advance, you can avoid having to “Ignore” them later on. But please: make sure you run any such software through VirusTotal to be doubly darn sure it’s safe before allowing it to take up residence on your PC. Such tools can indeed be used for malefic purposes, as well as legitimate ones. Be safe out there!
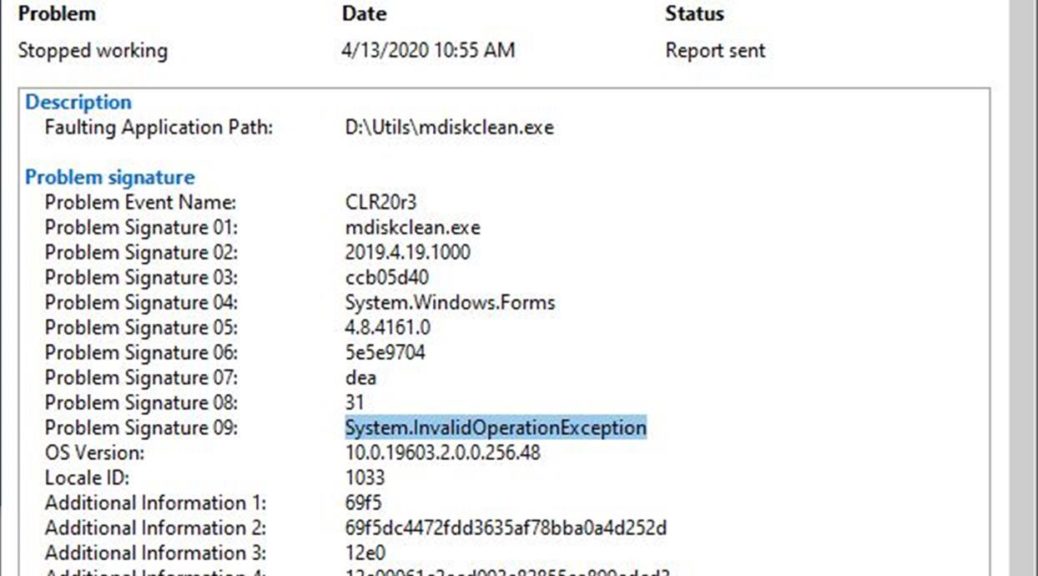
You know, there are more benefits to keeping software up-to-date than just avoiding security vulnerabilities. They even go beyond the pleasures of good housekeeping. When I couldn’t run Albacore’s excellent Disk Cleanup reaplacement (mdiskclean.exe) on my Lenovo X220 Tablet this morning, I started troubleshooting. Along the way, I found it ran just fine on my X380 Yoga (my other Fast Ring test machine). “Hmmm,” I said to myself, “let me compare the file dates.” And sure enough, I was running an April 2019 version of the project. However, the X380 was running a newer, May 2019 version. A quick online check confirmed that May 2019 is the latest and greatest version. Thus, I concluded that old MDiskClean.exe throws System.InvalidOperationException error. Those details appear in the lead-in graphic above.
If Old MDiskClean.exe Throws System.InvalidOperationException Error Then Update!
Indeed, my next move was to grab a copy of the current version. I replaced the old, outdated April 2019 version with the current May 2019 version. Then I ran the program again. This time, it worked like a charm. There was nary a trace in the Reliability Monitor of its passing, either. Sometimes, the easy fix is also the right fix. I’m glad to report that this is one of those times. The problem is solved.
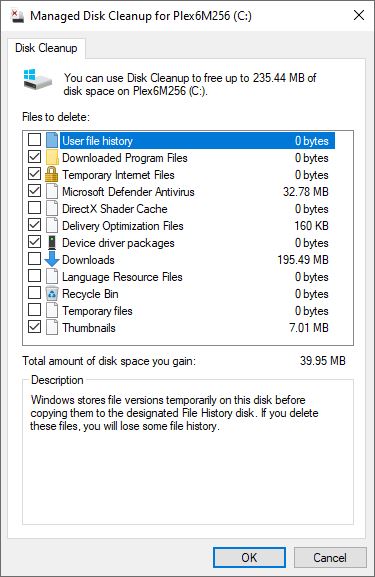
With the current (05.2019) version running and working, mdiskclean.exe looks exactly like Disk Cleanup, except it lets you show all available selections at the same time.
Disk Cleanup limits the display area to 5 items, so you have to scroll like mad to get through a big list.
If you should run into application level errors in Reliability Monitor, it’s smart to check the application itself first before taking troubleshooting further. In this case, that was as far as I needed to go. Had that not helped, my next move would have been to run the system file checker (sfc /scannow) and to perform a DISM componentstore health check (dism /online /cleanup-image /checkhealth). Normally, that would be as far as one would need to go at the application level. Beyond that, though, comes an in-place upgrade repair install (TenForums Tutorial) and finally a clean (re)install (TenForums tutorial). Glad I didn’t have to break out any of that heavy artillery. Cheers!
I’ve still got a Surface Pro 3 kicking around. It includes an i7-4650U CPU, which the Intel Ark tells me was introduced in Q3’2013. When I bought that machine, I also bought the Surface Pro Dock, which granted me a hardwired Ethernet port, 2 each USB 2.0 and 3.0 ports, and a charging cradle. But it hasn’t been problem free. In fact, it’s kinda flaky. I keep a USB 3 drive plugged into the dock for backups and extra storage. But sometimes, the drive “goes away.” It simply drops off the PC. If I unplug the device, then plug it back in, or cycle the power, sometimes the device will reappear, and sometimes it won’t. This works on my external 2TB HDD, but not on my mSATA drives in their Sabrent enclosure. Researching things just now, I see SP3 Dock USB weirdness well-documented at Microsoft Answers and elsewhere. Sigh.
Surface Pro 3 dock
The SP3 Dock has GbE, 2x USB3.0 & USB2.0 ports, plus Mini DisplayPort & audio in/out minijacks.
If SP3 Dock USB Weirdness Well-Documented, Then What?
Alas, when you’ve got known problems with hardware that’s this old there’s not much you can do about it. Checked to make sure I’ve got all the latest/current drivers and firmware (I do). Looked to third-party sources to see if any might address such issues (can’t find anything). Worked through the Dock Troubleshooting advice from MS Support, and there’s no relief there, either. Sigh again.
Now, I have to decide if I want to live with this or get rid of the device. I’m torn. I’d like to fix it, but I’m unable to work my way to a solution. I’ve been thinking about buying a Surface Book 3 when they come out, later this year (or perhaps next year). So there’s no need to be hasty. But it really bugs me when things don’t work like they should.
I’m open to suggestions. Anybody got any? If so, please comment here, or send me an email at ed at edtittel dot com (be sure to put Surface Pro 3 Dock in your subject line too, please).
I’m a big fan of Reliability Monitor. This is actually a strange and useful offshoot from Performance Monitor (aka perfmon or perfmon.exe). As I will explain, little gotchas from tales of two Relmons actually shed more light on system health than a straight-line perfect 10 rating across the board.
That’s what makes the tale of the second relmon (the first appears at the head of this story) more informative, in fact. Interestingly, type perfmon /rel into the search or run boxes for a quick launch method. Reliability Monitor (RelMon) does a good job of tracking and reporting on errors that occur in day-to-day Windows operation.
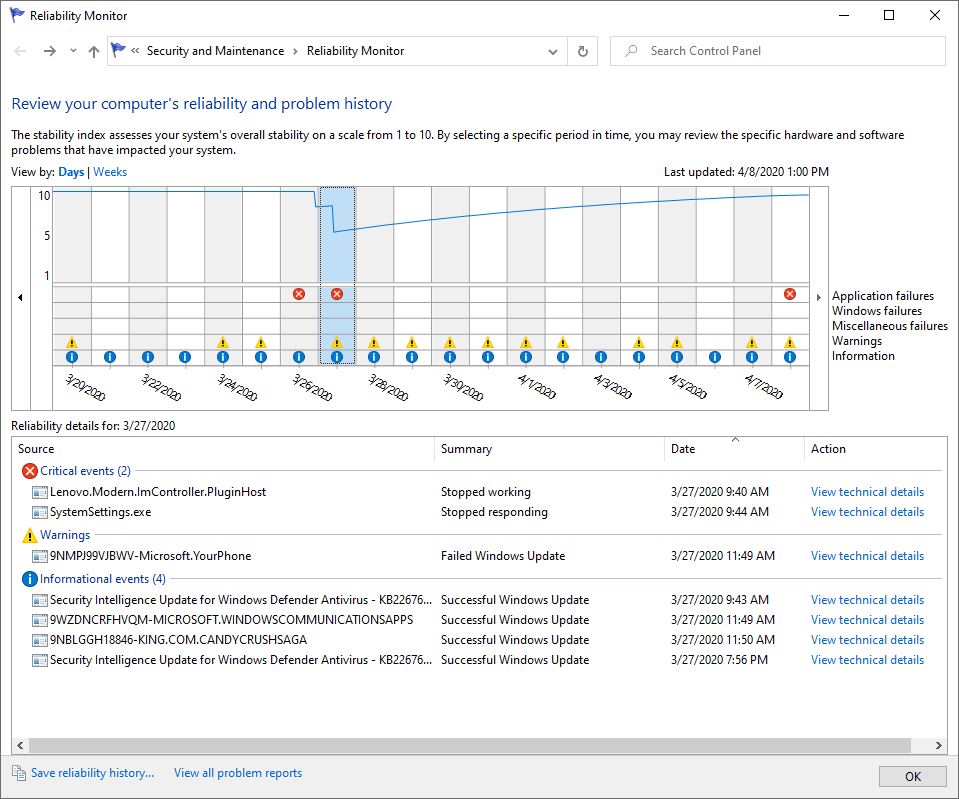
Over the years, I’ve learned to rely on RelMon (a) to check on the general health of my systems, and (b) as a place to look when noticeable errors or crashes occur. Those red Xs provide a strong visual clue when something isn’t right. Also the details RelMon delivers to back things up are helpful. They often provide important clues in deciding if a problem needs addressing, and if so, how one might start down that path. Here’s the second of the two RelMon outputs I’d like to present today:
This report from my production X380 Yoga, shows minor niggling errors. Most come straight from Windows 10 components or apps, in fact.
[Click image for full-sized view.]
Little Gotchas from Tales of Two RelMons Show Perfection Is Over-Rated
My first instinct when looking at “red X” detail in RelMon is to see what kind of software or other system component threw the error. Most of them, as with the preceding screencap, appear in the “Application failures” line. That means they report some kind of application or app error.
In general, I’m a lot less worried about those than I am about Windows failures (line 2) or Miscellaneous failures (line 3). That said, let’s look at what caused a nearly 3 point dip on March 27. Two errors are reported. One is a Lenovo software component (probably associated with Lenovo Vantage, which I use for driver and BIOS updates). The other is the Settings application itself. The Lenovo item shows up as an Explorer shell extension: the problem event name BEX64 is quite familiar. In the other error, the Settings app stopped communicating with Windows and was closed. In other word, Settings hung for one reason or another. No big deal: happens sometimes, but not often. An explorer restart fixed this: read all about it at Win10.Guru.
When RelMon Spurs Me to Act
In contrast, let me recite a recent list of items from RelMon that have spurred action and repair maneuvers:
A repeated driver crash on iahStorA.sys (part of Intel’s Rapid Storage Technology) helped me decide to uninstall RST on that PC. It’s required for RAID, which I don’t use.
When CCleaner started throwing errors on a couple of PCs, it too got uninstalled. The makers have changed to a “more friendly” UI, and I don’t like it much anymore.
A long series of MoAppCrash errros from Outlook led me to the Microsoft Support and Recovery Assistant. It fixed my problem and is a valuable addition to my Windows toolkit.
When the Skype UWP app started crashing every two-three days, I used PowerShell to remove it. Never used it, either (plenty of laptops with microphones and webcams for online action).
Most of the time, when a RelMon error calls for action, you’ll be able to figure that out quickly. Sometimes, if it’s an essential Microsoft component, all you can do is report the error via Feedback Hub, and hope for a speedy patch or fix. But with time and experience, these things will sort themselves out. If something you don’t need, use, or perhaps even want causes a problem, it may just be best to uninstall or remove it.
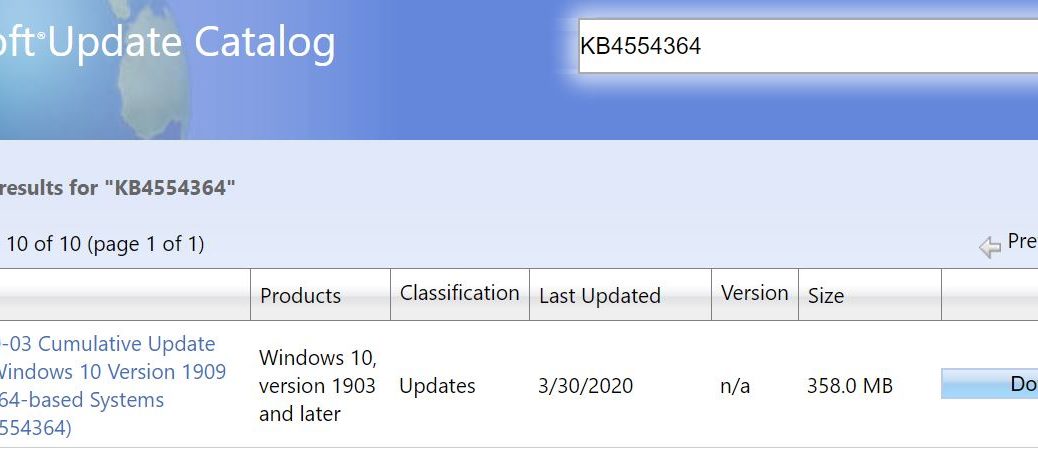
One week ago today (March 30), MS released an optional update KB4554364 through the Microsoft Update Catalog. This update is discretionary (though it will probably get rolled up into the next Update Tuesday on April 14). The update was released specifically to address reported issues with certain VPNs and with Internet connectivity problems for certain applications. If one has no such problems, it’s not necessary to install KB4554364. I just went ahead and did it anyway on one of my PCs. Why? Because the process of installing KB455364 illustrates MS Catalog Update install actions and behavior. That’s the subject for today’s blog post, in fact.
To begin the process, one must download the update from the MS Update Catalog. The entry for the 64-bit 1909 version of this item provides the lead-in illustration for this story. If you click the download link at the far right, you’ll be prompted to confirm that download in a pop-up window. Note: this download is named windows10.0-kb4554364-x64_0037f0861430f0d9a5cea807b46735c697a82d0c.msu. The file extension at the end of the file name — .msu — indicates it will call the Windows Update Standalone Installer to install itself. Careful inspection of the filename shows it identifies numerous aspects of the update involved:
windows10.0 identifies the operating system target as Windows 10
kb4554364 identifies the governing knowledge base article that describes this particular update
x64 identifies that the update is for 64-bit OSes
the long string of digits is a globally unique identifier (GUID) for this particular self-installing update file
the .msu file extension, as already mentioned, indicates that this file calls on the Windows Update Standalone Installer to apply the update(s) it contains. Some updates come in the form of cabinet (.cab) files. I’ll explain how to install those in the concluding section of this blog post
Step 2: KB4554364 Illustrates MS Catalog Update Install with Installer Start-up
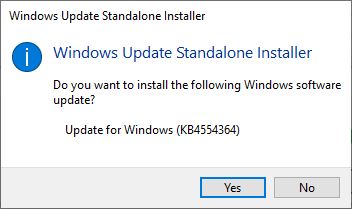
To launch the self-installing update file, double-click it in File Explorer, or right-click and select “Open” from the pop-up menu. This launches the Windows Update Standalone Installer, depicted in the following screencap:
When the Windows Update Standalone Installer starts up, it asks you to confirm installation of the targeted update (KB4554364, in this case). Click “Yes” to fire off the update process.
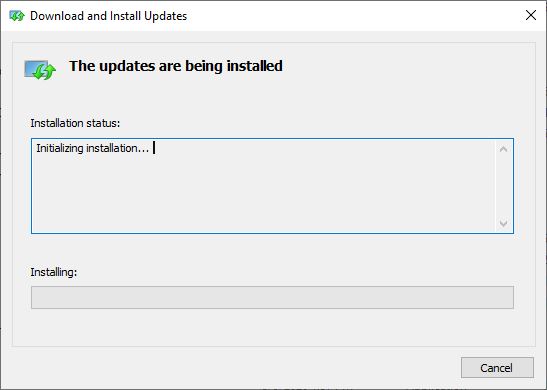
Step 3: KB4554364 Illustrates MS Catalog Update Install with Update Installation
First, a status window appears that indicates the Windows Update Standalone Installer has begun its work. As you can see it report that is is “Initializing installation…”
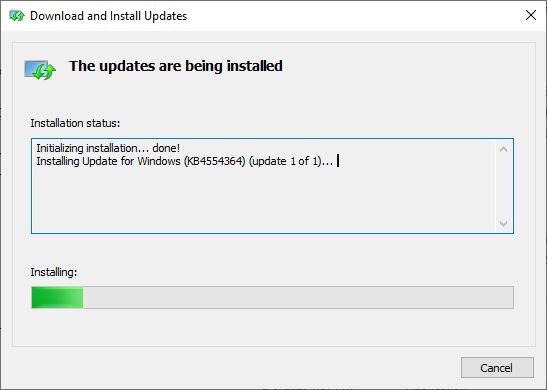
Once the intialization phase is complete, the Standalone Installer reports that it is installing the specified update (KB4554364)
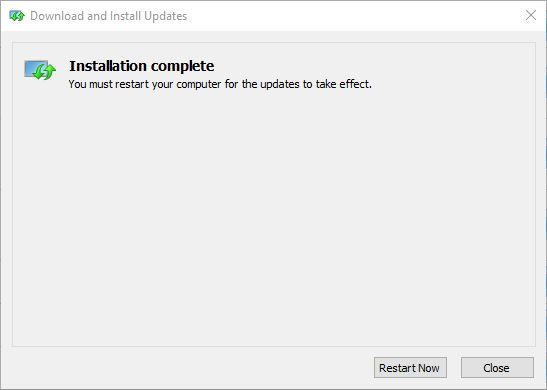
This takes some time to complete, but eventually you’ll see a report that the update installation has completed
At this point, the update won’t take effect until the host PC is restarted. Thus, you have the option of forcing an immediate restart (click the “Restart now” button). OTOH, if you have unsaved or unfinished work on that system, or aren’t yet ready to restart, click the “Close” button and keep on computing. You can manually restart later at a more convenient time, or the PC will automatically restart when the next eligible restart time window comes around.
Installing Cabinet Files from the Windows Update Catalog
You can use the DISM command to install .cab files downloaded from the catalog. I find it easiest to shift right-click the download entry in File Explorer, then use the “Copy as path” option from the pop-up menu. As an example, I just did so with the .cab file named "C:\ProgramData\Package Cache\{CE83D0BD-418A-F3D1-D6CE-687E96D1EBD0}v10.1.17763.132\Installers\ff8dd5a961e46b5d05906ac4b7a5ba37.cab" purely for illustration. The proper DISM syntax is:
dism /online /add-package /packagepath:path-spec
Thus, for the preceding path specification, this becomes:
If the path specification includes any spaces, leave the quotation marks around that string. Otherwise, as you see above, it’s OK to remove them. This will apply an update-package in .cab format to your current, running Windows image.
I can’t help it. I *LOVE* this kind of stuff. I just learned that with the right syntax, you can watch SSD TRIM work using Optimize-Volume PowerShell cmdlet. The TRIM operation on an SSD erases data blocks that are no longer in use. Then, it returns them to the pool of available blocks for re-use.
According to SearchStorage.TechTarget “The use of TRIM can improve the performance of wriitng data to SSDs and contribute to longer SSD life.” I just counted. Of the 10 drives I have installed on my production PC, 4 of them contain SSDs. That said, one of them uses a dual RAID controller for 2xSamsung EVO 250 SSDs. I just learned it doesn’t support the TRIM operation (which is good to know, all by itself). All three of the others TRIM works just fine. (These are: my boot drive, my work data drive F: OCZ3-120 and my scratch drive G: ScratchSSD.) When I tried to TRIM the L: DualSam2 drive, here’s what the cmdlet told me:
Because the L: drive uses a Syba Dual mSATA to SATA RAID controller, it doesn’t support the TRIM operation. Sigh.
[Click image for full-sized view.]
How-to: Watch SSD TRIM Work Using Optimize-Volume PowerShell Cmdlet
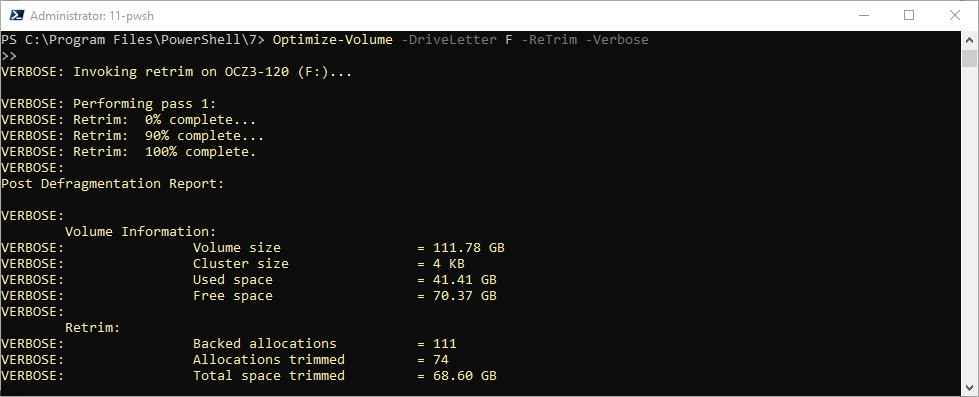
The syntax for the cmdlet is pretty straightforward, but the good stuff appears in the output it produces in verbose mode. I’ll show an illustration first, then spell that syntax out in detail.
Unless you enable verbose mode, Optimize-Volume runs silently. The space trimmed value is usually within 1-2 GB of the free space value.
[Click image for full-sized view.]
The command syntax is Optimize-Volume -DriveLetter X -ReTrim -Verbose
Substitute the actual drive letter you wish to optimize for the italic X in the syntax example, as I did for drive F in the preceding screencapture (e.g.Optimize-Volume -DriveLetter F -ReTrim -Verbose). It will also do a nice little progress bar animation while the operation is underway, too.
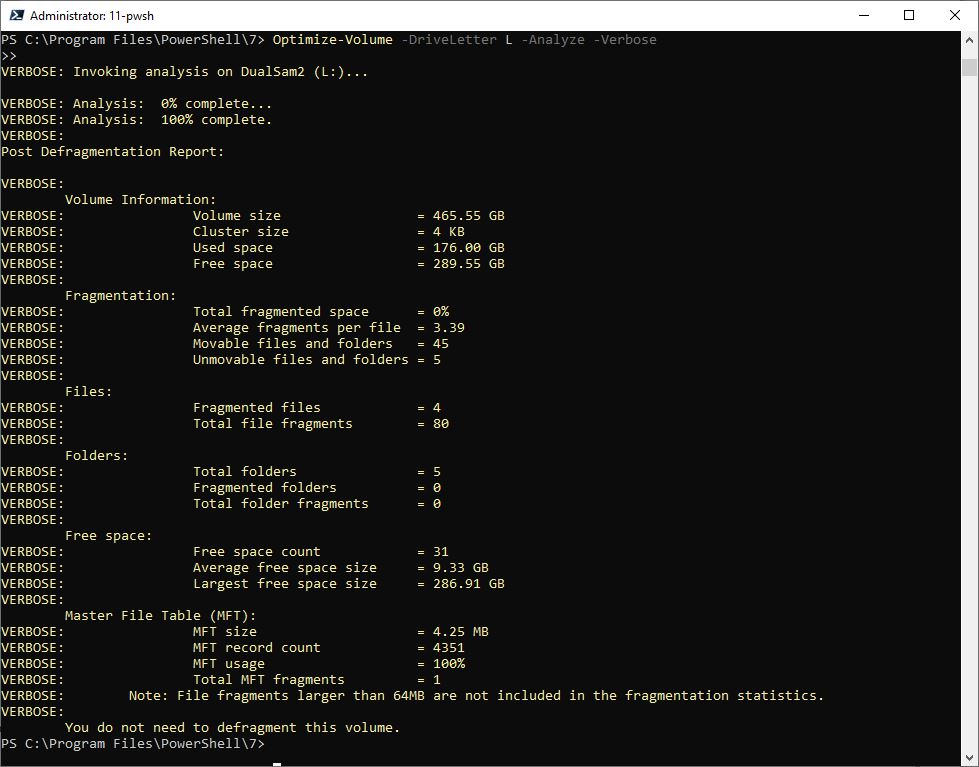
How-to: Use the -Analyze option to See if a Drive Needs Optimization
One more thing. If you replace the -ReTrim option with the -Analyze option for the Optimize-Volume cmdlet, you’ll get another set of verbose output that shows analysis activity and then reports on what it finds. Here’s what this command said for my unTRIMmable L: DualSam2 drive, just for grins:
Unless you enable verbose mode, Optimize-Volume runs silently. The space trimmed value is usually within 1-2 GB of the free space value.
[Click image for full-sized view.]
The regularly scheduled drive optimization task occurs on Windows 10 machines weekly, so I didn’t expect to see anything out of the ordinary. That said, this is one of those cases where it’s more fun to watch the tool work than it is to know it’s working silently in the background. Enjoy!
Here’s a link to the MS DOCs documentation for the Optimize-Volume cmdlet. It has more info, examples, and covers other cmdlet capabilities I didn’t mention here.
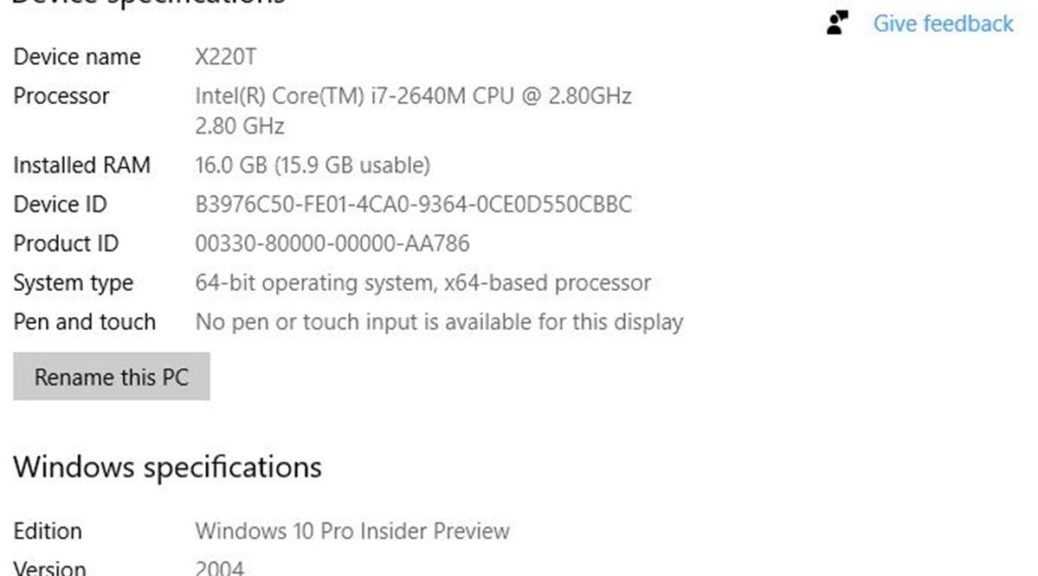
In the wake of the latest Fast Ring Insider Preview release — namely 19592.1001 — I noticed the return of some interesting language. If you click Settings → System → About, you can see it for yourself. In fact, it shows up under the “Windows Specifications” heading. (See the lead-in graphic.) Notice the bottom line is labeled “Experience.” And sure enough, that’s exactly where Windows 10 Feature Experience Pack returns, with a release numbered 120.7001.0.0. There’s no such line in the About info for the current 1909 release (nor for earlier 180x and 190x releases, either).
What’s Up When Windows 10 Feature Experience Pack Returns?
I did some fairly serious digging before I found this nomenclature. It lives in the Microsoft Hardware Dev Center. It’s covered in the “Available Features on Demand,” aka FOD, document. If you browse through the “Preinstalled FODs” items list, you’ll eventually discover this item. That’s because the list is long-ish and alphabetized. Thus, Windows Feature Experience Pack appears near its end. Here’s that entry’s text, verbatim:
Windows Feature Experience Pack
This Feature on Demand package includes features critical to Windows functionality. Do not remove this package.
As far as I can tell, this is mandatory in every Windows image. Thus, I’m not sure why MS has decided to call this out with its own line in the About/Windows Specifications info. But there it is, in black and white. Perhaps Microsoft will tell us more about this when another Feature Update is released. Notice the release info is version 2004 (aka 20H1). Maybe when the next Feature Update becomes generally available, we’ll learn more. In the meantime, it’s something new and relatively mysterious. Just the kind of thing that keeps life interesting, here in Windows World.