Category Archives: Updates

Exploit Winget Include Unknown Syntax

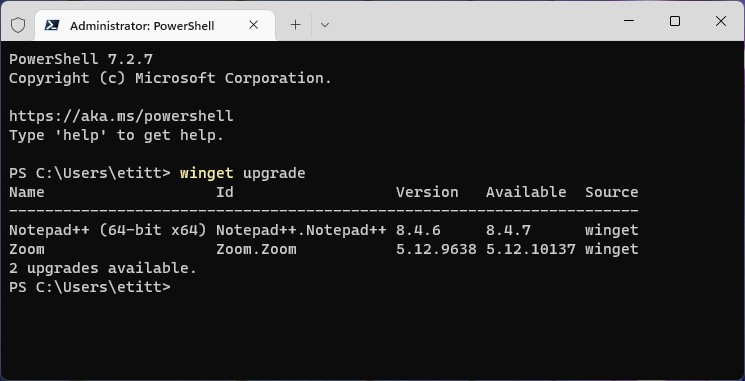
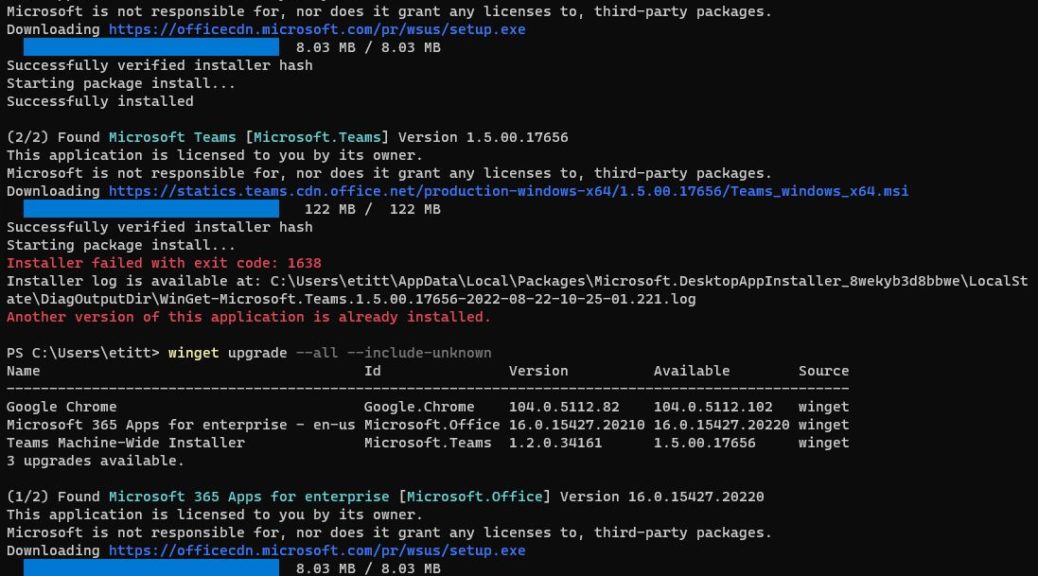
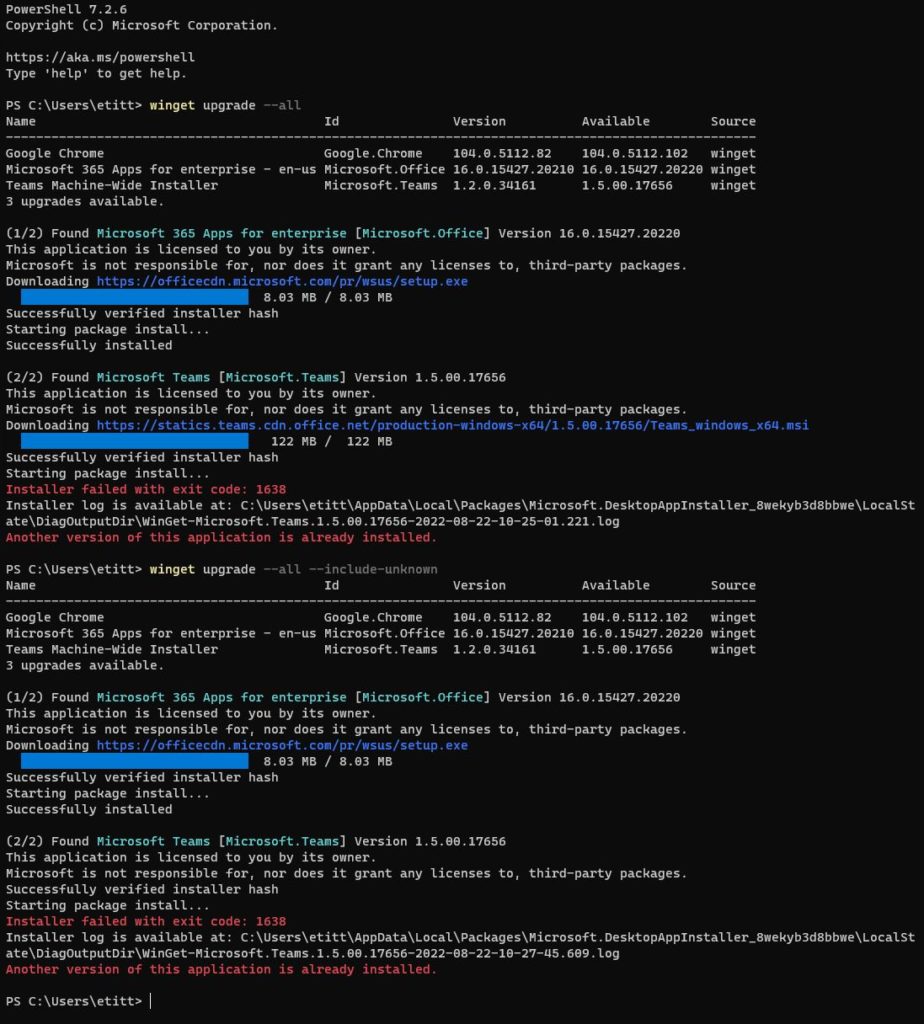
For the past couple of years I’ve been learning — and using — the Microsoft package manager, Winget, It helps me keep my PC apps updated. Just recently, I’ve learned to exploit Winget include unknown syntax to broaden its coverage. Basically, this will “upgrade packages even if their current version cannot be determined.” That quote comes from the upgrade command section of the MS Winget documentation.

How to Exploit Winget Include Unknown Syntax

First, that syntax couldn’t be simpler: just add the string
--include-unknown
to the usual invocation for winget . For the record that’s
winget upgrade --all
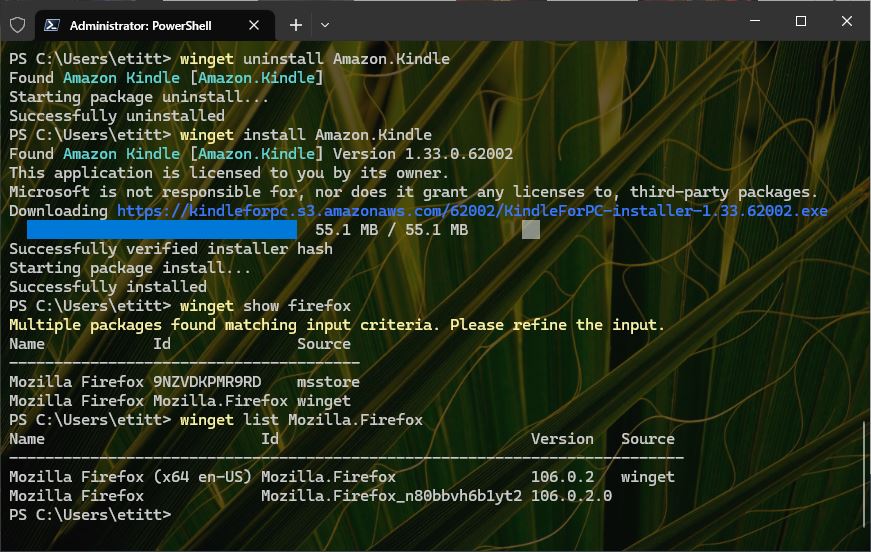
. This tells the program to apply upgrades for all packages with known versions. You can see this at work in the lead-in graphic for this story, in fact. Chrome shows up when unknowns are included, but not otherwise. (Compare top and bottom sections, or view the image full sized by clicking the following thumbnail.)

Exploit Winget Include Unknown Syntax

The difference between the unadorned “all” version of Winget upgrade and the one with unknowns included applies in large part to applications like Kindle, Chrome, Firefox, and more, which apparently do not report their current version numbers either consistently or well to Winget during its initial survey phase.

This addition to the command finds those things and attempts to upgrade them. Certain apps — most notably Teams — will not work with this tool because of version mismatches (and the prudent decision not to overwrite versions outside the same version tree). But this does improve its overall coverage. That lowers the number of apps and applications I must update manually. To me — and to you, too, I bet — that’s a good thing!

Note: Winget works in PowerShell with equal facility for both Windows 10 and Windows 11. It’s become one of my go-to tools for keeping my small fleet of PCs (currently numbered 12, with 2 going off to college with my son soon) up to date.

Facebooklinkedin
Facebooklinkedin

KB5012170 Can Provoke BitLocker Recovery

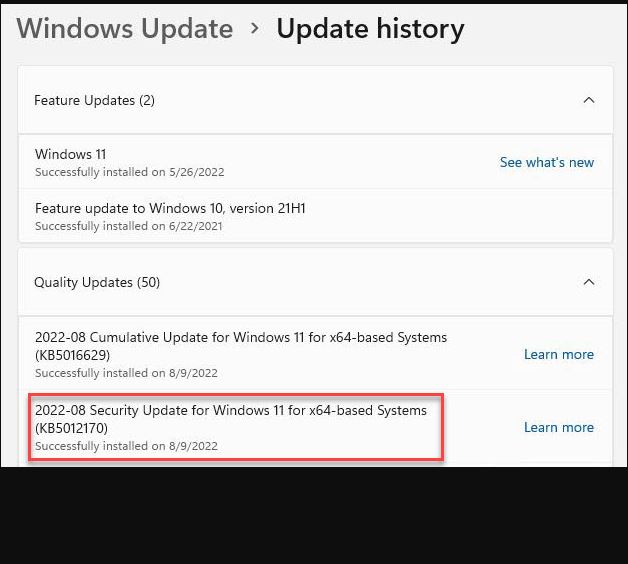
Here’s an interesting tidbit that’s making the rounds right now. KB5012170 appeared on August 9 on the latest Patch Tuesday. According to various sources — see this Neowin story, for example — some users’ PCs boot into BitLocker Recovery after the mandatory post-update restart, rather than business as usual. Thus, applying KB5012170 can provoke BitLocker Recovery (though unintentionally).

Of those affected, some have been able to get back to rights by applying the PC’s BitLocker Recovery key. Others have had to update their UEFI before that key application “takes.” In my case, I apparently dodged that bullet, because none of my production Windows 11 machines (four Lenovo laptops of various descriptions, and a Ryzen 5800X desktop) fell prey to this gotcha.

You can see the “success” report for this KB item boxed in red in the lead-in graphic for this story, in fact…

If KB5012170 Can Provoke BitLocker Recovery, Then What?

BitLocker keys can be stored in at least three ways. 1. On paper, 2. Electronically (usually on a USB drive). 3. Associated with a specific MSA (Microsoft Account). I prefer method 3 because it’s easy to set up and MS manages it automatically on your behalf.

You must log into your MSA online (I go through account.microsoft.com). Then go to Devices, and pick the affected PC. Next, click on Info & Support. There you’ll find a Bitlocker data protection item that includes a link to “Manage recovery keys.” That’s what you want. It will show you recovery keys for all the devices associated with that MSA (I show 11, of which I’m actually using 2, so I just got rid of the rest after saving a backup copy to an encrypted disk).

BTW, that means it’s essential to add all devices you might ever want to recover to your chosen MSA. Do so right away, if you haven’t already!

Facebooklinkedin
Facebooklinkedin

Updating Dolby Audio X2

On some of my Lenovo systems, one specific file often shows up in the Software Update Monitor (SUMo) in need of a newer version. It’s named dolbydax2desktopui.exe . According to Lenovo, it’s part of the Dolby Audio X2 system (DAX2) and comes preloaded on some of its PCs. Updating this Dolby Audio X2 file has been problematic, because a file source and update method have been unclear. No longer!

Updating Dolby Audio X2 Is Easy, If You Know How…

Most software updates require … well … an update of some kind to be applied. Not so for this particular file. One simply needs to overwrite the older version with a newer one in its default path:

C:\Program Files\Dolby\Dolby DAX2\DAX2_APP\

Of course, this raises an interesting question — namely, where might one find current versions of this file? I finally found them at a website named pconlife.com, which describes itself as “aimed at recovering the .dll or .exe file lost by Windows OS for computer users.” In general it seeks to help users replace lost, missing or damaged Windows files. For me, it’s shown itself to be a safe and reliable source of current versions of the afore-named DAX2 file. (Note: VirusTotal gives this file a 0/68 finding on its comparative checks).

Now, when SUMo tells me I need to update this file, I know where to go to get its specified version. I also know how to “update” that file. Choosing “Copy and Replace” in Explorer when seeking to over-write its predecessor does the trick nicely, thanks very much!

Yet Again, Persistence Pays Off

Learning how to keep Windows apps and components current is mostly a matter of routine. But for some things — this DAX2 item is a good example — one has to figure out how to do that, and where to get new versions as they appear. It’s easier when the vendor or maker provides an update package (and easier still when applying that package can be automated). But with enough investigation and elbow grease, these problems can be cracked over time. I’m glad to have this one finally made routine as well.

Facebooklinkedin
Facebooklinkedin

KB5015684 Provides Quick Windows 10 22H2 Upgrade

Here’s an interesting item. Turns out that MS has made KB5015684 available through its update servers. Thanks to the team at DeskModder.de you can find x86, x64 and ARM64 versions of either .CAB or .MSU files. All have links of the form https://catalog.s.download.windowsupdate.com/c/upgr/2022/07/windows10.0-kb5015684-xxx.cab or .msu. They must be legit, right? Hence my claim that KB501864 provides quick Windows 10 22H2 upgrade.

I just ran it on my production Windows 10 PC, and it went through without hitch or glitch. Completed in under 2 minutes, including download, install and reboot time, too. May be worth a try for those with Windows 10 PCs not expected to elevate to Windows 11 soon (or ever). So far, I see no discernable changes in look, feel, or behavior — just a new Build number 19045 (vs. 19044). Same minor extension as before, in fact: 1826.

What KB501864 Provides Quick Windows 10 22H2 Upgrade Really Means

Two things:
1. MS is getting close enough to a 22H2 public release for a preview to go out.
2. The code for the 22H2 release is stable enough to start it through the Windows Insider program.
Note: I didn’t have to join the Insider program to install this update, which appears as a “Quality Update” in Update History. The Windows Insider Program page on this PC, post-update, does NOT show itself as “joined-up” either. So one need not be concerned that applying the update automagically changes the PC’s status to that of an Insider machine. That’s a relief!

I ran the .MSU x64 version of the upgrade, simply because a self-installing update file is a little easier to apply than CAB files can sometimes be. You can find all links in the original Deskmodder.de article (6 files in all). It might be a good idea to apply this upgrade to test machines with some caution, if you’re concerned about possible unwanted side effects. That didn’t stop (or hurt) me on this PC, though…

If you’re interested, have at it. Cheers!

Facebooklinkedin
Facebooklinkedin

A-Volute Software Component Mystery Solved

Oho! Yesterday was Patch Tuesday for July. Thus, I’ve been working through my stable of PCs, applying updates as I can. On my Ryzen 5800X Windows 11 desktop, I noticed something new and mysterious. Its MUC (Microsoft Update Catalog) entry provides the lead-in graphic for this story. Upon conducting research, this A-Volute software component mystery solved itself immediately.

How Is A-Volute Software Component Mystery Solved?

As with most such things, a quick trip to Google helps point me in the right direction. It turns out that A-Volute provides drivers for the Asrock B550’s audio circuitry. This also includes support for an Nh3 Audio Effects Component. It pops up under Software Components in Device Manager:

A-Volute Software Component Mystery Solved.dev-mgr-props

Googling online points me to a Realtek-related (Nahimic) audio driver, with matching entry in DevMgr. [Click for full-size view.]

I first found a credible mention of this at TenForums.  It appears in a thread on which I myself have been active. ( It’s entitled “Latest Realtek HD Audio Driver.”) Next, I find an entry named “A-Volute Nh3 Audio Effects Component” inside Device Manager. Presto! That convinces me the mystery is no longer unsolved.

I like to run things down when something new shows up amidst Patch Tuesday updates. It came along for the ride because MS  provides drivers as well as OS and other related updates. In most corporate or production IT environments, this doesn’t happen. Why not? Because untested drivers pose too many potential problems to simply let them through on their own.

Deconstructing Windows Mysteries

In general, when something new or unexpected shows up in Windows, it’s worth the effort to identify it. In most cases, it will be benign — as it was with this item. But sometimes, the mystery might deepen. Or it might even point to something malicious or malign. That’s when remediation comes into play. I’m happy that wasn’t needed this time. I’ll still keep my eye on new stuff going forward, though. One never knows when something wicked might this way come.

Facebooklinkedin
Facebooklinkedin

More WingetUI Interactions

OK, then. I’m using WingetUI as an element of my Windows PC update toolbox. Along the way, I’m finding some areas where it shines, and others where it doesn’t. But as I gain familiarity with this tool, more WingetUI interactions convince me it’s worth using. That said, it’s no silver bullet for Windows updates, either. Let me explain…

After More WingetUI Interactions, Another Status Report

If you look at the lead-in graphic, I can point to elements where WingetUI shines, and those where it doesn’t. It handles most third-party apps perfectly (e.g. 7-Zip, Kindle, SUMo, Python 2, and Spacedesk). Not so for MS components, except for C++ runtime elements. It failed (or I didn’t try based on prior failures) with Edge WebView2, Teams, and the WADK. This is not a huge problem for me.

SUMo also catches the follow items that did not show up on the WingetUI radar: Chrome, Firefox, CrystalDiskInfo, Intel PROSet utility, MyLANViewer, Nitro Pro, Notepad++ (a false positive, IMHO), Snagit and Winaero Tweaker. Thus I must continue to use a collection of tools to get through my entire update roster. But I knew that already.

All’s Well That Ends Well

I was able to use PatchMyPC to handle the routine updates that WingetUI didn’t see. SUMo led me to fix everything except Intel PROSet, Nitro Pro, and Snagit. I got the first and last myself, and skipped Nitro Pro for the moment (though I did find install syntax for the latest version using winget itself, which I’ll try again later…).

[Note added 1 Day later…] Eventually, I jumped to the Nitro Pro download page (Product Updates) to grab and install the latest version (13.67.0.45). That got me completely caught up. What I now can’t understand is why winget will sometimes update Nitro Pro for me, but why I must do it manually at other times. I’m guessing it depends on package prep and info…


Facebooklinkedin
Facebooklinkedin

DISM Component Store Cleanup

This morning, I recalled the value of occasional “check-and-clean” operations on the Windows Component Store (aka WinSxS). Check the “Before and After” screencap at the top of this story. It shows that applying updates can leave old components behind. Checking the component store tells you what’s up. Performing a DISM component store cleanup recovers wasted space. To wit: 1.72 GB in reported size, and 1.47 GB in actual size.

How to run DISM Component Store Cleanup

What you see in the before (left) and after (right) image is syntax to check the Windows Component Store. Run it in an admin cmd or PowerShell session, like so:

DISM /online /cleanup-image /analyzecomponentstore

Two notes. One, the output from the before (left) tells you how many reclaimable packages are found (2, in this instance). Two, it tells you whether or not component store cleanup is recommended (yes, this time around). Running the check and report syntax shown above takes 1-2 minutes on most Windows 10 and 11 PCs.

Performing the Actual Cleanup

As with the check and report DISM command, the cleanup command must also run in an administrative cmd or PowerShell session. That syntax is slightly different:
DISM /online /cleanup-image /startcomponentcleanup
Depending on how many reclaimable packages are found, and how big they are, cleanup can take upwards of 5 minutes on most Windows 10 or 11 PCs. That wait goes up, as the number (and total) size of packages increases. Be patient! I’ve only had this fail a handful of times over the years I’ve been using this tool (and many of those failures were self-inflicted because of prior use of /resetbase, which locks existing packages into place in the Component Store).

Nevertheless, this is an excellent and recommended Windows cleanup technique, which I try to run after each month’s Cumulative Update (CU) is installed. The check and report command doesn’t always find something to cleanup, but when it does, I follow up with the /startcomponentcleanup to trim down the Component Store footprint. It’s a great technique for regular Windows image management, in fact.

Facebooklinkedin
Facebooklinkedin

WingetUI Offers Useful Update Capability

Lately, I’ve been using the Winget PowerShell applet to assist with updating my Windows 10 and 11 PCs. Thanks to Martin Brinkmann at Ghacks, I’ve found a GUI front end for that tool. Indeed, the aptly-named WingetUI offers useful update capability.

Winget.UI does other things, too. It let you explore all 3460 packages under its purview (“Discover Software” tab). It also shows a complete list of all packages already installed on your PC (“Installed applications”). On first blush, Winget.UI looks like a good tool. Its GitHub page provides the lead-in graphic for this story.

Winget.UI Offers Useful Update Capability.updates

“Available updates” quickly identifies and provides ready access to item-by-item update launch. [Click image for full-size view.]

What WingetUI Offers Useful Update Capability Means

To update an item from the Software Updates tab in Winget.UI (shown above), simply double-click its corresponding Winget entry under the “Installation source” heading. Personally, I find this prefereable to the winget upgrade --all command. Why? Because it provides item-by-item control. That lets me skip elements (such as MS Teams), which experience has taught me isn’t really amenable to winget updates.

The double-clicking takes a little getting used to, but by and large the update function works well. It worked well for third-party packages, including Kindle, Python 2, and Revo Uninstaller. It hit errors on some built-in MS components, such as the WADK and Edge Runtime. Based on prior history, I didn’t even try the Teams components.

Good, But Not Perfect

I’ll need to spend more time with WingetUI to fully understand and appreciate its foibles and strengths. For now, it’s much like other update tools I use: good — indeed, pretty helpful — but by no means either great or perfect. Perhaps that’s just the way that update tools work here in Windows World!

[Note: Nochmals Danke schoen to Mr. Brinkmann for an interesting find.]

Facebooklinkedin
Facebooklinkedin

Fighting Off Update OCD

I’ve been whipping my PCs into shape, preparing for a trip away from home. I’ll be OOO for all of next week, attending a legal process in Waco. Naturally, before I go, I’m making sure all the PCs here — especially production ones — are entirely up to snuff. I must be getting close to my goal, because I’m currently fighting off update OCD. Let me explain…

What Fighting Off Update OCD Really Means

As you can see from the SUMo listing for my production desktop (in the lead-in graphic above), I still have three items that appear to be obsolete or outdated. At least one of them is a false positive.

I just checked on FileZilla. And while no update was available yesterday, one is  indeed available today. Fixed! Here’s how I found that out just now by asking the app to check for updates:

Fighting Off Update OCD.FileZilla

When I checked yesterday inside the app: nada. Today I found — and installed — 3.60.1. Notice: It bears today’s date (6/1/2022). Go figure!

When I check on status for voidTools Everything (sometimes called Search Everything), it still reports itself current. That’s good enough for me, so I’ll quit looking for the putative 1.4.1.1017 version that SUMo recommends. Here’s what the program tells me when I tell it to check for updates:

Fighting Off Update OCD.everything

If the auto-checker says “OK,” I’ll take it at its word.

The last item is the sometimes tricksy Intel ® PROSet Adapter Configuration Utility. It’s easy to go round and round on this one. I’ve learned to search on the first two digits of the version number — that is, 27.3 — along with the utility name at intel.com. If it comes up, I’ll try it; if not, I’ll wait until next time around. I did find such a version, and thus I downloaded and installed it.

Two False Positives, One Gone

Even though I got to a new version of FileZilla, it wasn’t new enough to satisfy SUMo (it shows up in the app as version 3.60.0.0 rather than 3.60.0.1, despite its own self-labeling). But that’s close enough for me.

AFAI can tell, there is no such Everything version as 1.4.1.1017 — or at least, I couldn’t find it. Again, given the auto-updater’s response in the application, good enough for me.

Downloading and installing the Wired_PROSet_27.3_x64.zip file did clear the PROSet warning, though. Again: good enough for me.

I’ll waste no more time obsessing, and let my OCD find something else to obsess about instead. Basta!

Facebooklinkedin
Facebooklinkedin

Manual OneDrive Update

Late last week, SUMo (Software Update Monitor) informed me that the version of OneDrive on the home-from-school PC was outdated. It didn’t update itself, nor did any of my usual update tools handle this item either. Thus, I found myself asking: “How do I perform a manual OneDrive Update?” The answer, quite fortunately, is: “Easy!”

Working Through Manual OneDrive Update

If you right-click the OneDrive cloud symbol in the taskbar notification area, a menu appears. Click “Settings” from that menu (shown in the lead-in graphic for this story).

Next, click the “About” tab at the upper left of the resulting OneDrive window. If you the click on the version number in the “About Microsoft OneDrive” pane (boxed in red below), it takes you to the OneDrive release notes page.

The Build number clues you into what’s running on the target PC.

From there, you can compare the version number for the installed version (shown in your UI) and the “Last released build” under  the “Production ring” heading on the web page. If the numbers agree, you’re up to date. If the on-web version is higher numbered than the local one, click the link to download the OneDriveSetup.exe file. You need only double-click that file to bring your OneDrive version current. Easy-peasey!

Ordinarily, OneDrive takes care of itself just fine. But if you find a PC with an out-of-date version — even a way out-of-date as on the former school laptop — this technique will catch you up quickly and easily. Cheers!

Facebooklinkedin
Facebooklinkedin