Category Archives: Recent Activity

Bye Bye Secunia PSI

Drat! I knew a notification asking me to “view an important message regarding the future of this product” for Secunia’s Personal Software Inspector probably wasn’t good news. Once again, I took no pleasure in being right. That’s because the message was that it will soon be time to say “Bye bye Secunia PSI!” (That’s almost how the company entitled their explanatory blog post, too: “It’s time to say goodbye to PSI.”) Here are the relevant screen captures:

Bye Bye Secunia PSI notification
Bye Bye Secunia PSI msg txt

Less than two months left before end-of-life comes to Secunia PSI. It’s been a mainstay for me for at least a decade. Bummer!

After Bye Bye Secunia PSI, Then What?

Good question! There’s a Flexera CSI (Corporate Software Inspector), which costs money to obtain. I’ve sent them an email asking about their pricing and availability for 15 seats (I have 8 PCs currently, have had as many as 12 here at Chez Tittel at one time, and want to leave some room for growth). I’m hoping it’s not too horribly expensive, because I really want to keep up with the anywhere from 40-120 applications and apps resident on the local tablets, laptops, and PCs around here. Thanks to the labeling and language on the Flexera website, I’m pretty sure that this fits into their Software Vulnerability Manager product.

But looking around for other drop-in (and free) replacements for PSI, I don’t see a whole lot that provides similar capability with equal ease of use. Sure, there’s the Microsoft Baseline Security Analyzer (MBSA) but it doesn’t automate patching or fixing the holes that it finds. Then there’s BeyondTrust’s free vulnerability scanner, Retina Network Community. But I see that it requires an IIS server and  an MS SQL Server to be installed (and it can’t reside on a domain controller or Small Business Server, either). Sounds like more work that I want to do. But that’s it. All the other programs I read about (see Eric Geier’s 2014 Network World story “6 free network vulnerability scanners” as a typical case in point) either limit the scope or the number of scans you can use their tools for. The level of automation also leaves a lot to be desired.

Hmmmm. This is going to leave an interesting gap in my defenses. Hope it doesn’t prove too time-consuming, effort-laden, and expensive to fill. Sigh.

Facebooklinkedin
Facebooklinkedin

Understanding HomeDev PatchCleaner

I strongly recommend the PatchCleaner utility from Australian consulting and software company homedev. It keeps an eye on the contents of the %windir%\Installer directory. Usually, that’s C:\Windows\Installer where the OS stashes installer .msi and patch .msp files. At any given moment, you might need one or more of those files. That’s because they can be called on when patching or installing software components (both Windows and third-party items, in fact). That’s why the developers recommend moving “orphaned” files to another drive/directory rather than deleting them outright. However, the tool will happily delete files when so directed. Here’s some output from the program on my production PC. Examined properly, it should aid readers in understanding HomeDev PatchCleaner.

Understanding HomeDev PatchCleaner

The bigger box at bottom is the output from the second details item for orphaned files in the small box at top.

What’s Involved in Understanding HomeDev PatchCleaner?

PatchCleaner shows a line of data that conveys some important information. Namely, it discloses what’s in the Installer folder that isn’t necessary. The tool identifies such orphaned files by seeking out references to their names in other executables and OS files. Those that lack such references are considered orphans. In the preceding screencap, this key line reads “9 files are orphaned, 289.66 Mb details…” Clicking on that blue details item produces the orphaned files window shown below. There, I’ve zeroed in on an older installer file for Macrium Reflect (version 6.3.1821, now completely obsolete and out-of-date).

In general, I agree with homedev’s advice to move files from the C:\Windows\Installer directory to another directory. But, as I’ve been watching and working with the program, I’ve observed there is a specific class of items that it is almost certainly safe to delete rather than move. These items can be generically described as “applications that update often.” As shown, Macrium Reflect — which gets monthly updates, give or take — is one of those items. Another includes various Adobe programs such as the Flash Reader or Acrobat DC. These get updated about as frequently as Reflect (but usually take an .msp extension).

On some heavily-patched and infrequently-cleaned PCs, I’ve seen this number exceed 10 GB. My PCs, of course, are kept pretty clean, so mine seldom approach even 1 GB. As “the boss” (my wife, Dina) likes to say “the more often you clean, the less you have to clean up each time.” That’s as true for PCs as it is for her house, where by her grace and kindness I am also allowed to reside.

Facebooklinkedin
Facebooklinkedin

512 GB microSD Cards Are Coming!

Saw a fascinating announcement over on NeoWin this morning. UK company Integral Memory has announced release of a 512 GB microSDXC card next month (February 2018). No pricing information is available just yet. Even so, NeoWin speculates it will probably cost somewhere around US$249. Personally, it’s astounding that we can now pack half a TB onto a circuit card smaller than my thumbnail. That’s the same size, if not bigger, than all the SSDs I own. So buckle up kids: 512 GB microSD cards are coming, and will be here soon.

512 GB microSD Cards Are Coming!

The inexorable march of technology lets more than a few angels dance on the head of this particular pin, eh?

Get Ready: 512 GB microSD Cards Are Coming!

According to its legend and its maker, the card complies with the Video Speed Class 10 (V10) standard. That means users can record HD video to the device in real time. According to NeoWin, this card supports transfer speeds of up to 80 Mbps. That’s 20% slower than the 400 GB SanDisk card that ruled the size roost at 100 Mbps. Integral’s spokesperson, marketing manager James Danton, explains the target audience for this device. “The need to provide extended memory for smartphones, tablets, and a growing range of other mobile devices such as action cams and drones has been answered.”

At about the same price as a fast 500 GB SSD (a Samsung nVME 950 Pro goes for under $249 right now, while a 960 Pro goes for about $300), one wonders who really needs this device. But the appetite for storage is always there for some segment of the marketplace. I do get its appeal, particularly for GoPro and other mobile cameras that depend on ultra-compact flash storage.

As Capacities Climb, Older “Big Guns” Seem Smaller

I guess this size jump also explains why 128 GB microSDXC cards are cheap now. I bought one each for my Dell Venue Pro 11 and my Surface Pro 3 back in 2014 or 2015 when they were still pretty pricey, too. I’ve gotten good use out of those devices (but have neither the need nor inclination to buy up to this level). You can find them now for under $70 (quite a bit cheaper for slower media). When I bought mine, they were over $100 each.

Samsung is expected to release a 512 GB microSD card of its own manufacture sometime soon, too. I expect it will just be a matter of time before a 1 TB version comes down the road. Then, these pinnacle products have to step down a rung. Maybe then I’ll think about buying up!

Facebooklinkedin
Facebooklinkedin

Time Boosts (New) Wireless Hardware Throughput

A couple of days ago, my son mentioned that Internet speeds on his PC weren’t terribly impressive. So we went up to his room, and visited the Microsoft Store in Win10. While there we installed the handy “Speedtest by Ookla.” And indeed, the initial results weren’t impressive. 33.5 Mbps download speed, and 14.1 Mbps upload speed. Right now, my wired desktop churns out 335.5 download, and 20.93 upload, so I could feel his pain. It also led me to speculate that a new WiFi adapter might improve the situation. In fact, that’s why I entitled this post “Time Boosts (New) Wireless Hardware Throughput.” Continue reading Time Boosts (New) Wireless Hardware Throughput

Facebooklinkedin
Facebooklinkedin

Ed Earns Windows Insider MVP January 2018

On January 2, 2018, I received email notification from Joe Camp at Microsoft. It informed me that I was named a Windows Insider MVP for 2018. This comes mostly thanks to my good friend and frequent-coauthor, Kari Finn, who nominated me in 2017. But also, thanks to everyone who helped make “Ed Earns Windows Insider MVP January 2018” possible.

This award qualifies me to attend the next annual MVP summit in Redmond. It also gets me a variety of goodies, including free one-year Visual Studio Premium and Office 364 E3 subscriptions. But beyond those much-appreciated perks, I’m both honored and pleased to join the ranks of the Microsoft MVPs. I know well many of them well, and have followed and respected their work since this program kicked off in 1999. I’m especially grateful to MVPs Tom and Deb Shinder, Joli Ballew, Jerry Honeycutt, Shawn Brink, Robert Smit, and my friend and co-author Kari Finn.

Read more about the MVP award and its many distinguished holders on Microsoft’s “Most Valuable Professional” page. To learn more about Windows Insider MVPs in particular, and search their ranks, visit Windows Insider MVPs. To my amazement, I see there are over 150 such MVPs for Windows 10, not counting this year’s new admits (like me).

Windows Insider MVP logo

Thanks to the award, I’m allowed to use this logo for blog posts, email, and business cards.

But Wait, There’s More…

This same month — January, 2018 — also sees the launch of the website Win10.guru. Created in partnership with my friend and fellow Windows Insider MVP and co-author, Kari Finn, we plan to provide oodles of online content that includes how-to and other stories, editorial opinion pieces, and more. We will focus primarily on the needs of IT Professionals and power users who work with Windows 10 both professionally and seriously. Please check out this new site and, while you’re there, share your feedback and requests for coverage with us. Thanks!

Facebooklinkedin
Facebooklinkedin

Oh my! AOMEI OneKey Recovery Gets Interesting

I’ve been working with and learning about recovery partitions on Windows boot/system disks lately. My explorations led me to a decent but flawed tool that does some nice things for Windows OS recovery. It’s called AOMEI OneKey Recovery, and it’s available in both free and commercial versions. In theory, installing this program is easy. You must make space on your system/boot drive. Then, AOMEI OneKey Recovery adds partitions to that disk for boot-up and repair. As a bonus, its recovery partition incorporates a backup of your Windows OS partition. But in practice, AOMEI OneKey Recovery gets interesting. It’s particularly so when it comes to sizing the disk space that the program needs for its partitions. Here’s what the nominal 256 GB SSD drive on my Dell Venue Pro 11 7130 looked like when the program finished its work:

AOMEI OneKey Recovery Gets Interesting

Alas, considerable trial and error was required to properly size the F: partition I had to give AOMEI OneKey Recovery to work with.

Lack of Sizing Data Means AOMEI OneKey Recovery Gets Interesting Indeed!

To begin with, the program provides no guidance on how to size the partition from which it will create its partitions. These are labeled AOMEI and AOMEI Recovery Partition in the preceding screen capture from the Disk Management utility. I started small (at around 2 GB), and went through too many muffed attempts last night. I got increasingly vexed as I kept upping the size of the F: partition that OneKey Recovery used for the AOMEI partitions shown. For each try, I had to use MiniTool Partition Wizard to reduce the size of the C: partition. Then I used that space to expand the F: partition. Things didn’t work until the F: partition hit 44 GB in size. Finally, it created the disk layout depicted in the preceding graphic.

The problem was, resizing the C: partition requires a reboot to do its thing. For each attempt, I used MiniTool Partition Wizard to shrink the C: partition. Then I could grow the F: partition by the same amount. Each iteration took 3-4 minutes to complete because of the time involved in shifting partition boundaries and waiting for the reboot to complete. By the time I’d done this five times I was ready to spit nails. Surely AOMEI could expend the programming effort necessary to analyze the files on the C: partition and estimate the partition size needed to accommodate them? I would have been much happier with my experience in using the software if I didn’t have to keep repeating my attempts to set up those pesky partitions.

It’s Not All Tar and Feathers, However…

To give credit where it’s due, AOMEI OneKey Recovery was reasonably well-behaved aside from the lack or partition sizing information or guidance. It added itself nicely to my Boot Configuration Database (BCD data) on the Dell Venue Pro 11. Better yet, it didn’t mess with the Macrium Recovery Partition already installed on that drive. In testing of its onekey functionality, it worked quite nicely. The program offered to restore my backed-up runtime environment to the C: partition without a hitch. It took about 10 minutes to create the two partitions shown. Thus, I’m guessing it would take about the same amount of time to restore the contents of its Recovery Partition to C:, should that become necessary. I’ll try it out this weekend, when I have some spare time to devote to that task. I’ll follow up with an update then.

On balance I think this is a good tool for a free program. But because it does require resizing of the C: partition to create the space needed for its partitions, a commercial partition manager is needed to put it to work. Not coincidentally AOMEI makes one of those, too. But I prefer MiniTool Partition Wizard, mostly because I already know and understand how to use that program.

Facebooklinkedin
Facebooklinkedin

ExpressCard USB Insights Come Later Not Never

I’ve got a pair of Lenovo laptops I bought in February 2012, as I was preparing to write a book on Windows 8. The book never happened, thanks to an unexpected spate of legal work that year. But those laptops are still kicking and surprisingly capable considering they’re now over 5 years old. One of them is an X220 Tablet with a 12.5″ touchscreen (a very early production touchscreen PC). The other is a T520 with a 15.6″ 1366×768 display. Both units incorporate a dual-core i7-2640M processor, each with built-in Intel HD Graphics 3000 circuitry. The T520 includes an Nvidia Quadro NVS4200M GPU as well. ExpressCard USB insights come courtesy of the plug-in slot for ExpressCard devices on each machine.

These laptops have been through some upgrades along the way from early 2012 to the present day. Both now incorporate 16 GB RAM (2 x 8GB Patriot Memory PC3-10600 SO-DIMMs). Both now boot from Plextor PX-256M5M mSATA SSDs. In 2014, I purchased a StarTech 2 Port ExpressCard SuperSpeed USB 3.0 Card to endow them with faster USB connections. This last facility provides the subject for today’s blog. That’s because I noticed some important things about working with that adapter as I started prepping for the upcoming Windows 10 Creators Update. (It’s due to make its public debut on 4/11/17, but is already available in ISO form to Insider Preview members like yours truly).

ExpressCard USB Insights

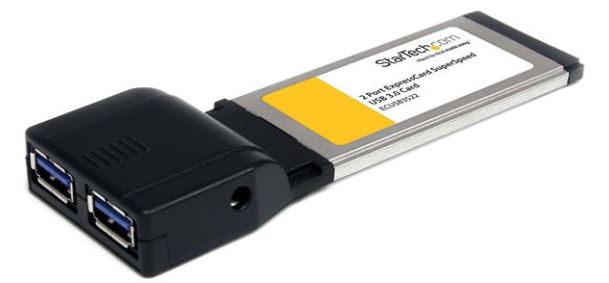
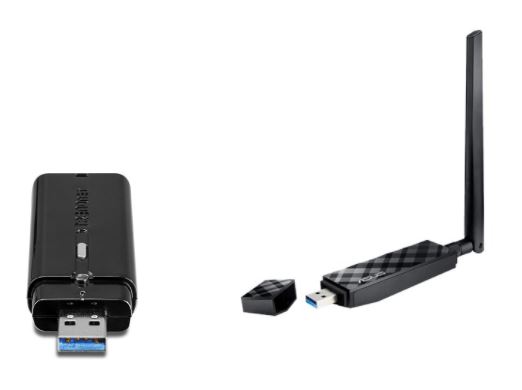
For under $30 (Newegg) this plug-in ExpressCard brings two USB 3.0 ports to older laptops like mine. It also comes with a couple of interesting “catches.”

ExpressCard USB Insights Come As I Prep PCs for Win10 Creators Update

In prepping my PCs for the upcoming upgrade, I’m performing a raft of housekeeping tasks, including:

1. Running Disk Cleanup in admin mode, to clean up system files and such
2. Running DriverStore Explorer (aka RAPR.exe) to remove outdated or obsolete device drivers
3. Using the DISM command to clean out the component store with the /startcomponentcleanup /resetbase options
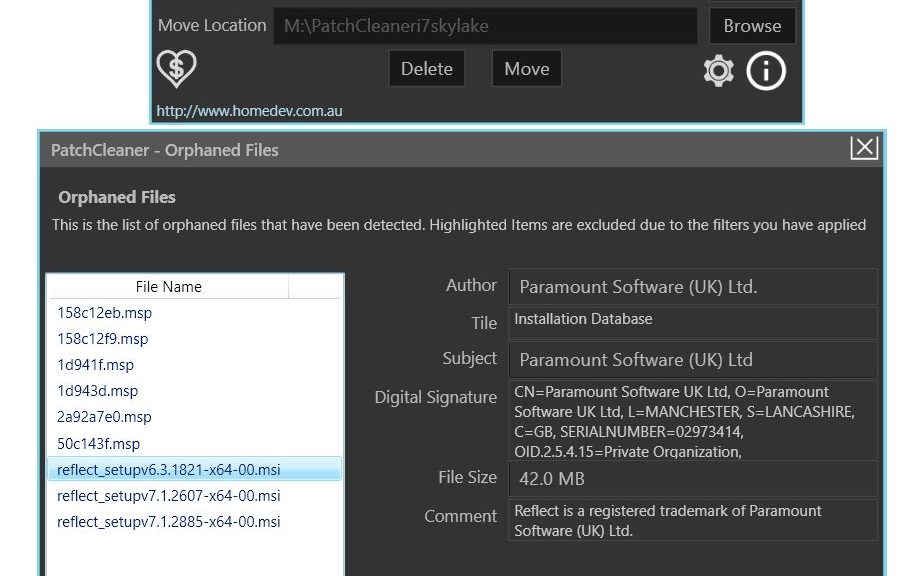
4. Running HomeDev’s excellent PatchCleaner utility to clear out obsolete or orphaned entries from the Component Store
5. Performing complete image backups using Macrium Reflect. Thus, I can easily roll back to 1067.14393.969 or .970 if something goes wrong enough with the upgrade for Windows rollback to fail.

In working with the Lenovo units, I attempted to switch the StarTech card from the 520 to the X220 Tablet while those machines were running. Alas, the USB 3 devices (flash drives and external disks) weren’t recognized at run-time. Further investigation turned up a Device Manager error: “a driver is missing or not completely installed.” To answer the question “Can I plug in or unplug these devices at runtime?” I tried inserting and removing the card on each laptop.

Curiously, the X220 Tablet requires that the card be inserted at boot-up to be recognized and used. But the T520 recognizes the card (with USB drive(s) already inserted) when inserted at run-time. Neither unit allows a USB device to be unplugged. In fact, using “Safely Remove…” to do this properly only shows an option to eject the StarTech card completely. It’s labeled as “Eject USB Root Hub (xHCI).” I also had to close all open applications accessing devices plugged into the card, before it could be ejected. A considerable amount of time, trial, and error is what helped me develop my ExpressCard USB insights, such as they were.

Where’s the “Mount” Option for ISOs?

Another interesting factoid: the “Mount” option that appears in most PCs with built-in USB 3.0 interfaces when one accesses a folder with an ISO file present does not appear in File Explorer in either Lenovo laptop. This fails to appear when a USB 3.0 drive is plugged into the StartTech USB 3.0 adapter. Curiously enough, that same option is also missing from the right-click menu when the same UFD goes into a USB 2.0 port on those machines.

That said, I get the right-click “Mount” option for the very same UFD on all of my other PCs, laptops and tablets.. But then, all of them sport native USB 3.0 ports of some kind or another. When this option is missing, however, one can still use the PowerShell command called “Mount-DiskImage.” This makes an ISO show up as a virtual DVD in File Explorer, as recounted in this TechNet Windows IT Center article (last updated 3/8/2017 as I write this blog post).

{Note added 12/18/17: My friend and colleague Kari Finn points out that you can also mount an ISO on any Win10 system by right-clicking the ISO file and using the “Open with …” option from the context menu. Selecting “File Explorer” when the target is an ISO file also triggers mount behavior. Useful shortcut, actually!}

I have to chuckle that I’ve had this card for three years now, and am just now really learning how it works (and sometimes fails). In acquiring ExpressCard USB insights later is indeed better than never. At least, that’s what the title of this blog post suggests, with tongue planted firmly in cheek. Cheers!

Facebooklinkedin
Facebooklinkedin

A Wrinkle Upon Office 365 Subscription

Just before the big holiday season got going, I took the boy — son, Gregory — to one of his favorite haunts: the Microsoft Store at the Domain in Austin. While we were there I picked up a year’s renewal for his Xbox Gold subscription, and at the same time bought myself a one-year extension to my Office 365 Home subscription. This morning, I finally got round to entering the subscription key for another year of use. I was in for a surprise: no sooner did I enter said key, than did the renewal process inform me it couldn’t find the key in its database. WTF?

office-key

A life size scan of the credit card sized plastic key card prompts the thought: why can’t they put a scan code on this sucker?

Of course, my first thought was I’d mis-typed one or more of the five 5-character groups that composes such a key. But a careful comparison of what I’d typed to what was printed there quickly disabused me of that notion. So I opened Google and searched on “Chat with Microsoft Support” and in under a minute I was chatting online with Pravin, my designated MS Support representative.

As he asked me how I’d attempted to renew my subscription, it suddenly dawned on me that I’d tried it in Chrome (my browser of choice these days, for good or for ill). I thereupon asked him if I should try my renewal in IE or Edge instead. Sure enough, that was it: entered the same web page, the same renewal screen, the same key in IE and it all worked like a charm. It just goes to show you that for some tasks, Microsoft still expects you to use their tools and not somebody else’s. Whoda thunk it? Now that you can access the Microsoft Update Catalog and MSDN using Chrome, why should subscription sign-ups or renewals be any different? I have no idea why it’s so, but there it is. If you find yourself renewing an MS subscription in the near future, remember to use IE or Edge and you’ll be more likely to zip through the process faster that I did on my initial attempt with Chrome.

And so it goes in Windows-land!

Facebooklinkedin
Facebooklinkedin

Dodged a Bullet on Norton Upgrade

As I was surfing the Web earlier this week, researching a story on a typical network/system administrators anti-malware toolkit, I happened to notice that Norton Internet Security is no more. It has been replaced with Norton Security of which the 2017 version represents its latest and greatest offering. Upon trying to update my software (for which I have 5 PC seats and 1 iPhone seat) I quickly realized this wasn’t something I could do for myself. So I jumped online to Norton Support chat and in short order the following things were done:

  1. My existing Norton Internet Security subscriptions (of which there were 3) were cancelled. Immediately, I got a notification from my production desktop that the license had been revoked.
  2. I was issued new licenses and keys for my available seats, and instructed to use the “Norton Removal Tool” first to remove all traces of NIS before installing Norton Security 2017.
  3. I ran the tool, rebooted my system, and installed the new software. Everything went smoothly and flawlessly.
Norton Identify Safe
Norton Identity Safe is a handy, simple password manager.

Norton Identity Safe is quick, compact, and easy to use.

Then I realized: “Holy crap! Did my Norton Identity Safe get cancelled and cleaned out along with the other old Norton stuff?” In case you don’t already know, Norton Identity safe is one of any number of password management programs out there, and it comes as part of the overall Norton environment. I use it to store account and password information for over 1,000 different accounts. This number comes from to the tool itself, though it counts multiple logins to the same site as separate accounts (for example, I have multiple Twitter logins for different personae, plus guest and admin accounts for many of the websites that I write for, own, or help to operate).

One more salient bit of information: I’ve also been using the Norton Password Generator lately, because it generates strong passwords automatically. They can be of arbitrary length, but the default is a nice, tough 12-character string. I don’t even bother to try to remember passwords any more. Because I can always get to the Norton Identity Safe on the Web from any of my PCs or mobile devices, I can always zip into that tool, search by URL, and cut’n’paste my password string (and account, if needed) into my login of choice. Extremely convenient, but an utter disaster if Identify Safe — or the data it contains — goes MIA.

Trembling with trepidation, I tried opening Identify Safe after setting up my new Norton software. Luckily enough, changing the anti-malware solution didn’t have any discernable impact on my honking huge collection of URLs, accounts, and passwords. Ideally, this is the kind of thing one should think about and prepare for ahead of time. The Identity Safe even offers an export function, so you can save its contents in the form of a CSV file, and import it back into a new safe (or use it as a backup for your existing safe). I’ve got one of those now, too, sitting on an encrypted flash drive here at the house. Having already dodged one bullet, I feel like I should get ready for more to come!

Facebooklinkedin
Facebooklinkedin

Inateck Offers Nice 2.5″ Drive Enclosure

A couple of months ago, entirely out of the blue, I got an email from a representative of Inateck, an apparently Taiwanese company that does business as “F&M Technology” in both the USA and Germany. It informed me about the company’s range  of 2.5″ drive enclosures, described on the product category page as “Tool Free USB 3.0 HDD Enclosure.” After some additional email back-and-forth with that person, I found myself in possession of two different and related products from Inateck:

1. One instance of product FE2010, an “Ultra slim 2.5 inch HDD Enclosure” (list price $19.99, but I can find suppliers for this item only on eBay at prices from $17.27 to 22.14)

FE2010

2. One instance of product HPD-BU, a nice little ballistic nylon zip up case in which to store item 1 (available at Amazon for a mere $6.99).

HPD-BU

What’s the Deal Here?

I’m always on the lookout for good deals on helpful hardware, especially for taking work on the road with me. I’ve purchased various 2.5″ and 3.5″ drive enclosures over the years, usually so I can pack ’em up and take ’em with me when I’m out the door on business. Often this means setting up in a conference room at a law or technology firm, or working in a hotel room somewhere (one time, this meant burning extremely expensive online minutes on a Disney cruise ship in the western Caribbean). That’s why I’m so interested in compact mobile gear that’s easy to set up and use, and as portable as possible.

What I really, really like about the Inateck enclosure (FE2010) is that its tool-free design is neither flimsy nor weak. It’s made of plastic, but the plastic is fairly thick and sturdy. A snap-together cover slides on rails away from the circuit area on the main half of the assembly where the drive plugs into a standard SATA power and data connector. It is easy to insert and remove using just finger pressure, but the device holds up well when transported. I took it with me on recent out-of-town trips to Dallas and Houston with family, for use with my Surface Pro 3 hybrid tablet. It behaved quite nicely on both jaunts, despite inexpert help from some enthusiastic tweens in carrying luggage and the computer bag and with device set-up and teardown. The enclosure also comes with a short (~12″) USB 3.0 cable with a standard USB Type A connector on one end (for plugging into a computer) and a compact, proprietary USB connector on the other (for plugging into the drive enclosure).

The incredibly cheap carrying case (HPD-BU) is a real bargain at $7, and accommodates the drive enclosure perfectly. It offered excellent protection for my traveling rig while on the road and is well worth its cost. It features a hard shell design that offers added rigidity to safeguard its contents from knocks and drops.

I purchased my last 2.5″ mobile drive enclosures from Newegg in 2013. They’re made by Vantec, model NexStar 3, and are old enough to feature USB 2.0 with eSATA for higher-speed connections. As I recall, I paid about $10 for them and they included a micro-USB to type A cable (with a second type A connector for extra power on laptops that may offer only limited USB power on a single connection) along with a flat sided zip-up ballistic nylon case in black. A similar USB 3.0 model is available at Newegg, also for $19.99 (discounts sometimes available: right now price is $2 lower), and includes no case.

All in all the Inatek FE2010 offers good functionality, easy access and use, and is a reasonably sturdy traveling drive enclosure. If you can find a good deal from a reputable retailer (or eBay merchant), it’s definitely worth buying. Don’t be flim-flammed by the company’s performance claims on this device, though: I believe they’re comparing USB 2.0 to 3.0 performance. I found no speed difference between using the same drive between my Thermaltake Superspeed 3.0 drive caddy and the Innatek enclosure, both plugged into the same PC and the same USB port.

Facebooklinkedin
Facebooklinkedin