Category Archives: PowerShell

Primary Desktop: Something Profoundly Wrong

I’ve been fighting dragons here at Chez Tittel all day long. On my primary desktop, something profoundly wrong is dogging my steps, and docking my productivity. I can’t boot to a recovery drive to fix a relatively simple problem with application package provisioning. Behind the scenes, something is amazingly weird, and blocking my every move to try to get things fixed. Let me explain…

More About Primary Desktop: Something Profoundly Wrong

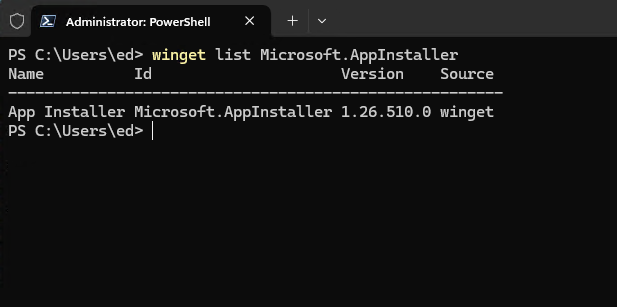
It all started with WinGet. It (Microsoft.AppInstaller) wouldn’t update  properly . I went through a lengthy and trying series of misadventures (that took the best part of a full day). I only slowly determined the ed@edtittel.com account profile was thoroughly messed up.

First, I went through three iterations building a WinRE (Windows Recovery Environment) bootable USB flash drive. I realized something fundamental and serious was broken. Copilot says it’s not because of any of these:

  • Not a bad install.
  • Not a missing EXE.
  • Not a PATH issue.
  • Not a system‑wide problem.

Rather, it’s a borked reparse point. It’s coupled with missing shims inside user-level WindowsApps and Winget folders.

A Wilderness of Errors

Here are some of errors I’ve fought today:

  • “The system cannot find the path specified”
  • Winget working in one account but not another
  • App Installer reinstall not fixing anything
  • PATH looking correct but still failing
  • Winget.exe present but nonfunctional
  • Commands failing instantly with no useful error text
  • Ephemeral pop‑ups and disappearing error dialogs

TLDR: I couldn’t build a bootable WinRE UFD that worked. I’ve switched to another PC. Now, it’s the Lenovo ThinkStation P16 Gen1. It’s frustrating… But at last a bootable UFD via the Windows 11 Download page and msconfig to get into “Safe Mode” worked. That said, I never got WinGet working on my primary MSA.

An Alexandrine Solution

I’ve now been up and down, and back and forth, over the same ground. I can’t make WinGet work in my primary login. It works fine in an alternate MSA. After spending a long, long day trying to fix this, I am throwing in the towel. I can run WinGet from the old MSA, and for now, that’s good enough for me.

Sigh. Another wasted day (at least 8 hours) here in Windows-World. Sometimes, all the effort just doesn’t produce the desired outcome. It’s a real pickle!


Facebooklinkedin
Facebooklinkedin

Copilot Assisted RAPR Analysis

Yesterday, I found myself revising a story for ComputerWorld. The topic: cleaning up Windows driver bloat using DriverStore Explorer, aka RAPR.exe. Along the way I found myself wanting to count the drivers in that store, and to identify duplicates for possible removal. Performing what I’m calling Copilot assisted RAPR analysis, I had it craft some Powershell for me. Came in really handy, so I’ll explain and illustrate what I used…

Enumerating Copilot Assisted RAPR Analysis Items

I used two one-liner PowerShell commands, plus one script, to do the following:

  • Provide a count for the number of drivers in the store (found in C:\Windows\System32\DriverStore\FileRepository)
  • Display the total file size of the store’s contents (same place)
  • Enumerate and identify the duplicates in the store (script)

These items are helpful because running the first two one-liners let me quickly count items and obtain their overall file size. Handy for before and after comparisons. The script was useful because it let me identify duplicates in the store, which RAPR does not always remove when you use the “Select (Old Drivers)” and “Delete Driver(s)” buttons for clean-up purposes.

If you look at the lead-in screenshot it shows the one-liners for making a count and getting size verbatim, and calls a script named dupdrv.ps1. The results also appear as well. These all represent post-cleanup results, FWIW.

PowerShell Details: One-Liners and Script

To obtain the count, PowerShell runs through all instances of signed PnP drivers in the store, and tots them up:

(Get-CimInstance Win32_PnPSignedDriver).Count

To get the size of the overall DriverStore, PowerShell examines each file, gets its size, adds it to a growing sum, then shows it in GB units:

(Get-ChildItem "C:\Windows\System32\DriverStore\FileRepository" -Recurse -File | Measure-Object -Property Length -Sum).Sum / 1GB

The script is longer and a little more complicated. Basically, it iterates through all files in the DriverStore, builds a table of unique entries by name, and counts all instances it finds. It reports only on instances that have counts of 2 or more (indicating duplicates).


pnputil /enum-drivers |
Select-String "Published Name","Original Name","Provider Name","Driver Version" |
ForEach-Object {
if ($_.ToString() -match "Published Name\s*:\s*(.*)") { $pub = $matches[1] }
if ($_.ToString() -match "Original Name\s*:\s*(.*)") { $inf = $matches[1] }
if ($_.ToString() -match "Driver Version\s*:\s*(.*)") { $ver = $matches[1] }
if ($pub -and $inf -and $ver) {
[PSCustomObject]@{
PublishedName = $pub
InfName = $inf
Version = $ver
}
$pub = $inf = $ver = $null
}
} |
Group-Object InfName |
Where-Object { $_.Count -gt 1 } |
Select-Object Name, Count, @{n="Versions";e={$_.Group.Version}}

These tools come in nice and handy when using RAPR to clean up a driver store. Indeed, they even extend its capabilities beyond finding old and obsolete drivers. They also identify duplicates as well. Sometimes, those too can be cleaned up. Good thing that trying to delete a driver in actual use in RAPR won’t succeed unless the “Force Deletion” option is checked. I don’t recommend using that unless you know you must for some good reason. I certainly didn’t need that here.

Benefiting from Copilot Assist

For updating this story, Copilot made it faster, easier and more convenient for me to do what I needed to anyway. That’s good. But it also let me step beyond what I’d been able to do by way of driver debloating in the past, and tackle duplicate elements as well. That’s about as good as things ever get, here in Windows-World. I’m jazzed!

Facebooklinkedin
Facebooklinkedin

ARM PC Throws Oh-My-Posh Curve

There are lots of interesting wrinkles that distinguish ARM-based PCs running Windows 11 from their Intel- or AMD-based counterparts. Nothing huge or deal-breaking. Just interesting and sometimes, mildy vexing. In setting up Windows Terminal and PowerShell “the way I like it,” I encountered just such a wrinkle. Indeed, my new ASUS Zenbook A14 AMR throws oh-my-posh curve that took some research to work around. The lead-in graphic shows where I started out.

How ARM PC Throws Oh-My-Posh Curve Ball

I used the OneDrive connection through my common MSA (Microsoft Account) to inherit a lot of my local set-up and preferences. So it is with Windows Terminal and PowerShell, for which I like to use Jan DeDobbeleer’s excellent Oh My Posh (OMP) customization tool. Note the end of the prompt that shows up on the A14 in the preceding screencap: “CONFIG ERROR.” Not good!

In figuring out what causes this, I learned that the way ARM PCs handle some errors differs from AMD and Intel X64 CPUs. Indeed, the issue seems to come from a slight change in folder structures, where OMP expects x64 and doesn’t accommodate ARM automatically.

Fixing the CONFIG ERROR

Fixing CONFIG ERROR, in this case, is as easy as reassingning the folder from whence Oh-My-Posh reads its configuration file. This comes from changing where OMP gets its theme — namely:

oh-my-posh init pwsh --config "C:\Program Files\WindowsApps\ohmyposh.cli_
28.0.0.0_arm64__96v55e8n804z4\themes\jandedobbeleer.omp.json" | Invoke-Expression

Note: I broke this command across multiple lines for improved rendering. Be sure to suck it into a text editor and remove the line-break in the middle before trying this yourself.

To make this change permanent, one must run notepad $PROFILE at the PowerShell prompt, and replace the current path specification for the startup-theme.  That means the path specification in the OMP invocation line must match the one shown in the preceding command string. Save the edited profielss and thereafter, when Windows Terminal boots into PowerShell, it will use the right version of the theme file to avoid CONFIG ERROR.

As you can see, after making that config change, I ran winfetch in a new PowerShell/Windows Terminal session (for something to see). OMP no longer throws a CONFIG ERROR. Problem solved!


wing

Facebooklinkedin
Facebooklinkedin

Bringing OhMyPosh to Flo6

Flo6 is what I call my new production desktop. Today, I finally got around to installing and turning on the OhMyPosh shell prompt tool on said desktop. I’ve done this before, and it’s always interesting to see how things work now, as opposed to the way they did the last time I did this. Indeed I hit some changes: nothing insuperable, but enough to make me stop and think about what I was doing, and how best to do it. In bringing OhMyPosh to Flo6, I had to overcome bogus Copilot guidance, re-read my own 2024 OhMyPosh article, and visit the OhMyPosh website to grab my preferred theme.

After Bringing OhMyPosh to Flo6, A Snazzy Look

If you examine the lead-in graphic you can see what adding OhMyPosh to the mix does for PowerShell inside Windows Terminal. It definitely adds to the visual appeal of the command prompt, and lets you see more info right away.

Here’s brief summary of the steps involved (all the deets are covered in the afore-linked OhMyPosh article, which I will henceforth abbreviate as OMP):

1. Install a nerd font (necessary for OMP to show its colorful symbols and glyphs)
2. Change the default profile in WinTerm to invoke that nerd font
3. Change PowerShell startup to call OMP and its theme on startup
4. Reload the startup info ($Profile variable) to invoke the new setup

In theory, this is dead easy. In practice, it requires a fair amount of command line jiggery pokery. The whole operation took half an hour or so, mostly because I had to remember (and read about) those steps and their details. OMP also no longer downloads its themes when it’s installed, so I had to visit the themes page and download the one I wanted (it’s named JanDeDobbeleer.omp.json) and put it in the OMP default folder (C:\users\<acct>\ohmyposh) to match the configuration in the associated profile info.

Eminently doable, if a bit more time consuming than I remembered. But shoot: that’s just another normal day here in Windows-World!

Facebooklinkedin
Facebooklinkedin

Winget Update Re-Raises Restart Requirement

Late last April, I wrestled with getting winget updates (aka Microsoft.AppInstaller) to “take.” That is, figuring out how to follow the advice to “restart the application” so the new version could take over. Turns out that nothing short of a restart seemed to guarantee that the update would run in PowerShell/Windows Terminal. Other techniques — killing all active processes, open/close WinTerm, and so forth — did not always suffice. A recent Winget update re-raises restart requirement, as I tried to move from version 1.26.430.0 to 1.26.510.0. It was the same darn thing all over again!

Why Winget Update Re-Raises Restart Requirement

If you read into my April blog post that offered explanations from two winget mavens, you’ll see that the winget upgrade waits until dangling APIs and runtime modules, plus pending package updates, all get resolved before completing its own upward move. For the chronically impatient — including yours truly — that makes a restart/reboot a surefire way to FORCE the changes through as a consequence of shutting down, then starting back up.

It worked last April, and it still works now. But a restart on my production PC with its numerous peripherals and 6 drives showing in File Explorer, is no small thing. It takes over a minute to shut down, and another 2-3 minutes to get through restart and to the desktop. So while it does the job, it also makes me wait rather longer than I’d really like to.

But hey: that’s the way things go in Windows-World sometimes. When things change, waiting for “out with the old, in with the new” can take some time. Maybe I should go get another cup of coffee…

Facebooklinkedin
Facebooklinkedin

Another WinGet Version Mismatch

I think I’m starting to be able to see them as they happen. I run the built-in Windows Package Manager (WinGet, aka Microsoft.AppInstaller) daily, so I get to see it act up pretty often. Yesterday, I found myself updating Python.Launcher repeatedly and endlessly. I had to wonder: could this be another WinGet version mismatch. Sure enough, that’s exactly what it was. Let me explain…

How I Identified Another WinGet Version Mismatch

As I was noodling about with the unending sequence of Python Launder updates, I thought to myself “Why not try the old uninstall/reinstall manuever?” This is actually a valid nostrum for many WinGet gotchas and hiccups, so it wasn’t a bad thought. If you look at the lead-in graphic, you can see what happened when I tried that very thing, which produced a major clue. It reads (in red text):

Multiple versions of this package are installed. Either refine the search, pass the ‘–version’ argument to select one, or pass the ‘–all-versions’ flag to uninstall all of them.

OK, then: there’s proof there is a version mismatch. And indeed the output from WinGet list Python.Launcher reads:

Name   Id                       Version  Source
-----------------------------------------------
Python Launcher Python.Launcher 3.13.5   winget
Python Launcher Python.Launcher < 3.13.5 winget

Notice the mismatch in the two version strings. The lower one has a leading “< ” at the head, which I have to bet is an outright mistake.

Targeted Uninstall Does the Trick!

Looking at the two versions, I have to believe they’re the same, and that one of them has an error in the Version string data. Thus, I targeted that one in a WinGet uninstall directive, to wit:

WinGet uninstall Python.Launcher –version “< 3.13.5”

And, sure enough, that appears to fix the issue. When I run WinGet upgrade … again after that, it comes up with nothing to upgrade, and stays mum on the subject of Python.Launcher. Problem solved. Next!

One More Thing…

Please note that the responsibility for a version mismatch falls on the package developer. They’re the ones who enter the information that goes into the package repository, and define the version strings for what’s known and what’s current. So it’s on them to fix things when this sort of hiccup happens.

That said, I’m going to urge the WinGet developers to write some string checking code for version strings before they’re allowed to be checked into the repository. Two weeks ago a parenthetical phrase in a Visual Studio update also caused the same behaviors. Seems to me that a little “string policing” effort might help head such things off at the pass. Just sayin…


Facebooklinkedin
Facebooklinkedin

Unsticking Lenovo System Update

From May 6 through 12, I had a Lenovo System update stick in WU. That is, it would attempt to install, fail, and then push a retry button at me. Alas, that meant WU wouldn’t show me any newer updates, either. At the end of this cycle KB5058496 came along. It didn’t show up in WU, either. That’s when I found myself unsticking Lenovo system update on the Lenovo ThinkPad Yoga X380 where it happened. How did I do that? I ran the:

Reset_Reregister_Windows_Update_Components_for_Windows11.bat

batch file from the Eleven Forums tutorial Reset Windows Update in Windows 11. As it so often does, the Lenovo System update worked the next time I tried after said reset operation had completed and I’d rebooted that PC (as per the batch file’s own instructions). The new CU installed, and went to Build 26120.3964.

More on Unsticking Lenovo System Update

I’m not sure why the WU version got stuck, nor why it stayed that way for some time. When I looked in the Windows-Update.log file I produced via the PowerShell Get-WindowsUpdateLog cmdlet, no supporting detail told me why it happened, either.

All that Copilot could tell me was that it must be a Lenovo servicing driver update of some kind. Google was willing to speculate it might be the driver for the Lenovo Intelligent Thermal Solution. Lenovo Vantage kind of confirms this in a back-handed way, in that its history shows the latest version dated March 2024 with version number 2.1.14.0, which certainly seems to follow in the general numbering track for the item that got stuck.

So I checked Device Manager > System devices > Lenovo Intelligent Thermal Solution properties. Sure enough, the currently installed version is 2.1.52.0. Interestingly the install date shows as 4/11/2025 (same as in WU update history). That leaves me glad this already-installed driver somehow got itself unstuck. I’m still wondering why WU offered it repeatedly from 5/6-12.

These meaningless mysteries never stop in Windows-World. I’m just glad this apparently unnecessary driver offer stopped when I reset WU. Now the machine is running Build 26120.3964 and the right Intelligent Thermal Solutions driver without further issues. I’m good for now, but sure something similar will pop up soon, on one or more of my mini-fleet of 12 PCs. Stay tuned!

Facebooklinkedin
Facebooklinkedin

Rebuilding P16 Windows 11 24H2

Allrighty then: I got tired of seeing odd, unfathomable and stuck packages in the component store. That image resides on the Lenovo ThinkPad P16 Mobile Workstation. So yesterday, I set about rebuilding P16 Windows 11 24H2 to come up clean. Let me explain what I did, and why I did it. The whole story shows in the lead-in graphic. It depicts the image going from 10 reclaimable packages to 2 and then to zero (0): clean! But you’ll  need keen eyes (or be unafraid to grab this screencap and make it readable.)

3 Steps To Rebuilding P16 Windows 11 24H2

STEP 1: My first step was to visit Settings > System > Recovery and then click the “Reinstall now” button to kick off an in-place upgrade repair on the P16’s suspect Windows image. For the record, it failed my “sniff test” because it kept showing 4 reclaimable packages that wouldn’t surrender to DISM /online /cleanup-image
/startcomponentcleanup.
The reinstall took about 45 minutes to complete, but required little or no effort from yours truly.

STEP 2: My second step was to run the aforementioned DISM …         /startcomponentcleanup command and see what remained. As I expected, that brought the number of reclaimable packages down from 10 to 2.

STEP 3: My March 21 blog post “Remove Package Kills Spurious Reclaimables” explains this use of a specific DISM /Remove-Package target that’s responsible for 2 spurious packages showing up in a canonical Windows 11 24H2 production image. TLDR version is: a deeply superseded package is stuck in WinSxS, but a single command removes both spurious reclaimables in one go.

The results appear in the fine print at the bottom of the lead-in screencap: a clean version of Windows 24H2 Build 26100.4061, with zero (0) reclaimables in the component store. Good-oh!

Facebooklinkedin
Facebooklinkedin

OhMyPosh Upgrade Needs WinGet DB Reset

Something interesting just popped up in Windows Terminal. Literally. Upon starting Windows Terminal, I got a notification from OhMyPosh that it was updating to the latest version: 25.21.0. So I closed WinTerm and re-opened it to run WinGet upgrade –all — include-unknown. As you can see in the intro screenshot, WinGet went ahead and updated OMP again anyway. When I asked Copilot why this happened, it explained that an OhMyPosh upgrade needs WinGet DB reset so it is forced to rescan all currently installed packages. A restart makes that happen automatically, BTW.

Why OhMyPosh Upgrade Needs WinGet DB Reset

When Windows Terminal has been up and running already, WinGet doesn’t refresh its current package data through a simple open/close operation. Instead, users must run the following WinGet command to force that to occur (again, a restart has the same effect):

winget source reset --name winget --force

This tells WinGet to rebuild its list of local (that is, currently installed) packages. After that running an update check won’t show OhMyPosh in need of updating anymore. I checked this out on another test PC and indeed this approach works. Good to know!

ICMYI: A Quick Intro to OhMyPosh

Many readers will recognize OhMyPosh (OMP) as “the way” to snazz up the command line in Windows Terminal/PowerShell. For an inkling of what this looks like using developer Jan De Dobbeleer’s own unique theme, look at the top and bottom of the intro graphic. It shows glyphs for (from left to right):

  • the current login account (ed) and folder icon
  • execution time for most recent command (0 ms)
  • battery status (power connector against green means “good”)
  • current environment = PowerShell (pwsh)
  • current time = 10:33:08 (time of screen capture)

The last two items in the preceding list show up at right, the first three at left, on the command line. For all items shown, and a whole bunch more OMP offers users a plethora of themes. It also provides good documentation and “source code” (JSON markup, actually) for all of them. Users can even create their own custom themes. I’ve written an intro and how-to story about OMP for TekkiGurus, but that site is now defunct. Find it via this WayBack Machine link. Enjoy!

Facebooklinkedin
Facebooklinkedin

Correlating KB Items and DISM Package IDs

Here’s an interesting situation. I was reading on Neowin this morning that MS has fixed a Windows 10 issue that caused BSODs on some systems (not mine, thankfully). To find or uninstall such an item, one must use DISM. But DISM deals in “Package Identity” strings, not in KB article numbers (e.g. KB5057589, as in this case). Surprisingly, correlating KB items and DISM package IDs turns out to be vexing and tricky. Indeed, this SuperUser thread more or less confirms what I quickly figured out. That is: the only datum both items have in common (using Update History for KB items and DISM Get-Packages for PkgIDs) is their install date/time.

Fortunately, what I was seeking showed up dead last in the Get-Packages output in PowerShell/Windows Terminal. As you can see in the lead-in graphic, it’s the only item whose install date matches that for KB5057589. But there’s no inherent correspondence with its PkgID: Package_for_WinREServicing~31bf3856ad364e35
~amd64~~19041.5728.1.1. What to do?

More On Correlating KB Items and DISM Package IDs

I figured there might be a PowerShell script (or something similar) already available to establish this correlation. AFAIK, nope! I thought that Copilot might be able to write me such a script. Nope again: it wants to look for the KB item ID inside the PkgID. You can see from the foregoing item (or by looking at installed updates using DISM Get-Packages) that this just ain’t so.

It looks like the only way to put all this together is to install the PSWindowsUpdate module, then use its built-in Get-WuHistory cmdlet. By writing that to a file, and then doing likewise with output for DISM Get-Packages, it should be possible to use matching date strings for KBs from the former with the “Install Time” attribute value from the latter to find and document matches.

Another Project for My List

Now that I know what I must do, I need to figure out how to do it. That will make excellent fodder for another blog post. As soon as I find the proverbial “round tuit” I’ll put that together and post it here. In the meantime, it’s nice to see that the obvious path to success (looking for the KB item ID inside the DISM PkgID) isn’t the actual path to success. Here in Windows-World, that’s all too often the case. I’m glad it keeps me entertained. I hope you feel likewise.

Facebooklinkedin
Facebooklinkedin