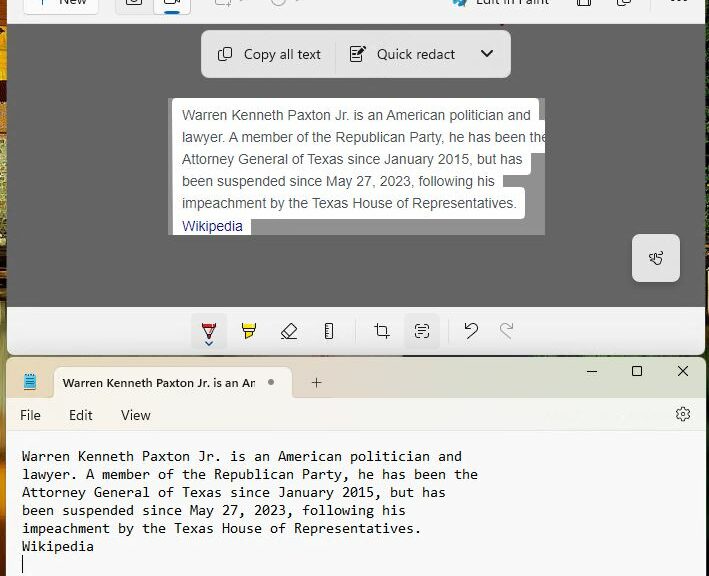
Category Archives: Cool Tools

Exploring TB4/USB4 Backup Speeds

OK, then. I’m starting to dig into the capabilities of my new loaner SFF Lenovo P360 Ultra PC. It’s a beast, especially for such a small package (3.4 x 8.7 x 7.9″, 87 x 223 x 202 mm, weight 4.4lb/2.0 kg). Right now I’m giving the front USB-C ports a workout, and exploring TB4/USB4 backup speeds. They’re amazing.

Exploring TB4/USB4 Backup Speeds.f&rview

About the preceding graphic. It shows a front and rear view of the P360 chassis. Here’s what those numbered items convey:

1. Power switch (on/off)
2. Audio/headphone jack
3. USB 3.1 Gen 2 Type A port
4. 2 x Thunderbolt4/USB 3.1 Gen 2 Type C ports
5. Wi-Fi antenna mount
6. 2.5 GbE wired network (RJ-45)
7. 1.0 GbE wired network (RJ-45)
8. 4 x miniDP GPU (connects to Nvidia GPU)
9.  Chassis latch release
10. 3 x full-size DP GPU (connects to on-chip Intel GPU)
11. 4 x USB 3.1 Gen 2 Type A ports
12.  Optional PCIe card slot/port
13. Power in from 300W power brick

What Exploring TB4/USB4 Backup Speeds Says

First things first: I ran comparatives using CrystalDiskMark on a set of different NVMe enclosures with their own drives, as follows:

Enclosure                NVMe SSD              Price (Date)
======================   ==================    ==============
Sabrent NVMe PCIe x1.3   ADATA XPG 256GB       US$ 60  (2019)
Puhui USB 3.1 USB-C      Samsung OEM 512GB     US$ 30  (2022)
Konyead M.2 TB4/USB4     Rocket 4 Plus 1TB     US$162  (2022)

I didn’t get a lot of useful data out of that comparison, though the numbers for all three devices increase their readings down the preceding list. The final item shows most readings between 2x and 3x those for the first item. However, I decided to compare backup results for all three setups, working through a brand-new Belkin Pro Thunderbolt 4 Dock.

The results turn out to be a bit of a good new/bad news scenario.  New TB4/USB4 NVMe enclosures are still punishingly expensive. Performance results from backup show them not yet worth the $132 differential vis-a-vis a cheap0 USB 3 3.1 Gen2 version. About the only thing they can do right now, as far as I can tell, is bring up the “USB 4.0 SSD” label in the Thunderbolt Control Center, as shown in the lead-in graphic.

Big Price Diffs Don’t Translate to Performance

Here’s a table of backup times from Macrium Reflect Free to the three drives, listed by Enclosure name (consult previous table for more info on innards):

Enclosure                Backup (times)
======================   ==============
Sabrent NVMe PCIe x1.3     162 (2:42)
Puhui USB 3.1 USB-C        131 (2:11)
Konyead M.2 TB4/USB4       132 (2:12)

While there’s a 31/32 second difference (about 20%) between the older Sabrent enclosure and the two newer ones, there’s so little difference (1 second) between the other two that I’m sure that falls in the margin of measurement error one would expect.

What’s interesting here is that these backup speeds — even on the slowest/oldest device — are about twice as fast as on my other, similarly loaded test machines (which top out at USB 3.1 Gen 2). That tells me for those who do a lot of backing up, video editing, or other data intensive stuff there’s some real benefit to be gained from investing in TB4/USB4 ports and devices.

Lessons Learned

What lessons do I draw from this experiment? Glad you asked! Here’s a list:

  • It’s definitely worth adding an interface to older desktops to support TB4/USB4 for the speed bump it provides.
  • This new technology provides a “speed reason” to consider buying in on a newer laptop or PC.
  • Newer, more expensive TB4/USB4 NVMe enclosures may not be worth the added cost as compared to USB 3.1 Gen 2/TB3 counterparts.
  • From what I’m reading, it’s a good idea to use as short a USB4/TB4 rated cable as possible.
  • It’s also best to hook the NVMe enclosure directly to the PC if you can (going through the dock reduced performance by about 5% overall)

A terrific experiment, and a  great learning lesson, too. Thanks to the nice folks at Belkin and Lenovo who made their gear available to me.

Facebooklinkedin
Facebooklinkedin

CarPlay Cable Connections Are Key

Here’s another recent lesson learned from our just-completed trip to New England. On our reconnaissance mission in late July, we quickly figured out that a Lightning cable between iPhone and in-car USB makes connecting simple and fast. This time around, we learned that the cable itself also matters. Though I packed 3 such cables in our cable bag, only one of them worked well to support CarPlay. Hence my title: CarPlay cable connections are key. Let me explain…

Why CarPlay Cable Connections Are Key

One of the cables was probably shorted: the charge indicator kept turning on and off when it was in use in the car. That simply won’t do.

The second cable was an old — iPhone 6 vintage, at least — Apple-provided charging cable. Clearly, it couldn’t handle the bandwidth requirements needed to ferry comm traffic between the iPhone and the car’s built-in display. It simply didn’t work reliably or well.

The third cable proved to be the charm. It was a 10-foot Amazon Basics USB A for iPhone and iPad cable purchased in 2019. This item is no longer in stock, but something like this iPhone 11 model (US$16.99) would undoubtedly work. I gave one to my son when he went off to school, so I’m ordering 2 more right now.

Underlying USB Support in CarPlay

As I understand it, Lightning cables support USB 2.0 more or less uniformly (here’s an interesting discussion from Volvo, and an informative Reddit thread). My guess is that both of my old cables were sufficiently “used” that they simply couldn’t provide full USB 2.0 capability/bandwidth. The newer cable — despite its 10ft (~3M) length — worked just fine.

Hint/tip: before you take off on a road trip, it’s probably a good idea to test your chosen Lightning cables (listening to music is a fair method) to make sure they can carry the load. I’d also recommend taking a spare — I always do — just in case you lose or damage one while traveling.

Facebooklinkedin
Facebooklinkedin

Appreciating Apple CarPlay

Hello there! We’re just back from a combination trip to the Northeast. On August 25, we flew to Boston with son Gregory to move him into Emerson College. On August 31, we took an Uber to the Boston Logan rental car pickup to head north to Maine. This latter half of the trip has me appreciating Apple CarPlay greatly and enthusiastically.

Why I Am Appreciating Apple CarPlay

I’ve owned and used various in-car GPS systems for years, including those available in Mercedes, Volvo, and Toyota models. Each one is a little different. Each one has its decided UI quirks and foibles. That leads me to my number one source of CarPlay gratitude: a single, consistent and pretty intuitive UI for navigation via Google Maps. It’s great!

Item number two may be just as important. I can remember paying $300 to $500 to access GPS capability in several cars. CarPlay comes as a standard (no added cost) feature on many cars these days. That’s a nice savings, in addition to the benefits of a familiar and standard UI.

My third source of gratitude is a YMMV thing, or it may be a matter of personal preference. I find the voice instructions in Google Maps to be easier to understand and follow than those in the Mercedes GPS (that’s the built-in one I know best thanks to using it in 3 cars over the last 10 years or so).

When driving in unfamiliar places, that’s a benefit that’s hard to overstate. I’ve learned to turn around or re-route to rectify my mistakes while driving. But gosh! I’d rather not have to rectify mistakes that result from misunderstanding voice instructions. Google Maps works better for me in that regard.

All My Future Vehicles Will Have CarPlay

Because we’re an iPhone family (wife, son and myself all have 13 models right now), it makes sense to integrate phone and vehicle. There are lots of other benefits, too — including music, phone calls and SMS messages, the Waze app, and more. Frankly, I just can’t see paying extra for a feature from a carmaker that doesn’t work as well for me as the iPhone running Google maps (or some other equivalent). One more thing: here’s an interesting MakeUseOf story that explains the best of the CarPlay apps, and what new stuff lies ahead in this category. Check it out!

‘Nuff said!

Facebooklinkedin
Facebooklinkedin

Inspecting Travel Cable Bag Contents

OK then, we’re sending my son off to college where he will have both a portable laptop (going with him) and a more powerful desktop (shipped in advance). Inspecting travel cable bag contents to take inventory, I find the following items:

  • 2 2.4 Amp iclever dual USB port wall chargers
  • 2 USB-A to lightning cables, 10 ft
  • 1 USB-A to lightning cable, 2 ft
  • 1 USB-A to USB-C cable, 2 ft
  • 1 USB-C to USB-C cable, 2ft (for next item)
  • Sabrent USB-C NVMe drive enclosure PCIe x.3
  • 1 RJ-45 Cat6e network cable, 6 ft

The whole thing weighs in at 795g (1 lb 12 oz). It fits nicely in the front pouch of my soft-sided Targus computer briefcase when we go on the road. I bought a duplicate for the boy to take with him to school.

After Inspecting Travel Cable Bag Contents…

We’re usually charging stuff — phones, mostly — until we go out the door, so the cable bag is one of the last items to go into my briefcase. Please note: the image serving as the lead-in graphic obviously belongs to an Apple-head. While we do all have iPhones (and thus, lightning cables) the rest of our stuff is Windows centric. So the picture doesn’t show the local story. I just grabbed it from Amazon for eye-candy.

This time out, the travel briefcase will start out with 3 laptops: my work unit, another for other family members, and the laptop for school use. Those items are, respectively:

  • A Lenovo X1 Extreme, i7 32 GB RAM, 1.5 TB across 2 SSDs
  • A Lenovo Yoga 7i 14″, 16 GB RAM, 1 TB SSD
  • A Lenovo X390 Yoga, 16 GB RAM, 1 TB SSD

It will probably make the TSA guys wonder why we need 3 laptops when we transit the x-ray machine tomorrow. It is what it is, and I’ll just have to tote the weight until we can do a little lightening when the boy heads off to his dorm on Sunday. Please: wish us all luck! Some of us may need it more than others, but you can never have too much…

Facebooklinkedin
Facebooklinkedin

Exploit Winget Include Unknown Syntax

For the past couple of years I’ve been learning — and using — the Microsoft package manager, Winget, It helps me keep my PC apps updated. Just recently, I’ve learned to exploit Winget include unknown syntax to broaden its coverage. Basically, this will “upgrade packages even if their current version cannot be determined.” That quote comes from the upgrade command section of the MS Winget documentation.

How to Exploit Winget Include Unknown Syntax

First, that syntax couldn’t be simpler: just add the string
--include-unknown
to the usual invocation for winget . For the record that’s
winget upgrade --all
. This tells the program to apply upgrades for all packages with known versions. You can see this at work in the lead-in graphic for this story, in fact. Chrome shows up when unknowns are included, but not otherwise. (Compare top and bottom sections, or view the image full sized by clicking the following thumbnail.)

Exploit Winget Include Unknown Syntax

The difference between the unadorned “all” version of Winget upgrade and the one with unknowns included applies in large part to applications like Kindle, Chrome, Firefox, and more, which apparently do not report their current version numbers either consistently or well to Winget during its initial survey phase.

This addition to the command finds those things and attempts to upgrade them. Certain apps — most notably Teams — will not work with this tool because of version mismatches (and the prudent decision not to overwrite versions outside the same version tree). But this does improve its overall coverage. That lowers the number of apps and applications I must update manually. To me — and to you, too, I bet — that’s a good thing!

Note: Winget works in PowerShell with equal facility for both Windows 10 and Windows 11. It’s become one of my go-to tools for keeping my small fleet of PCs (currently numbered 12, with 2 going off to college with my son soon) up to date.

Facebooklinkedin
Facebooklinkedin

Build 25179 Gives Everybody Tabbed Explorer

It’s been a long time coming. The gradual release of tabs in File Explorer is now a Dev Channel feature. That’s right: Build 25179 gives everybody tabbed Explorer. I’ve had it come and go somewhat randomly over the whole summer. But now, it looks like it’s here to stay, as shown in the lead-in graphic above. Good-oh!

When Build 25179 Gives Everybody Tabbed Explorer …

… Then, everybody can make use of the feature. Personally I find it much easier to navigate around a bunch of tabs in a single Explorer window, than to jump across a bunch of disjoint Explorer windows. But that’s just me — others may feel differently.

That does explain, however, why I welcome the general release of this long-awaited Windows feature. For me, Explorer is one of the Windows applications I use most frequently. That means even a slight productivity improvement offers big dividends. And with dozens of daily uses (I almost always have one or more File Explorer windows open on my desktop) that’s a big win.

Two Explorer Windows Still Have Their Uses

When I have to compare or move files between directories, I can still make use of multiple Explorer windows at the same time. It’s a handy way to see what’s going on in two file system locations at once. Be that to move files from one location to another, or to compare files across those locations, it’s still a handy technique.

But when I want to scope out the contents of multiple file system locations, I think I prefer tabs for that purpose. As I said earlier, I’m convinced it’s easier to click tabs in a single window for that purpose. Jumping among multiple windows just isn’t as workable or attractive IMO.

You are, of course, free to form your own opinions and habits where File Explorer is concerned. But it’s always nice to have options, right?

Facebooklinkedin
Facebooklinkedin

Build 25169 Gains Spotlight Background

Windows Spotlight is a gorgeous collection of nearly 2K images that MS brings to OS users. It appears by default in the hidden local app data folder associated with your login account (see below for a full path spec). Thus, it’s always available to those who know where to find it. But, starting right now, Dev Channel Build 25169 gains Spotlight background option in Settings → Personalization → Themes. It also shows up at the top of the Personalization pane, as shown in the lead-in graphic above. It’s boxed in red at the upper right corner of the six theme tabs showing there. Its mouseover text reads “Windows Spotlight, rotating background images.”

When Build 25169 Gains Spotlight Background Variety Folllows

The range and coverage of the Spotlight collection includes reams of nature photography, plus all kinds of other arresting images of great visual interest. Thus, the collection is worth exploring just to see and appreciate what’s there.

Find it at the following path specification (broken across multiple lines for readability: if you cut’n’paste to navigate there, you may need to paste it back together first):

C:\Users\<Account-name>\AppData\Local\Packages\Microsoft.Windows.ContentDeliveryManager_cw5n1h2txyewy\LocalState\Assets

Please note: you’ll need to replace the place holder in the preceding string shown as <Account-name>. Use the label associated with your current logged-in account. In my case that’s “etitt” (a truncation of “etittel”). YMMV.

I Win at the Gradual Rollout Game, for Once!

Though the 25169 announcement is mum on this topic, 3rd-party reports on the Spotlight background option indicate that it’s another gradual rollout from MS. That means some Dev Channel users will see it on their desktops, while others won’t. To my astonishment and delight it showed up on my Dev Channel test PCs.

For once, I seem to have been included in the first wave of lucky participants. Good-oh!

Facebooklinkedin
Facebooklinkedin

Build 25158 Camera App Reworked

The latest Dev Channel build includes a new iteration of the venerable Camera app. Indeed, in Build25158 Camera app reworked includes a brand-new, much sparser interface with simplified controls. No settings at all, in fact, as far as I can tell.

If Build 25158 Camera App Reworked, Then What?

Contrast that look and feel from the lead-in image with the Windows 10 version (from higher up in the same baker’s rack in my office). Settings are shown this time at left in the following screencap.

Build 25158 Camera App Reworked.win10-compare

Am I wrong to see the lack of more detailed controls as a loss of capability? [Click image for full-sized view.]

Indeed, most image manipulation is a post-processing task. But I occasionally found it useful to use some of the various controls that the old Camera app made available but which — as far as I can tell — the new Camera app does not. Particularly, the framing grid for image selection and layout help, and the photo quality and aspect ratio controls. To me, this turns the new camera into a more limited, image grab only, kind of function. It’s OK, but it’s not as flexible as the older version.

Running Against the Grain

This is kind of interesting, because most of the new-version or reworked apps showing up in Windows 11 include added functionality and capability, rather than a reduction in same. Favorite example: the sometimes elusive tab feature in File Explorer. Although it has turned into something of a now-you-see-it, now-you-don’t phenom in recent Dev and Beta Channel builds, I do like it and think it represents a useful (if not long overdue) extension to what that tool can do.

The camera changed are described in a a July 13 Windows Blog. It does apparently gain improved QR and barcode scanning. The biggest accolade reads “match the beautiful new look and feel of Windows 11.” It says nothing about the banishment of Settings and related controls. Go figure!

Facebooklinkedin
Facebooklinkedin

Choose Reflect Backup Drives Carefully

I’m a HUGE fan of Macrium Reflect. Available in both free and for-a-fee forms, I’m convinced it’s the best Windows image backup tool available today. Disclosure: I run both free and fee-based versions, and own a Home 4-Pack license that I upgrade as new versions are released. I was reminded to choose Reflect backup drives carefully yesterday, when I targeted an older USB 3 drive with mSATA SSD devices under its hood. Let me explain…

Why Say: Choose Reflect Backup Drives Carefully?

Because the read and write speeds of the underlying device and the speed of the channel (USB 3.1 in my case here) matter. In fact, they strongly affect the time it takes to complete a whole-image backup. In targeting an mSATA device that backup took nearly 40 minutes to complete.

I’m making the same backup right now, and targeting a PCIe x3 NVMe SSD in a Sabrent USB-C enclosure right now. As you can see from the lead-in graphic, Macrium Reflect currently guesstimates it will take 19 minutes to complete. That’s just over 50% faster than the mSATA number, or about 20 minutes overall.

If such a task is running in the background, and can complete whenever it’s done, that doesn’t matter much. But if, as in my case, I was waiting on completion to do something else, it matters a lot.

And There’s More…

While watching the NVMe and mSATA image backups proceed, I noticed another difference. The transfer rate for the two backups not only differed but so did their variability. The NVMe device kept getting faster as it proceeded. It ranged from a low of 1.1 Gbps to a high of 1.8 Gbps. The mSATA device started out at around 600 Mbps, It dropped as low as 220 Mbps, and as high as 1.0 Gbps during the course of the backup process.

Upon completion, Reflect also shared other stats worth noting. The overall read rate for the mSATA device was reported at 1.6 Gbps, while its write rate came in at a less stellar 550 Mbps. On the NVMe device, the overall read rate was 6.6 Gbps, and the write rate 1.9 Gbps. That’s a BIG difference, and explains the title for this story. Yes, these numbers appear inflated because they take compression into account. But those are the numbers that Reflect reports, and they do underscore the importance of device read/write speeds.

Note: Actual time for the NVMe backup was 19:31, while actual time for the mSATA backup was 39:52.

Facebooklinkedin
Facebooklinkedin

Windows Terminal PowerShell Selection

I have to laugh. Yesterday, I noticed version 5 of PowerShell  running inside Windows Terminal. So I naturally wondered: “How do I upgrade this?” Turns out, in fact, that no upgrade is needed. It all comes down to the current Windows Terminal PowerShell selection. I’ll explain shortly, but first: look at the window in the lead-in graphic.

Managing Windows Terminal PowerShell Selection

By default, version 5.1.xxx… appears when you open Windows Terminal. But it’s easy to get to a newer PowerShell version. No upgrading is necessary: you need only know how to do this. If you click on the down-caret at the far right of the title bar, a menu appears, like this:

Windows Terminal PowerShell Selection.choose shell

The down-caret menu lets you choose among shells you can run in a Windows Terminal tab. [Click image for full-sized view.]

The trick — if you can call it that — is to choose the right version of PowerShell (and corresponding default) to run. The top item in the menu corresponds to version 5.1.xxx. The fourth item down brings up the latest 7.x PowerShell version (specifically, 7.2.5). If you click Settings, you can also choose this version as the “Default Profile” which makes the new version (rather than the 5.1.xxx version) appear whenever you open Windows Terminal, or click the “Plus” sign to open a new default Terminal tab.

As with many other things in Windows World, foreknowledge and understanding are key to doing things right. In my case, I had no need to update PowerShell. I only needed to pick the right version to run inside Windows Terminal. Now I know how. If you didn’t know how already, this should make things equally simple for you. Cheers!

Facebooklinkedin
Facebooklinkedin